Stable Android 17 has finally landed on Pixel phones with the June 2026 Pixel Drop, and there’s a genuinely long list of things worth poking at. Google made a big deal about the social-media-focused additions when it teased them at the Google I/O event, and now that they’re actually on my phone, I’ve been working through them one by one.
The one that stuck with me is Screen Reactions. On paper it sounds almost too simple to bother writing about: record your screen and your face at the same time. But the more I used it, the more I appreciated how much fiddly work it quietly removes. It’s the kind of small, smart feature that makes you wonder why it took this long to ship as a native option, and honestly, I’m a little surprised Google built it in rather than leaving it to third-party apps.
What Android 17’s Screen Reactions actually does
If you spend any time on Instagram or TikTok, you’ve already seen the format a hundred times. A creator pulls up a piece of news, a meme, or someone else’s clip, and drops a small floating video of themselves in the corner reacting to it in real time. It works because you get both things at once: the original content and the human response to it. Every so often, the reaction lands harder than whatever it’s reacting to.
I’m a pretty casual poster. I’ve made the odd Reel, but the reaction-video format always felt slightly out of reach. I knew the building blocks existed: virtual green screens, overlay tricks, and a stack of editing steps. I just never wanted to sit down and learn the workflow. I assumed it was easy. I also never got around to it.
That’s exactly the friction Android 17’s Screen Reactions erases. The feature is baked straight into the system screen recorder, so your selfie camera footage gets layered over whatever’s on your display while you record. The clever part is the background handling. Instead of asking you to set up a real green screen, it uses on-device AI to cut you out and drop a clean separation behind your face, the same way Google Meet isolates you from your living room. So your reaction floats over the content naturally, with no external gear and no extra apps in the chain.
A few things worth knowing before you dive in. The selfie overlay is resizable. You can drag it around and shrink or grow it depending on how much of the frame you want your face to take up. Sharing is built for short-form content too, so clips are sized and tuned for Instagram, TikTok, and YouTube Shorts. It’s also part of a wider creator push in Android 17 that includes tighter Instagram integration and more on-device editing, so this isn’t a one-off gimmick. It’s one piece of a bigger toolkit.
One practical caveat on availability: Screen Reactions is live first in the U.S., with Google saying other regions will follow in the coming months. It also needs a Pixel 6 or newer, and it’s rolling out to other manufacturers’ phones throughout the year as they ship their own Android 17 builds. Samsung is already working on its version through One UI 9.
How to use Screen Reactions on Android 17
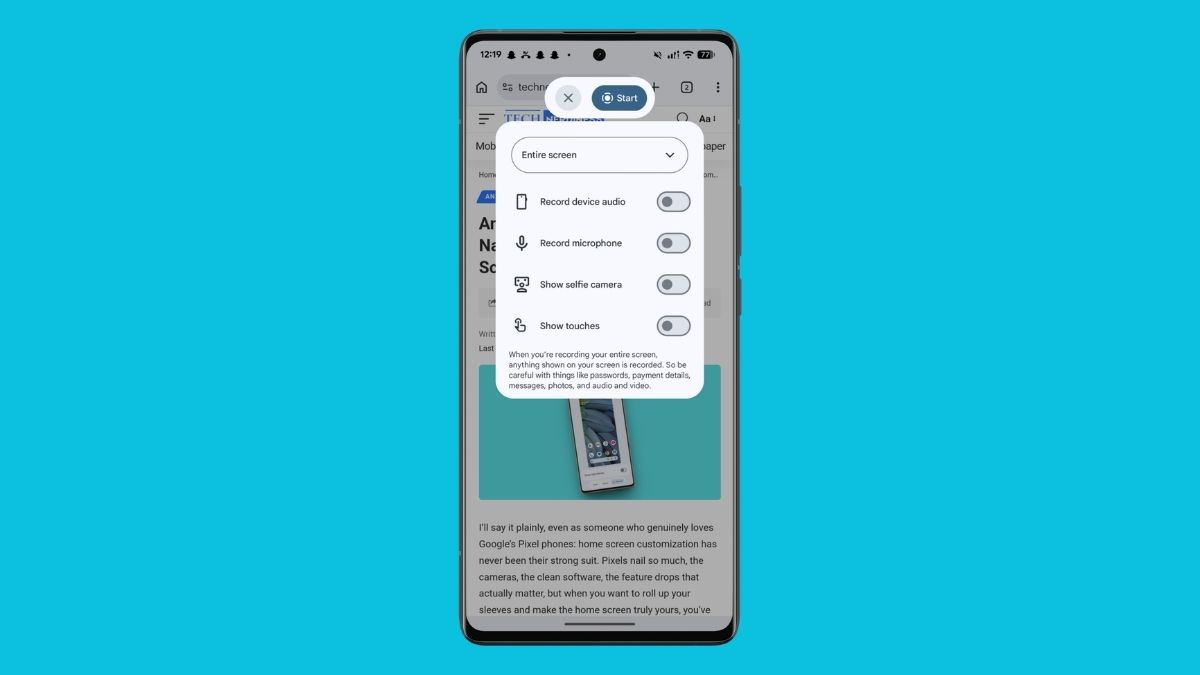
Here’s the actual workflow. Once you’re set up, you can use Screen Reactions on Android 17 Google Pixel phones in a handful of taps. I’m doing this on my Pixel 7a, but the steps are the same across supported devices.
- Swipe down from the top of your screen to open Quick Settings.
- Tap the Screen Record button. If you don’t see it, edit your Quick Settings panel and add the tile first.
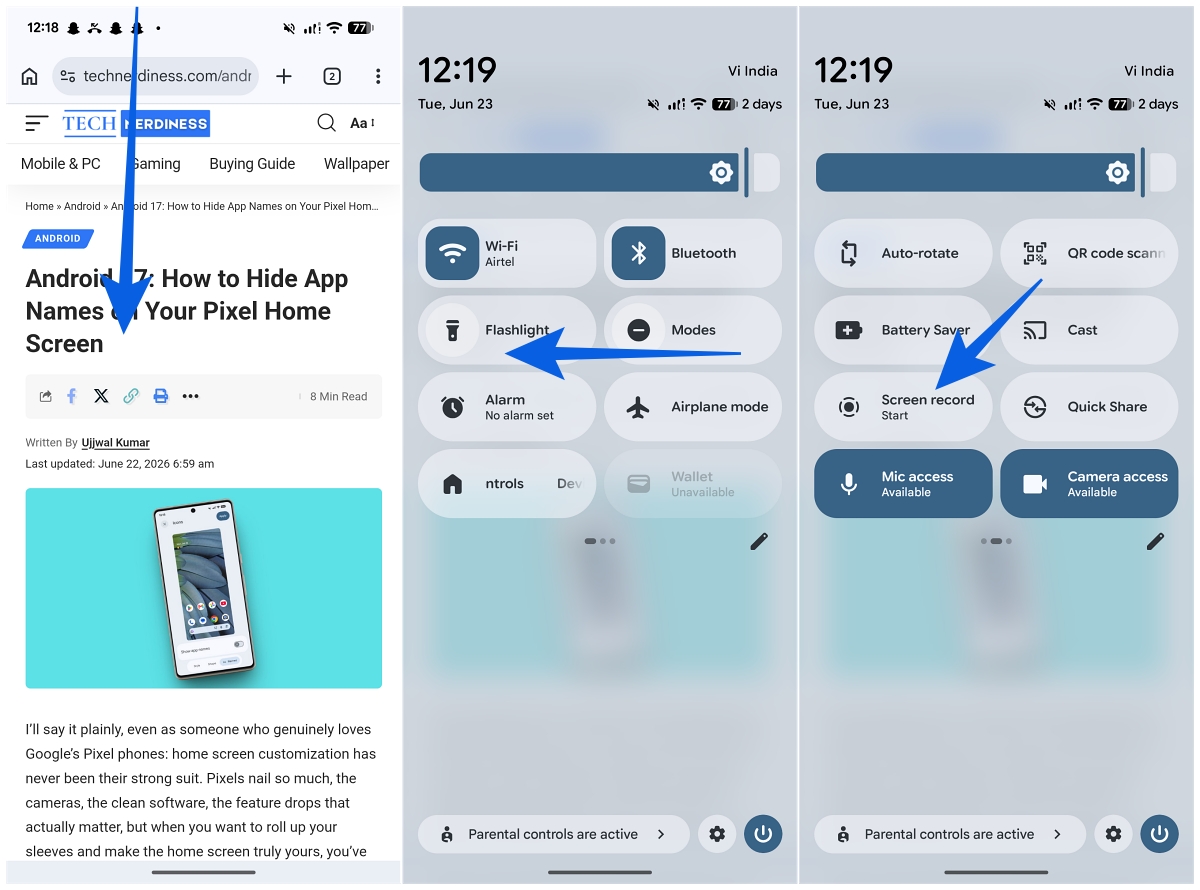
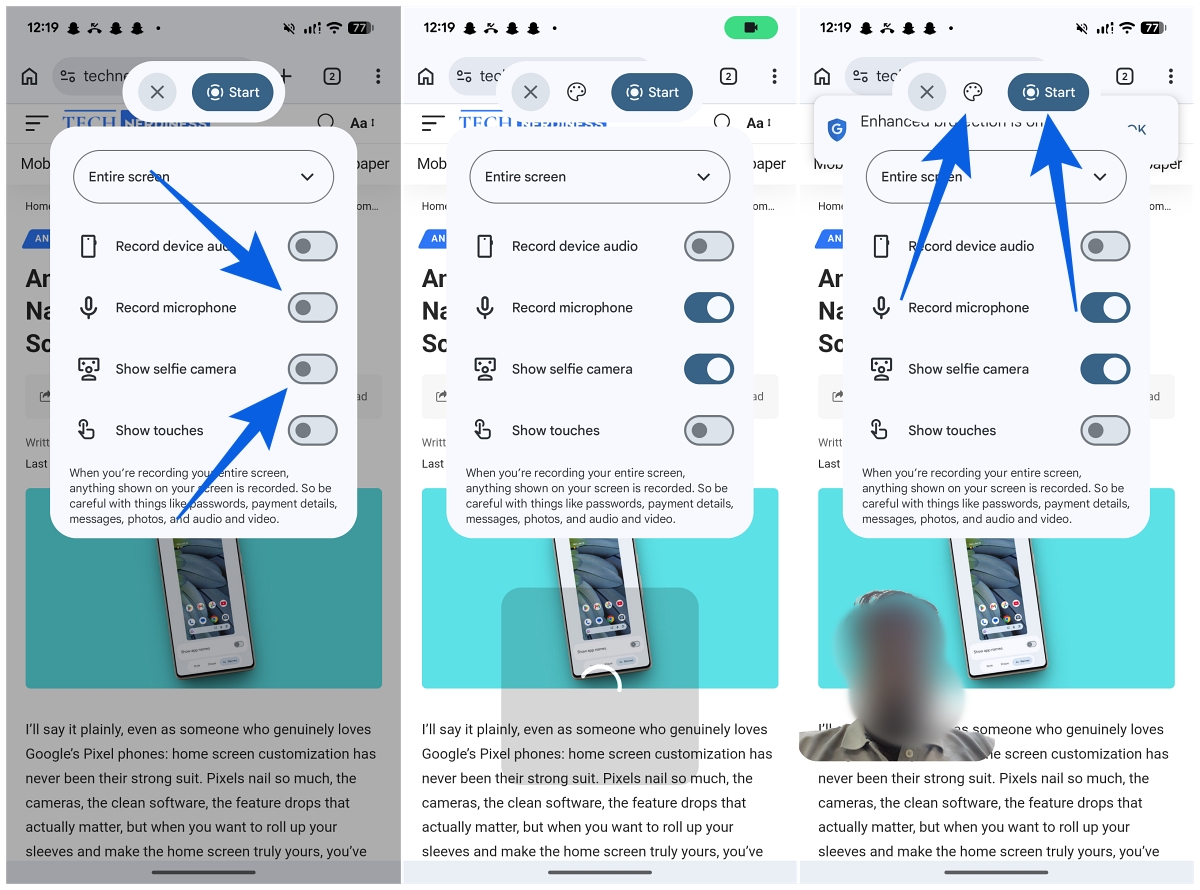
- Toggle on “Show selfie camera.” This automatically switches on “Record microphone” as well, so your audio comes through.
- Tap the color palette icon to enable a colored background. Tap a color to apply it, or tap it again to turn it back off.
- Tap Start to begin recording.
- When you’re finished, pull down and tap the live notification, then tap Stop.
- From there you can jump straight into another clip, delete the take you just made, or open it to edit.
When you’ve got your clips, you can stitch and trim them together right inside Google Photos, or take them into Instagram or TikTok to add captions, music, and the usual finishing touches.
That’s the whole loop. The fact that it slots into the recorder you already use, rather than living in a separate app you’d have to learn, is the real win here.
Things to keep in mind
It’s a great feature, but it isn’t flawless, and a few quirks are worth flagging before you build a posting habit around it.
The big one: it only works when you’re recording the entire screen, not a single app. That means everything on your display ends up in the take: volume sliders, the notification shade when you pull it down, and the moment you tap to stop. It makes sense, since a reaction might involve you diving into settings or hopping between apps mid-record, but you’ll want to keep your screen tidy while the camera’s rolling.
My first instinct was to record a reaction over a full-screen Instagram Reel for a cleaner shot with less UI clutter. For whatever reason, that doesn’t work. Reels just render as a black box with your selfie video floating over nothing. TikTok’s Clear Display mode does play nicely, so that’s a workable alternative. Failing that, downloading the Reel or TikTok first (when the option’s there) sidesteps the problem entirely.
The full-screen requirement also drags in the screen-recording status icon up in the notification shade, which ends up baked into your clip. I find it a little tacky, and I wish there were a toggle to leave it out. It’s about the only area where Instagram’s and TikTok’s own green-screen tools still have the edge. Their output just looks cleaner. An option in a future Screen Record update to hide these stray on-screen elements would close that gap completely.
I’d also love it if stopping a recording weren’t a two-step dance: pull down the shade, tap the live notification, then hit stop. A more reachable stop or pause control would mean I’m not waving my hand in front of the selfie camera every time I want to end a take.
Small stuff, mostly. While you’re tidying up your setup, it’s also worth knowing you can quickly hide app names on your Android 17 home screen. Pairing a cleaner home screen with cleaner recordings goes a long way if your screen shows up in your content.
Should you bother with it?
Despite a couple of questionable UI calls, this is one of those features that lowers the barrier to entry more than its simplicity suggests. If you’ve ever wanted to make reaction content, a quick rant, game commentary, or a fast tutorial without juggling apps or rigging up a green screen, it removes nearly all the setup that used to get in the way.
If you’ve got a Pixel and you’re on Android 17, it’s genuinely worth a try. Open your screen recorder settings or search “Screen Reactions” in Settings and see what you can make. I’m also curious to see how Samsung and the rest interpret it once Android 17 spreads beyond Pixels later this year.
Don’t miss these related reads: