Microsoft has been tightening its grip on the Windows 11 setup process with every major update, and if you have tried installing the OS recently, you already know the account sign-in screen feels like a toll booth. Stricter restrictions were introduced with the Windows 25H2 release in October 2025, making it noticeably harder to complete setup without handing over a Microsoft account. But local accounts still work perfectly fine once you are past the OOBE.
The challenge is just getting there. Whether you are setting up a shared PC, prepping a machine to donate, or simply drawing a hard line on cloud-linked computing, these three methods will get you through cleanly and without drama.
How to Bypass the Microsoft Account Requirement With ms-cxh:localonly
The classic OOBE\BYPASSNRO workaround is no longer effective on 25H2, but a more direct method is available: a single command that opens a built-in local account creation dialog tucked inside the OOBE itself. This approach uses a legitimate internal path rather than exploiting a bug, which is part of why it has remained the most stable option across recent builds.
Here is how to use it:
- Boot into Windows 11 setup and proceed until you reach the Wi-Fi selection screen.
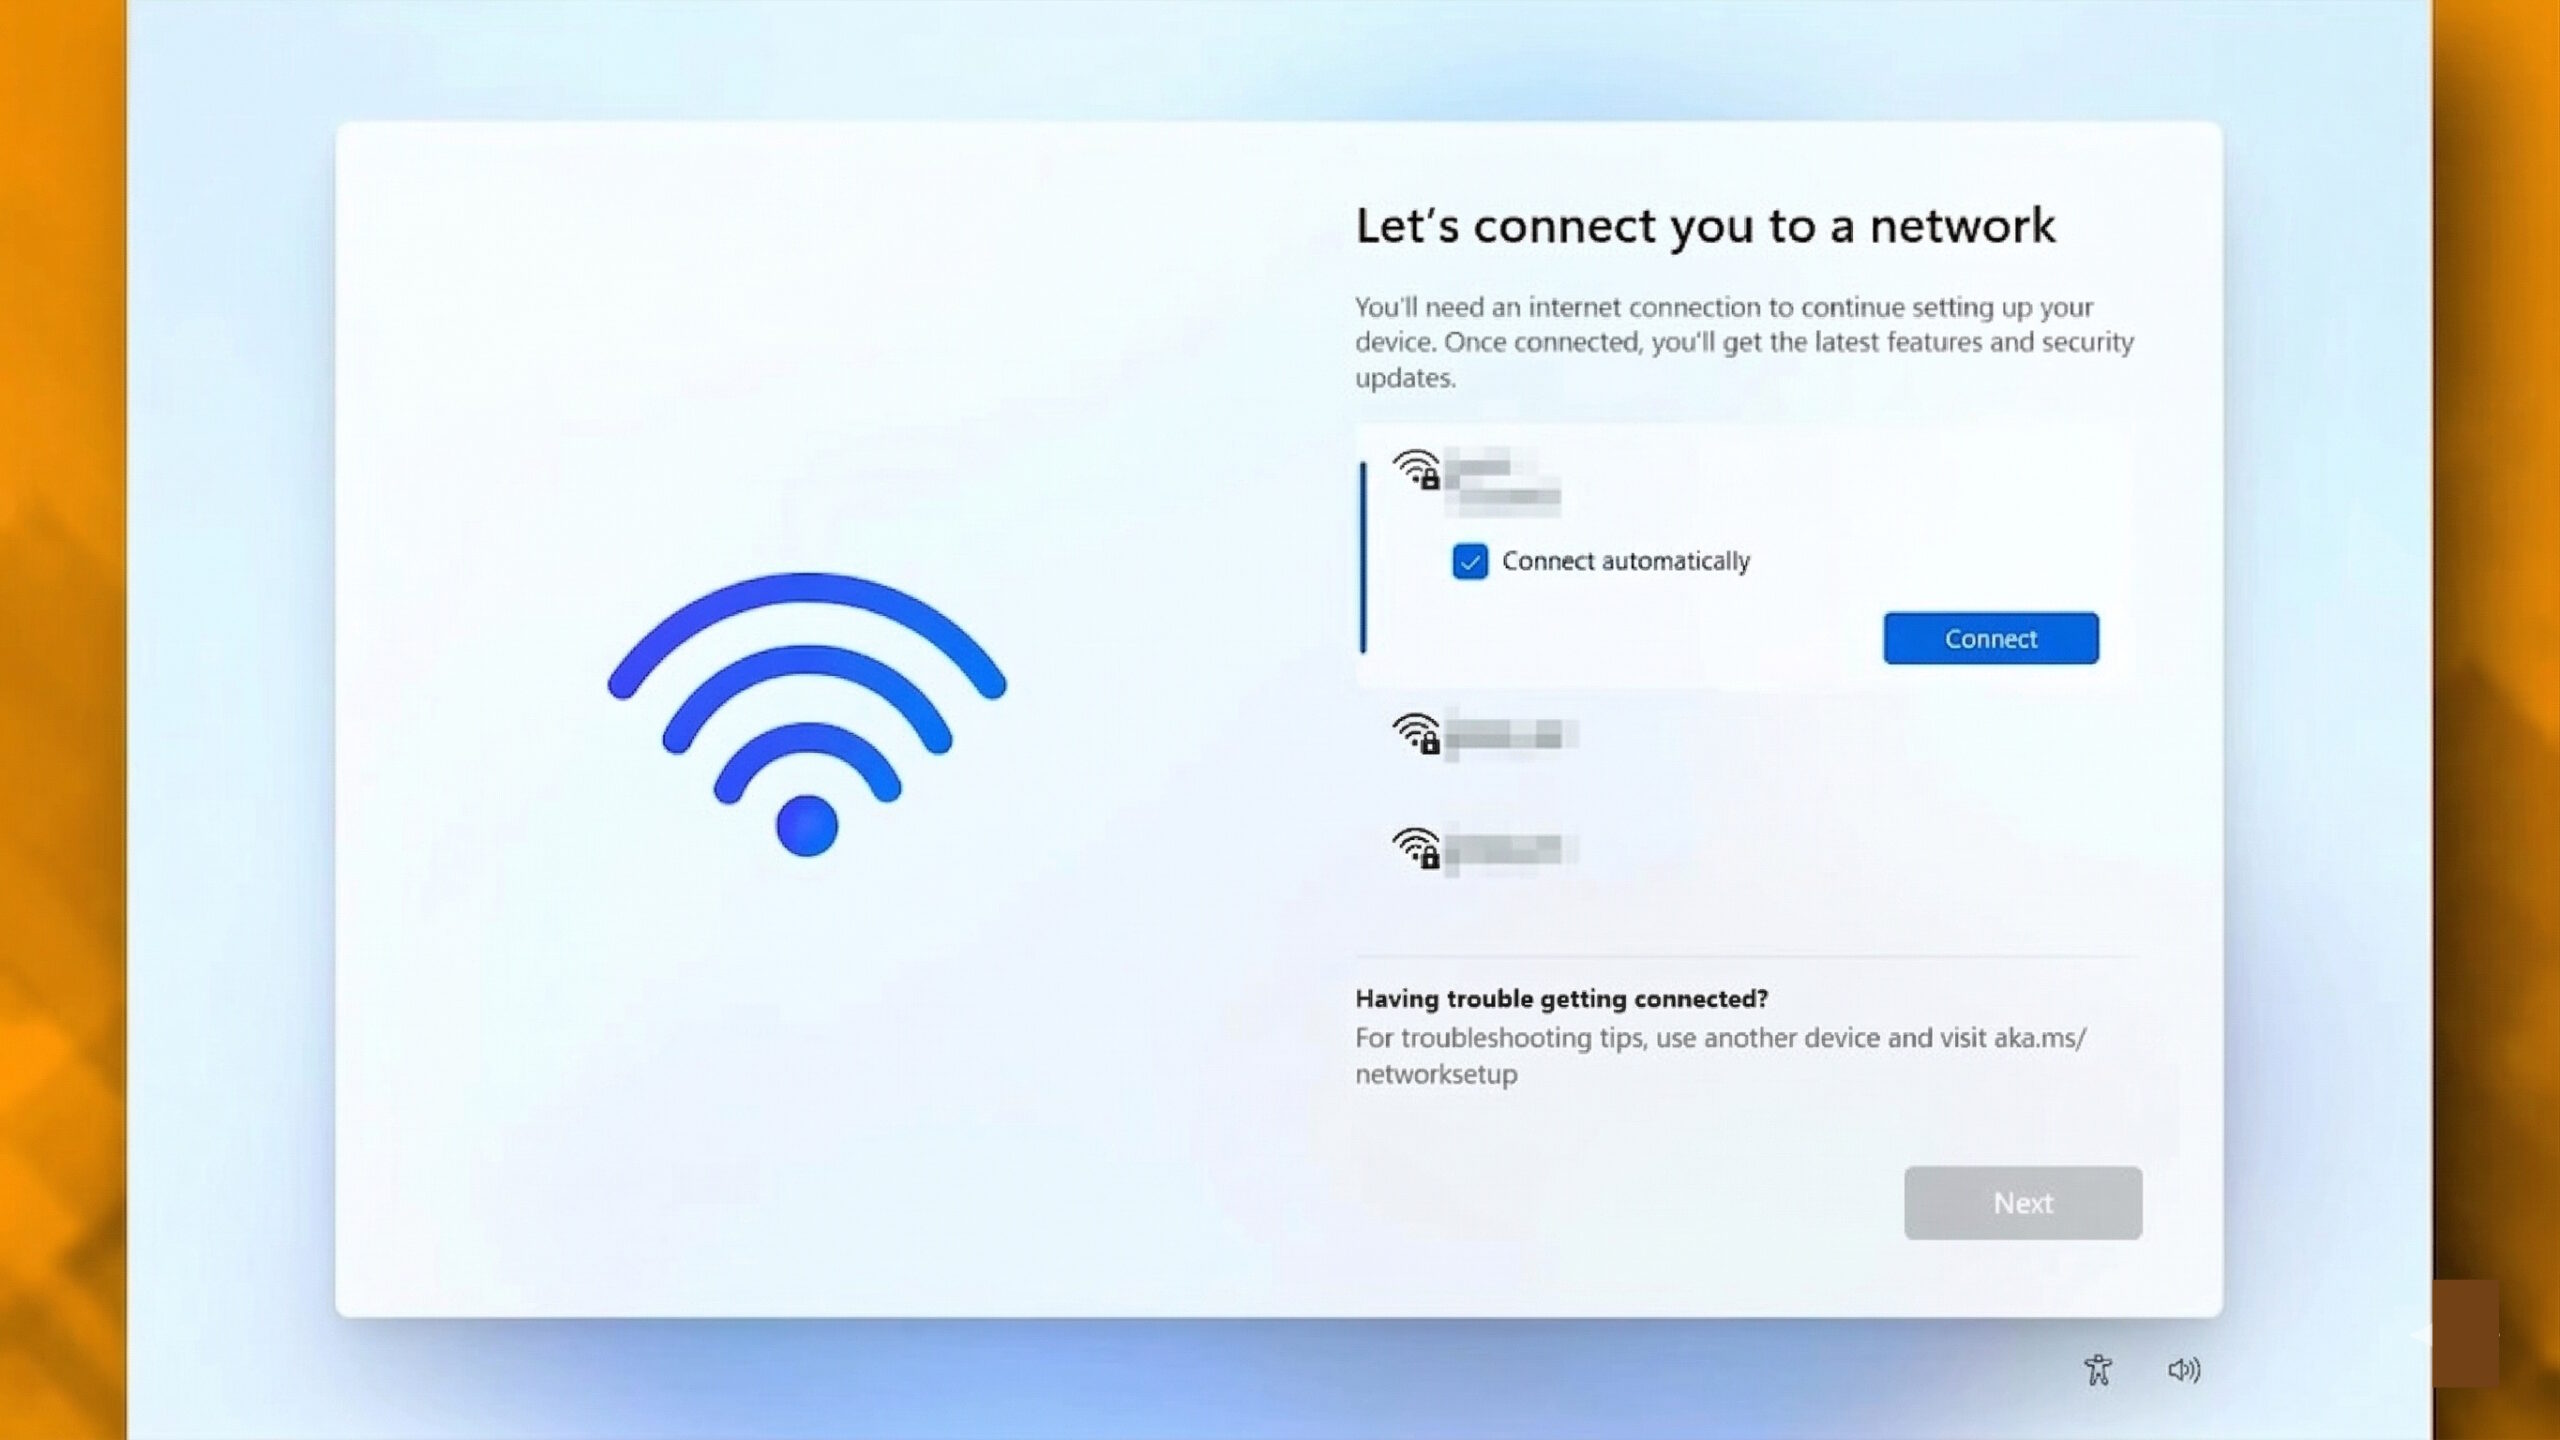
- Press Shift + F10 to open a Command Prompt window.
- Type
start ms-cxh:localonlyand press Enter.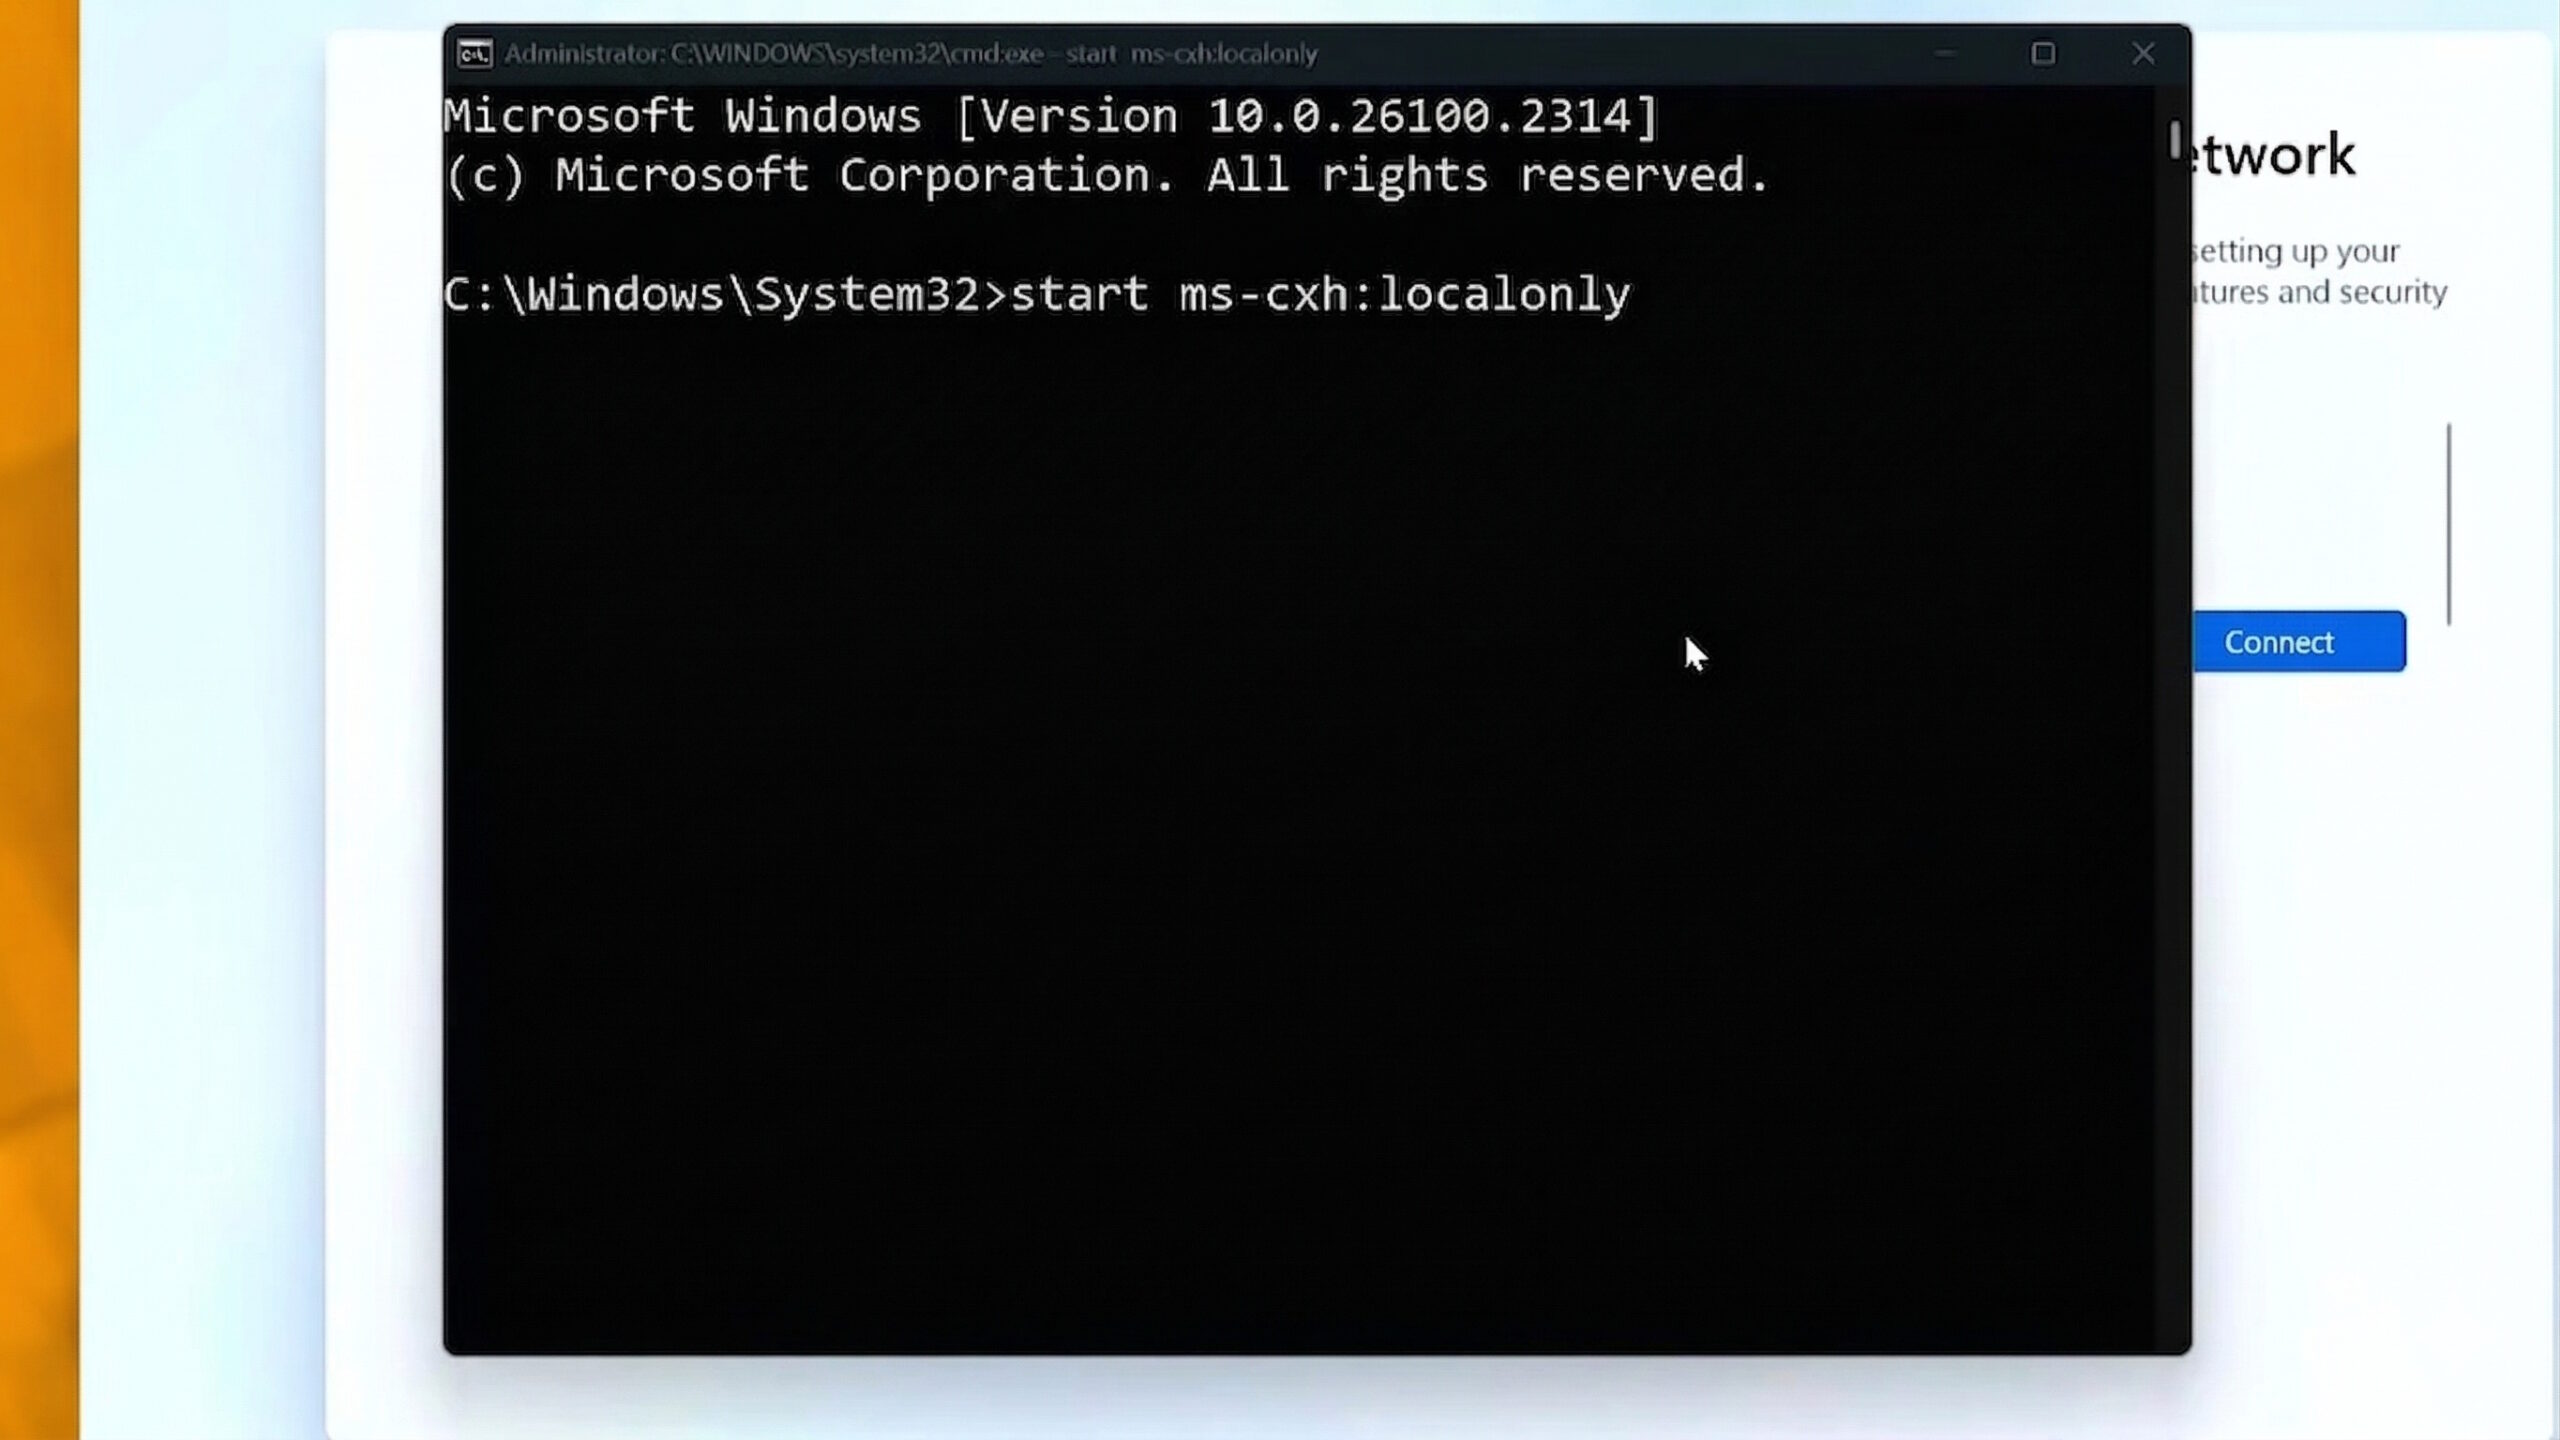
- A familiar interface will appear, allowing you to create a local account with a custom username and password.
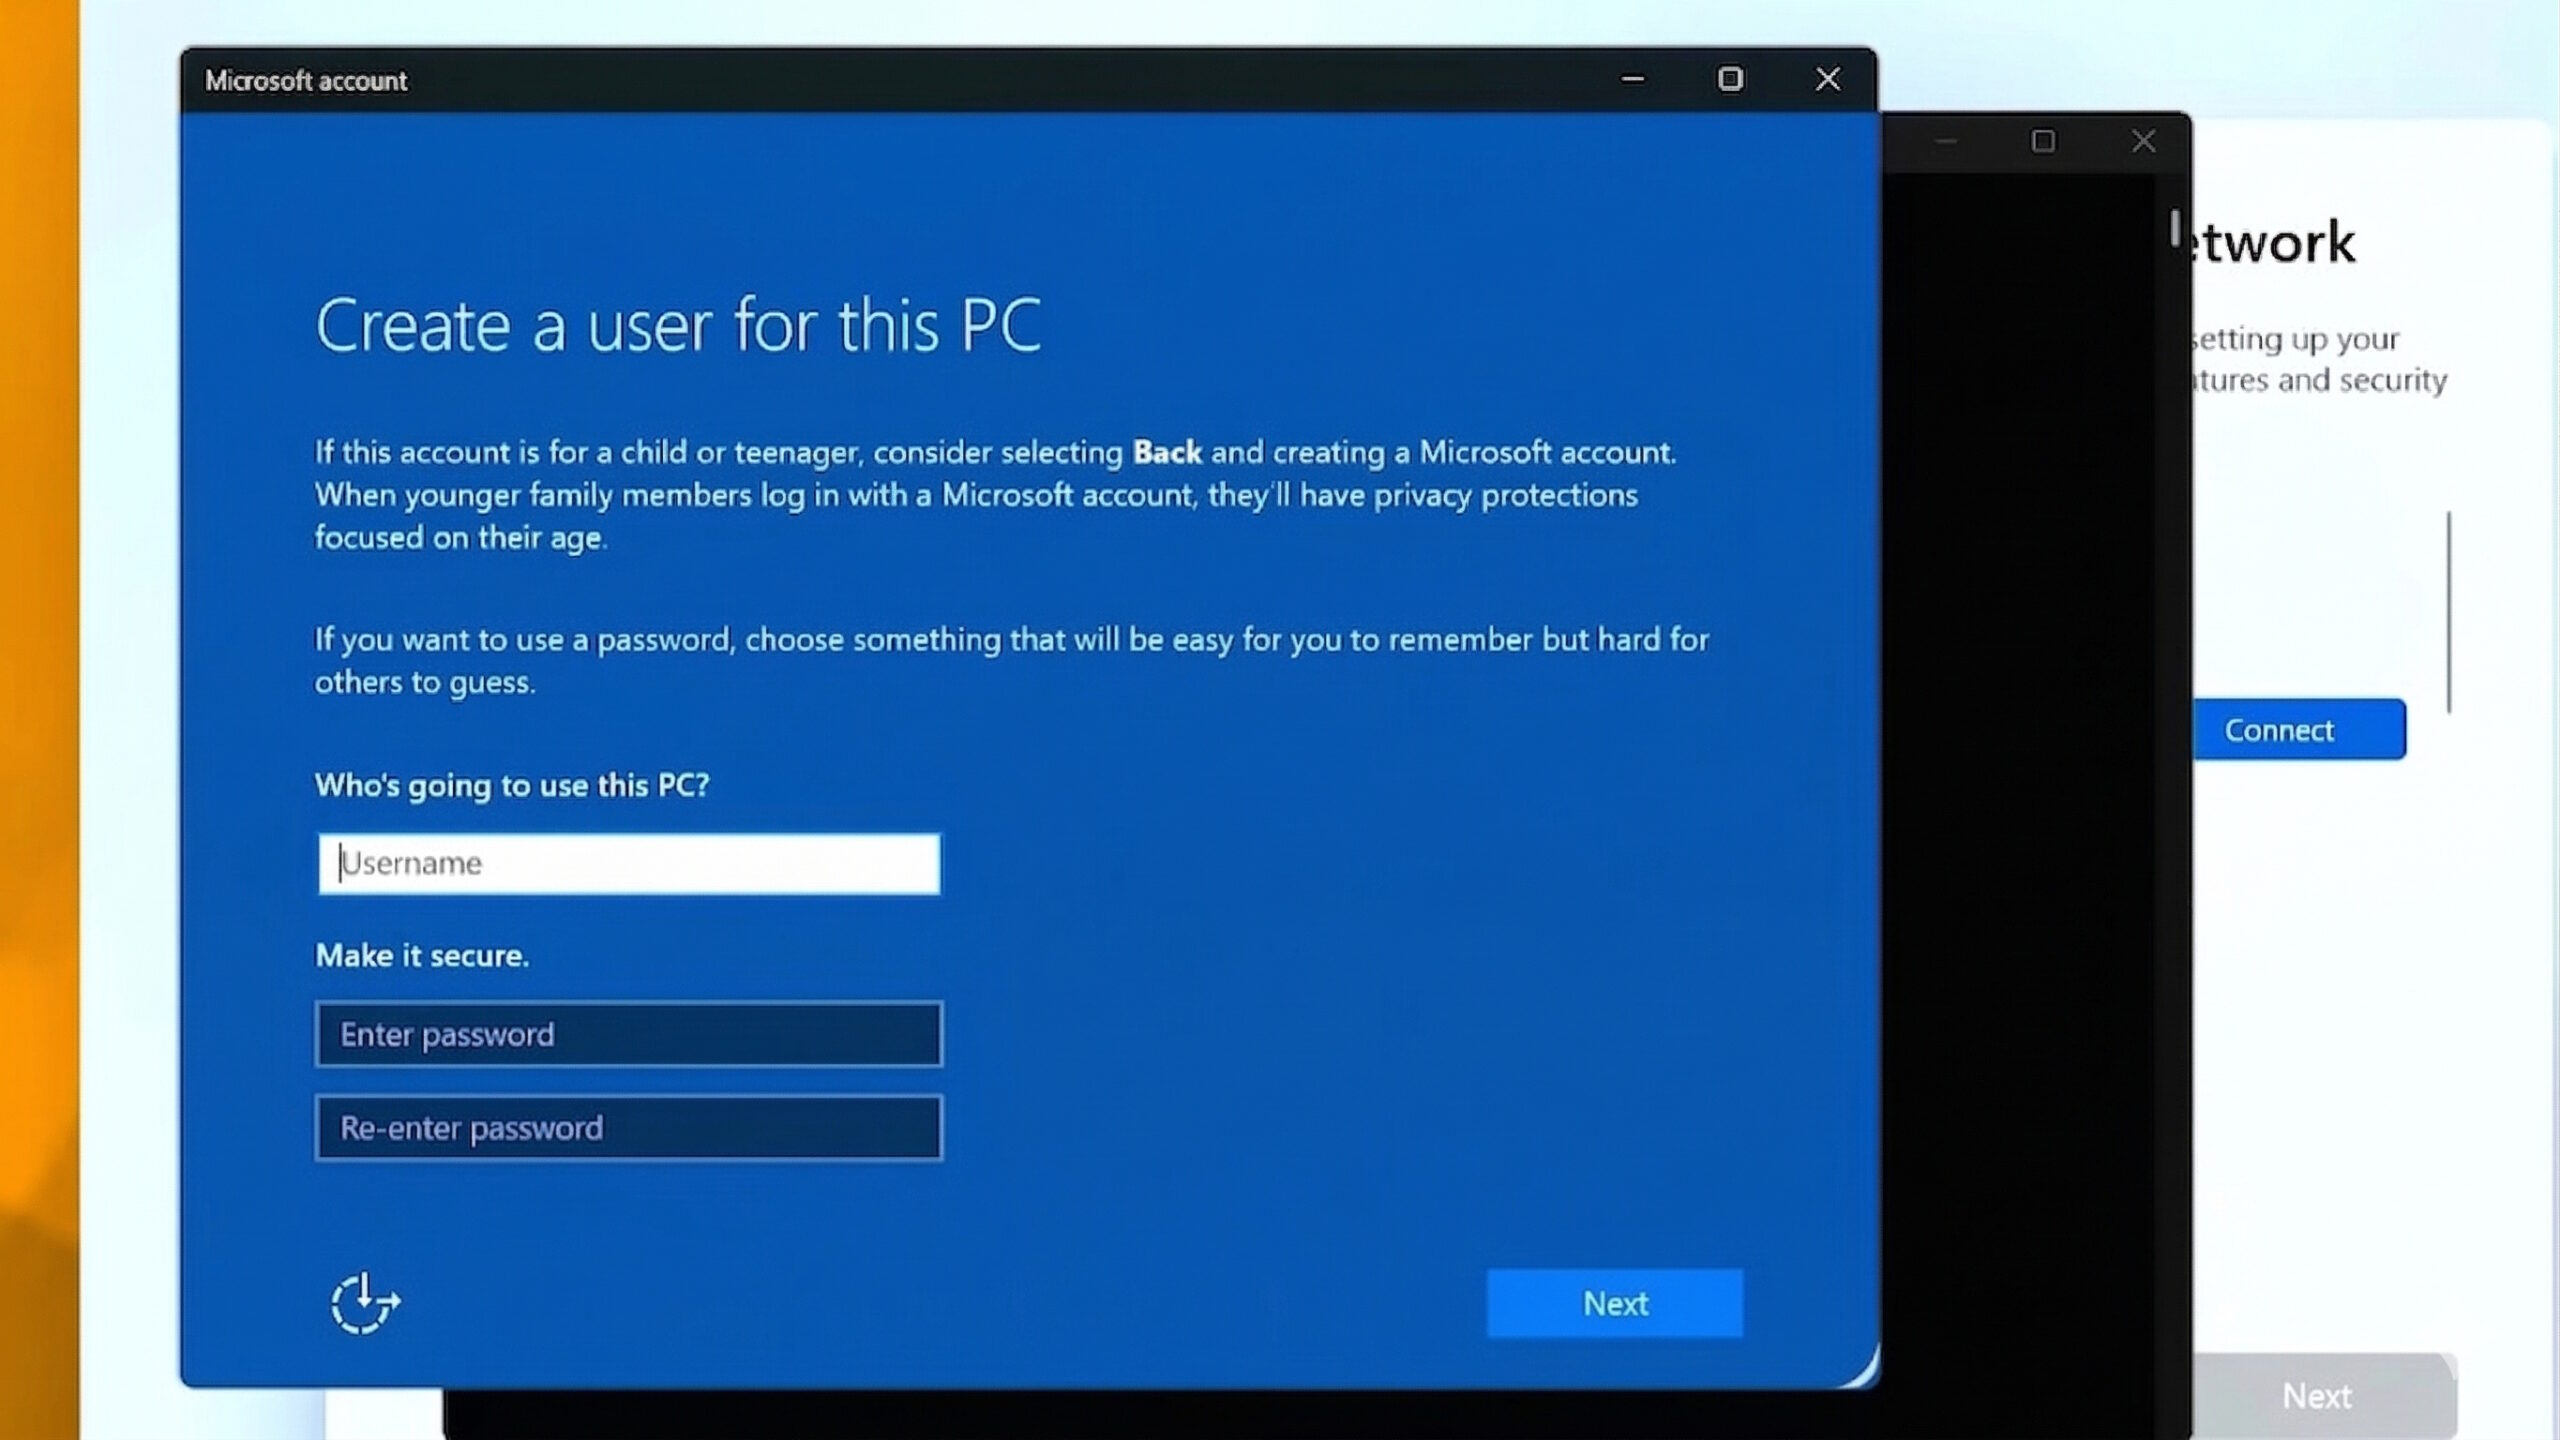
- Fill in your preferred credentials and click Next.
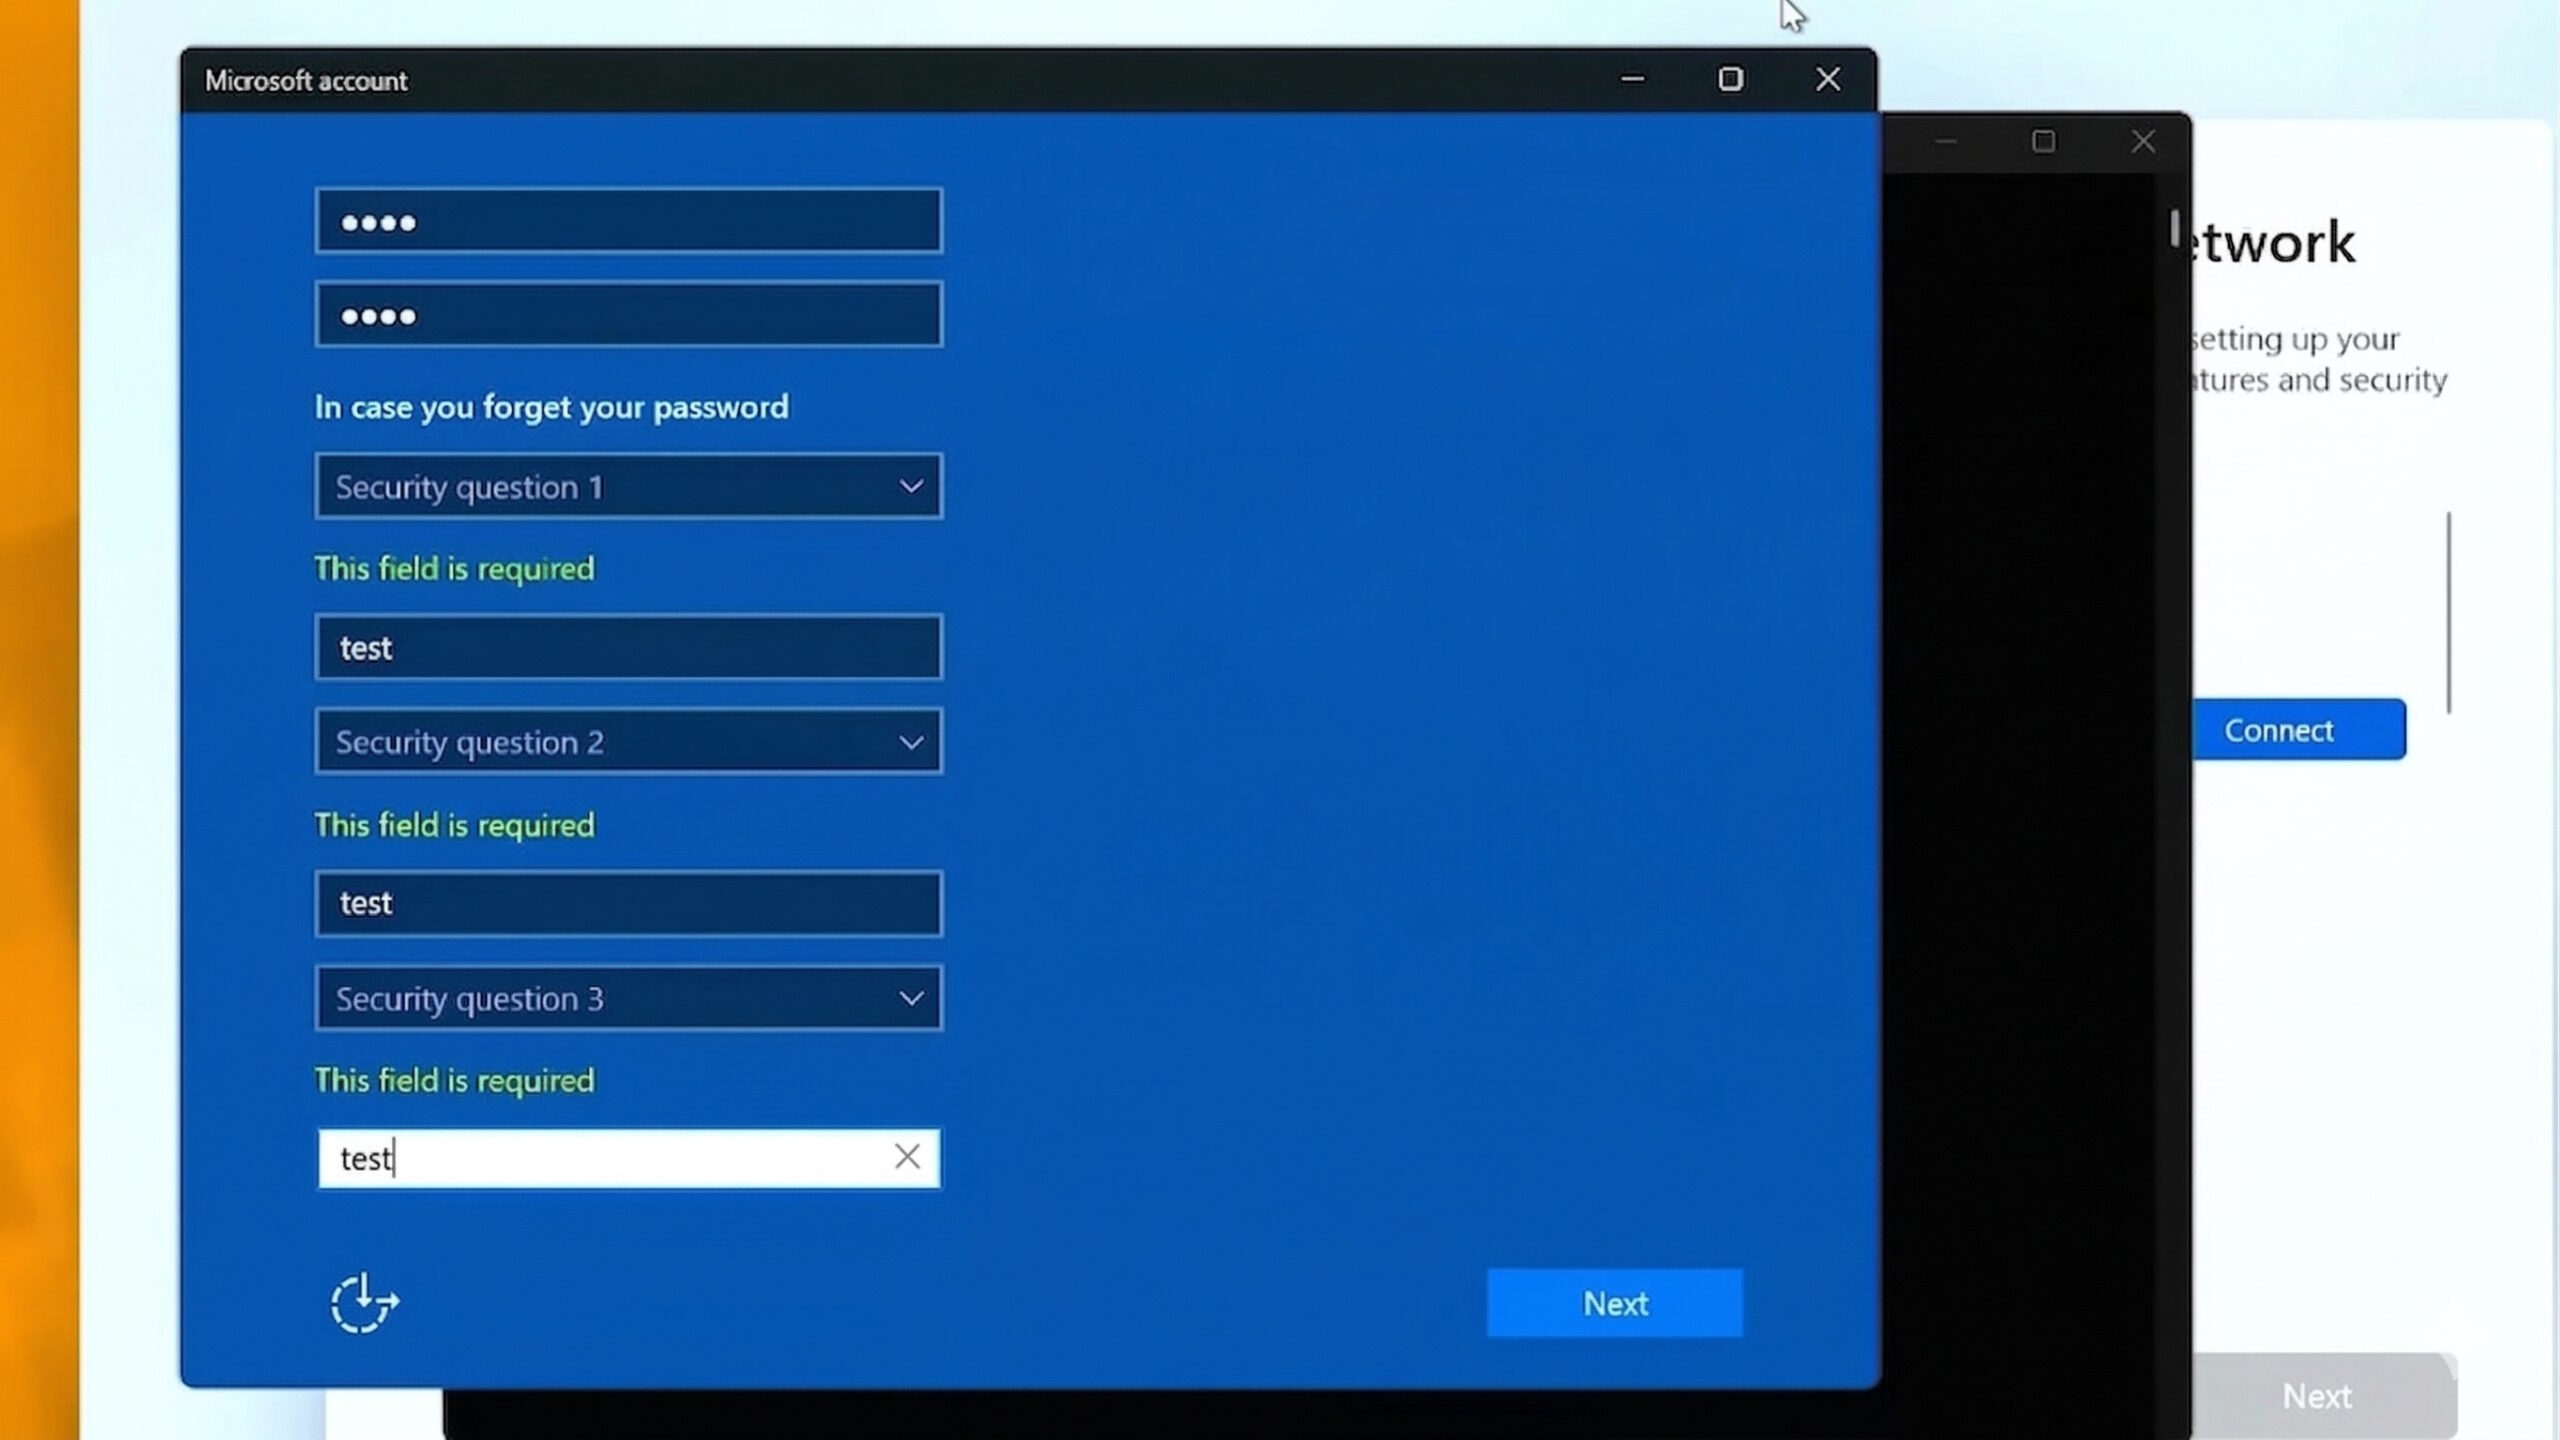
- Complete the rest of the setup as normal.
This is the cleanest option available right now for 25H2, and the one most likely to keep working across future builds, at least until Microsoft closes this particular door.
Related: How to Debloat Windows 11 for Better Performance
How to Use the Registry to Recreate the BypassNRO Workaround
If ms-cxh:localonly does not work on your specific build; there is a second approach that reconstructs the old BYPASSNRO behavior through the registry. Although the OOBE\BYPASSNRO command itself has been removed, the underlying registry value it relied on can still be set manually, resulting in the same effect.
Here is how to do it:
- Start Windows 11 setup and proceed until you reach the Region configuration screen.
- Press Shift + F10 to open Command Prompt.
- Type the following command and press Enter:
reg add HKLM\SOFTWARE\Microsoft\Windows\CurrentVersion\OOBE /v BypassNRO /t REG_DWORD /d 1 /f - Then type
shutdown /r /t 0and press Enter to reboot. The OOBE will restart.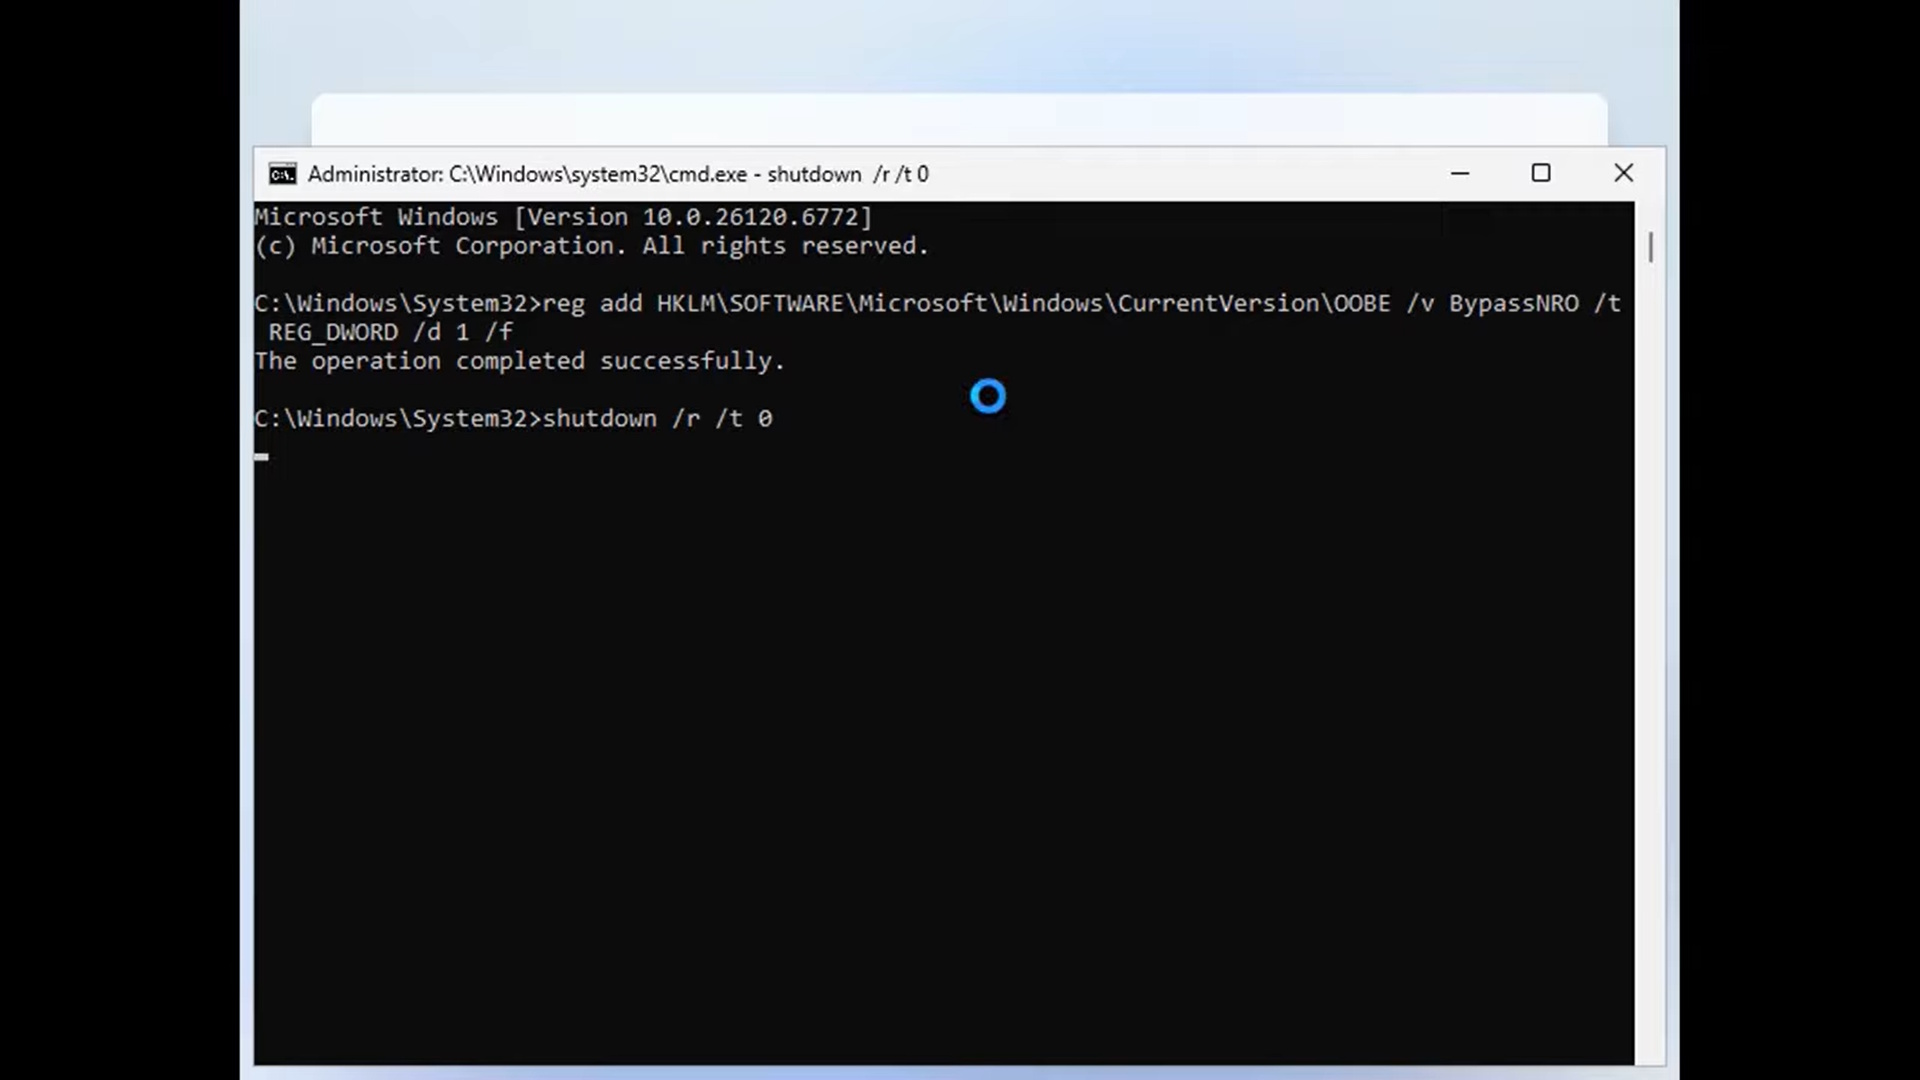
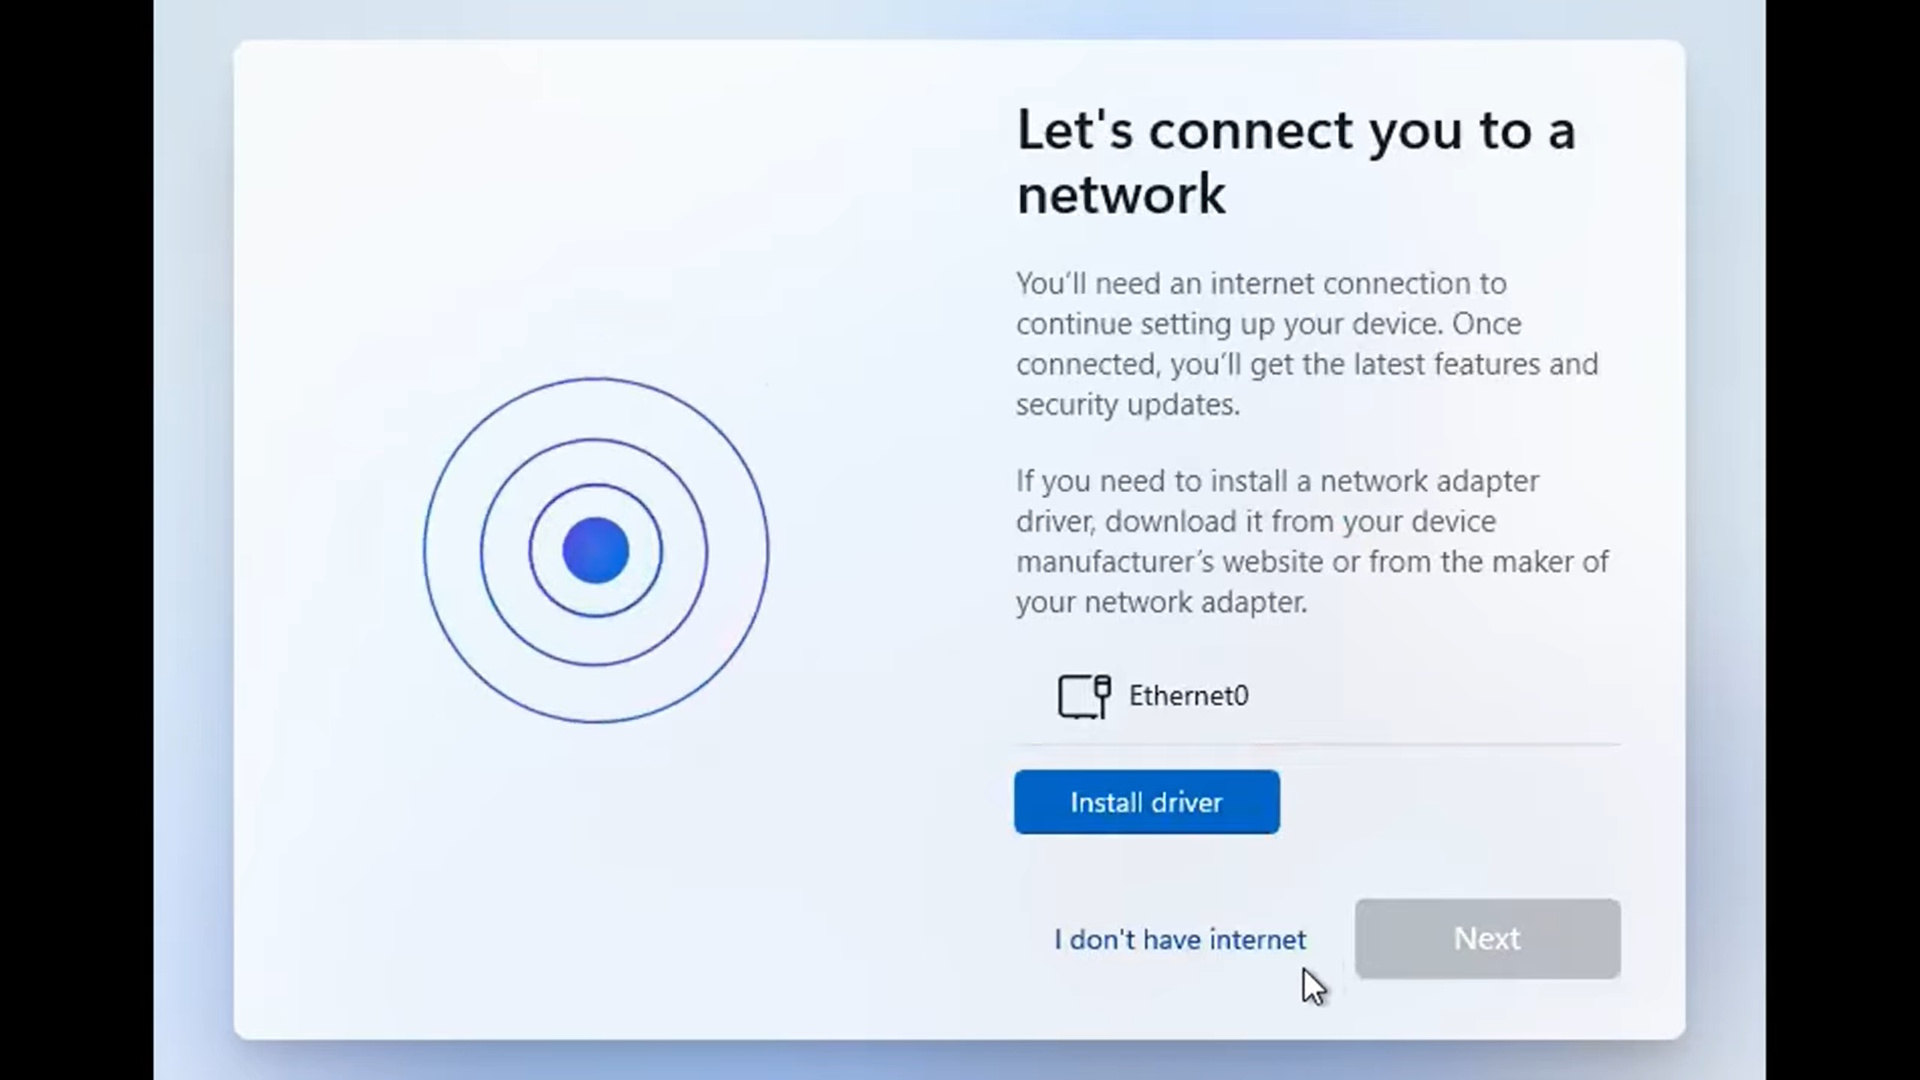
- Navigate to the “Let’s connect you to a network” screen, where you will find an “I don’t have internet” link. Click it, then click past the next screen, and a “Who’s going to use this device?” prompt will appear, allowing you to create a local account.
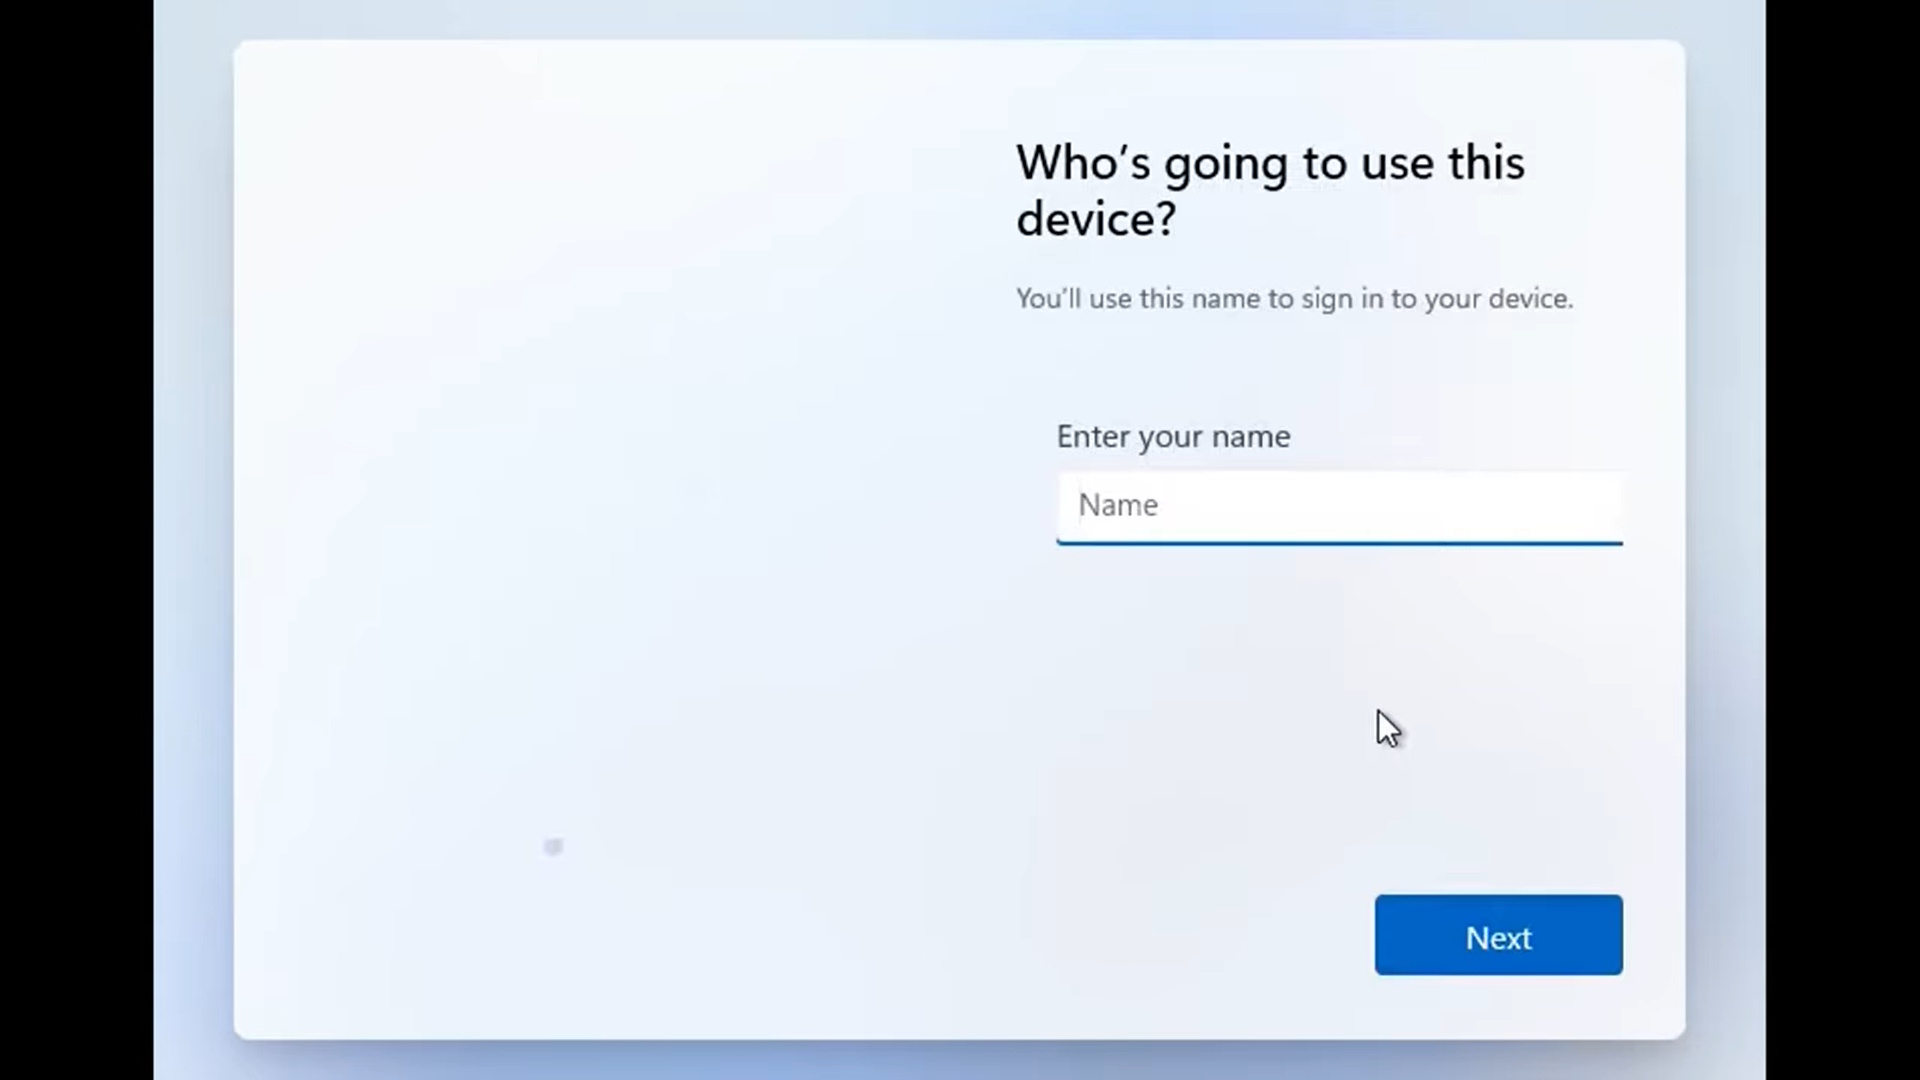
- Enter a username and a strong password. Complete the remaining setup screens, and you will land on the desktop.
This method has a slightly longer runway than the command above, but it is worth knowing as a reliable backup option.
How to Use OOBE\BYPASSNRO on Windows 11 24H2
If your machine is still running the 24H2 release build and has not yet moved to 25H2, the original BYPASSNRO trick still works and is arguably the quickest route available to you. The command temporarily disables the internet connection requirement during setup, giving you a clean path to a local account without any registry edits.
Here is how to use it:
- Start Windows 11 setup and proceed until you reach the “Is this the right country or region?” screen. Do not select anything yet.
- Press Shift + F10 to open a Command Prompt window.
- Type
OOBE\BYPASSNROand press Enter. The PC will reboot and return you to the same screen.
- Close the Command Prompt and continue selecting your region and keyboard layout.
- When the “Let’s connect you to a network” screen appears, click “I don’t have internet,” then “Continue with limited setup.”
- Enter a local username and password when prompted, and complete the rest of the installation.
Worth noting: once your machine upgrades to 25H2, this command will no longer work. At that point, the ms-cxh:localonly or registry method covered earlier becomes your new starting point.
How to Build a Custom Windows 11 Install Disk With Rufus
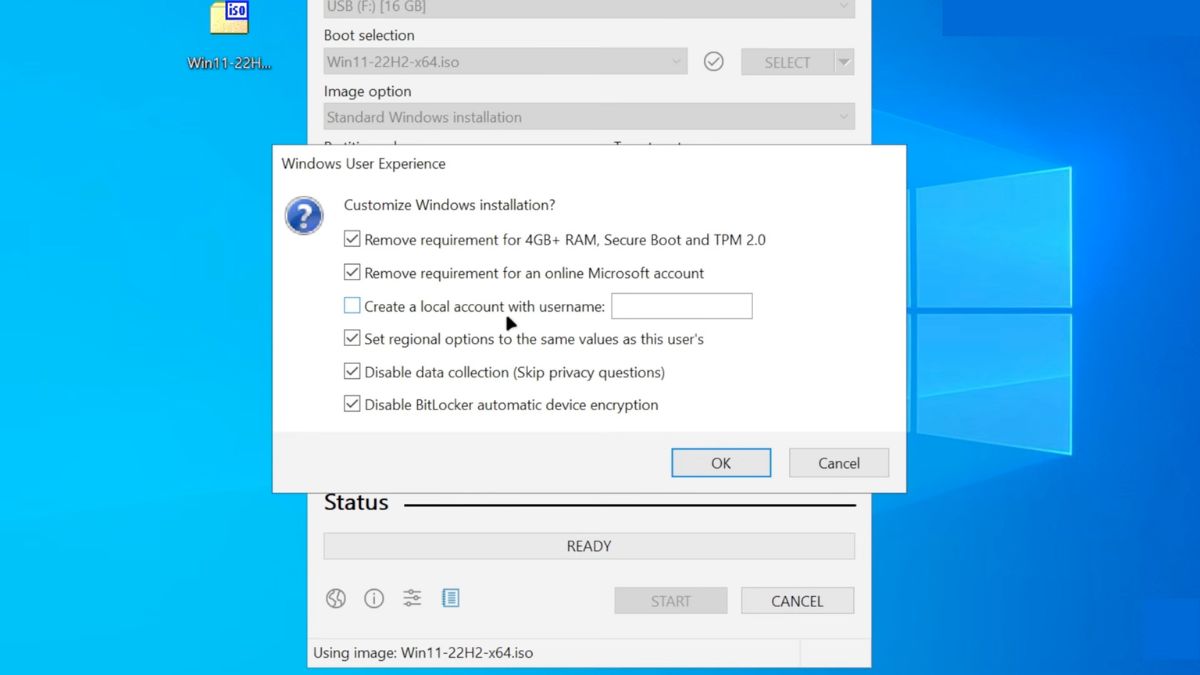
If you regularly set up Windows machines, or simply want a foolproof install disk you never have to fight with again, Rufus is the tool worth knowing. You handle the Microsoft account bypass once, up front, and the resulting USB drive handles the rest during setup without any command-line intervention. For 25H2 specifically, the important detail is to check both the online account bypass option and the local username creator in Rufus, as enabling only the bypass has been reported to get overridden in newer builds.
Here is how to set it up:
- Download the official Windows 11 ISO directly from Microsoft’s website.
- Grab a USB flash drive with at least 8GB of storage. Everything on it will be wiped.
- Download and launch Rufus version 4.4 or higher. No installation is required.
- Select your USB drive from the device menu if it is not already selected.
- Click Select and choose the Windows 11 ISO file you downloaded.
- Click Start at the bottom of the Rufus window.
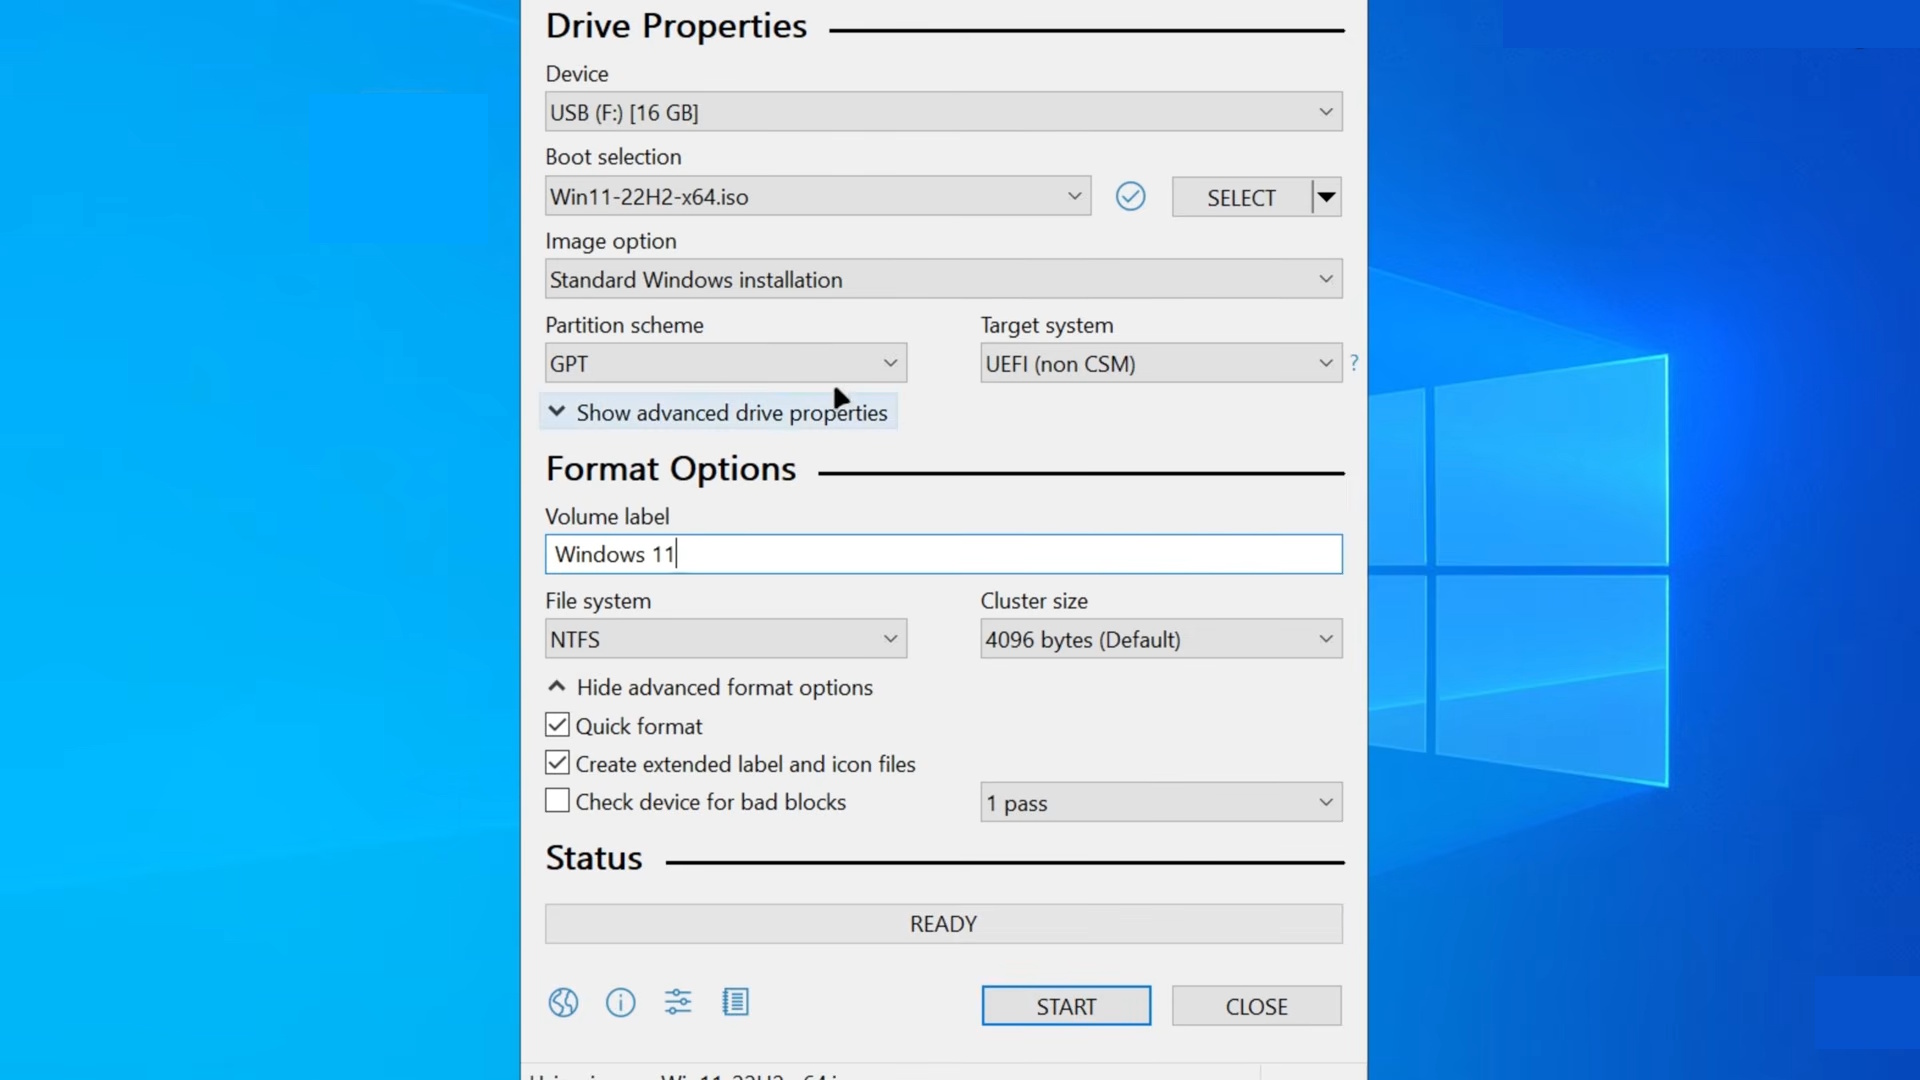
- A customization dialog appears. Toggle on “Remove requirement for an online Microsoft account.” Also, toggle on “Create a local account with username” and enter your preferred username directly in the field.
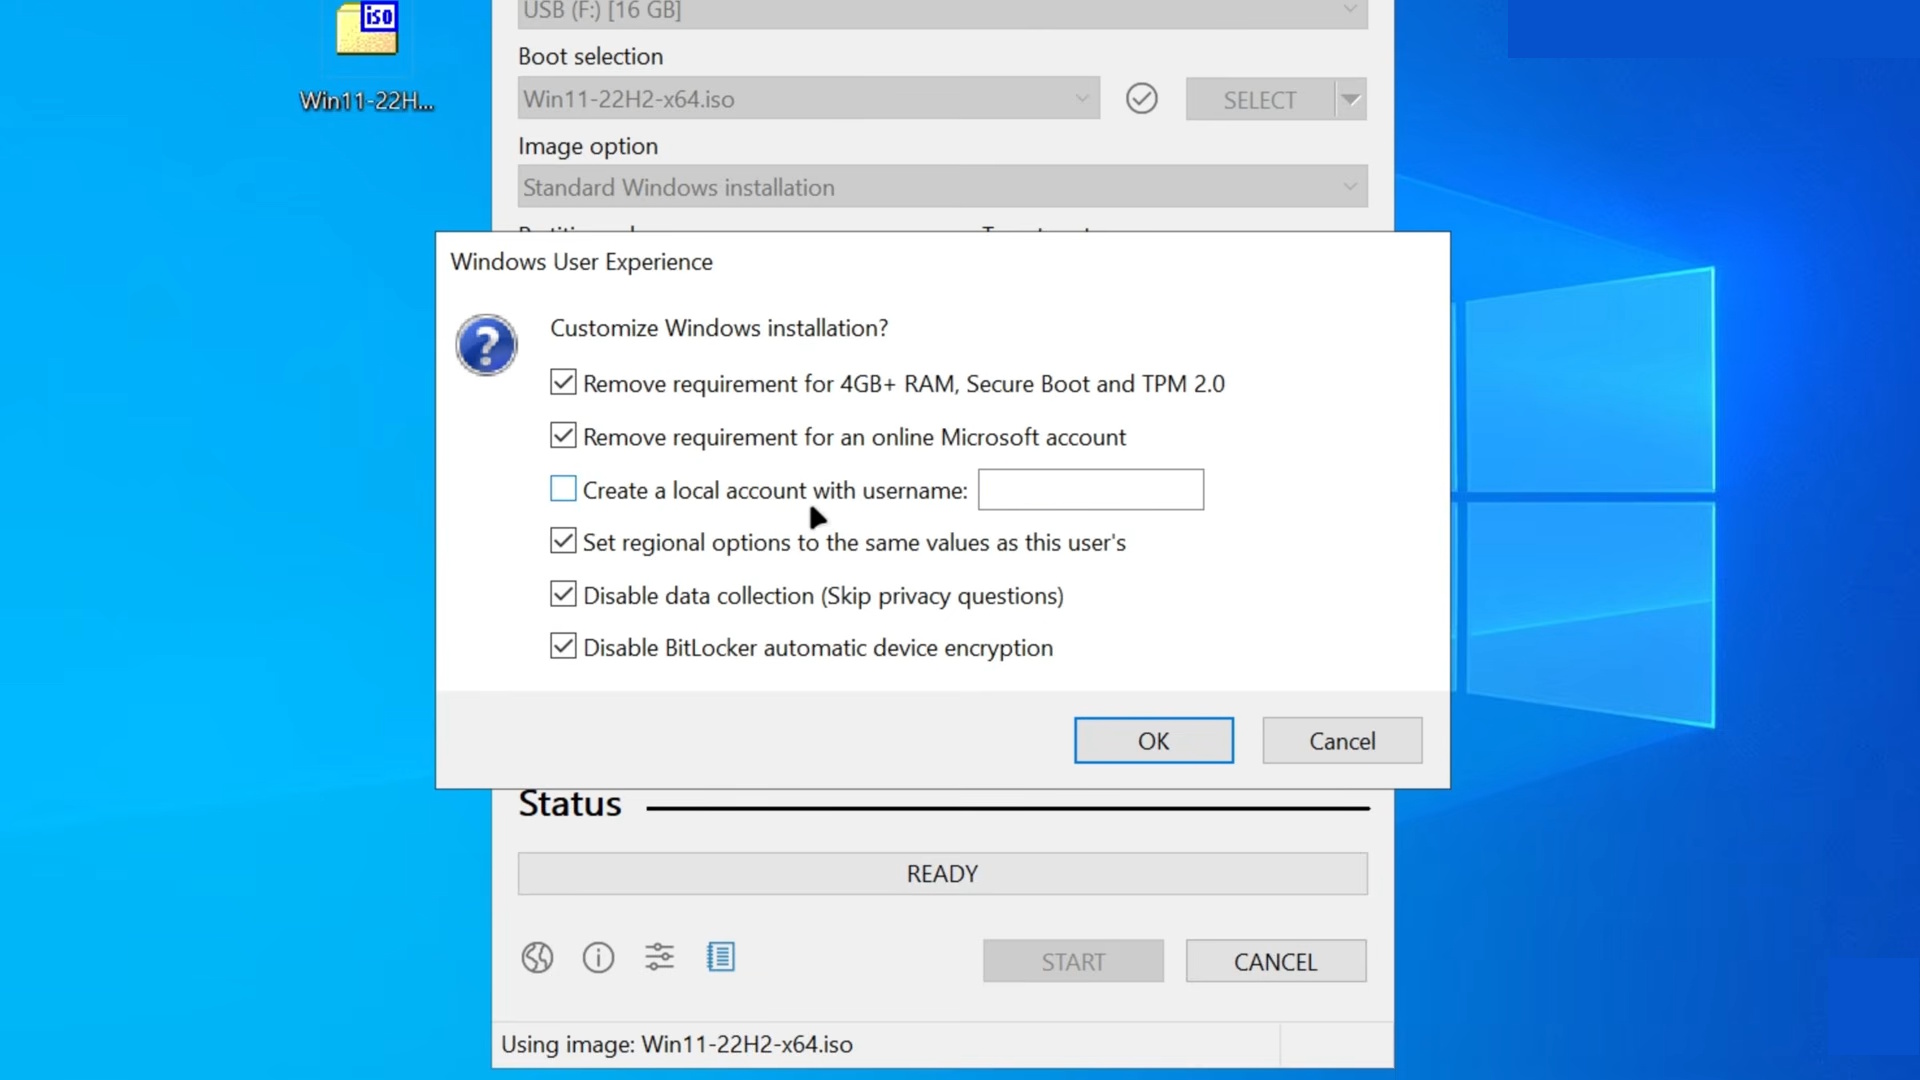
- Optionally, check the boxes for TPM 2.0, Secure Boot, and RAM bypass if your hardware does not meet Microsoft’s minimum requirements. Rufus handles all of them in one step.
- Confirm that Rufus can overwrite the drive and let it finish. The process takes roughly five to ten minutes.
Boot from the finished drive and proceed through setup. No account prompt will appear, and no command-line acrobatics are needed.
You Own the Machine, Not the Other Way Around
Local accounts do not include OneDrive auto-sync or cross-device settings continuity, and for many people, that is precisely the appeal. A computer that does not phone home with your preferences and usage habits is not a lesser machine. These methods work as of March 2026, and while Microsoft will inevitably keep adjusting the setup process, the underlying reality has not changed: the door to a local account has never been fully locked. You just have to know which key to use.
Don’t miss these related reads: