Whether you’re putting together a tutorial, capturing a bug to share with IT, recording a presentation, or saving a gaming highlight, screen recording is one of those skills that comes in handy. The good news is that Windows 11 makes it easier than ever, with built-in tools that require zero downloads. And if you need more control, there are excellent third-party options too.
This guide walks you through every method to screen record on Windows 11, from the quickest built-in shortcut to the most powerful free software, so you can choose what works best for your situation.
Method 1: Record Your Screen Using Xbox Game Bar (Built-In Tool)
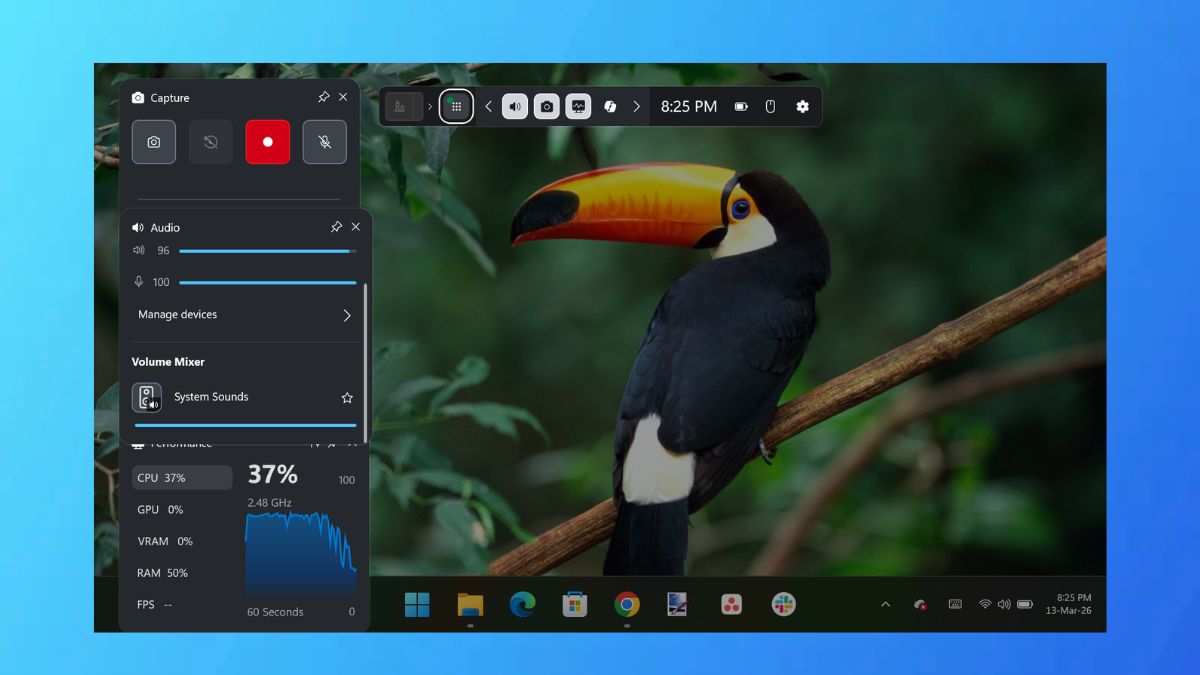
The Xbox Game Bar is Windows 11’s built-in recording tool, and it’s the fastest way to start recording your screen without setting anything up. Despite the “Game” branding, it works for much more than gaming, so you can use it to record any app window.
Here’s how to use it:
- Open the app or window you want to record. The Game Bar can’t record the Windows desktop itself or File Explorer, so make sure you’re working inside a supported app (a browser, video editor, game, etc.).
- Press
Win + Gto open the Game Bar overlay. A small toolbar will appear on screen.
- Click the Record button in the Capture widget (the circle icon), or use the keyboard shortcut
Win + Alt + Rto start recording immediately without opening the overlay.
- A small recording timer will appear in the corner of your screen. When you’re done, press
Win + Alt + Ragain, or click the Stop button in the Game Bar overlay. - Your recording is automatically saved as an MP4 file in
C:\Users\Your PC Name\Videos\Captures.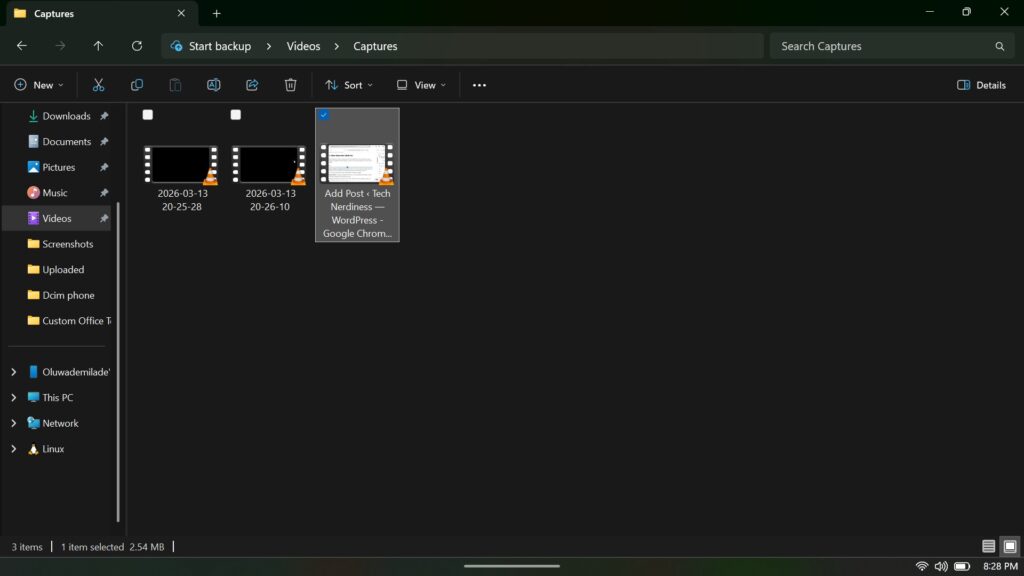
Tips for Using Xbox Game Bar:
- To include your microphone audio, click the microphone icon in the Game Bar before you start recording.
- You can also take screenshots with
Win + Alt + PrtScnthrough the same tool.
There are a few limitations worth keeping in mind. Editing options are fairly minimal, since the tool focuses on capturing rather than refining what you grab. And on lower-end machines, performance can feel a bit inconsistent depending on what else is running.
Method 2: Screen Record with the Snipping Tool in Windows 11
Microsoft upgraded the Snipping Tool in a Windows 11 update to include screen recording, and it’s quite capable. If you’ve ever used the Snipping Tool for screenshots, the video feature works the same way: select a region, hit record, and you’re done.
Here’s how to use it:
- Open the Snipping Tool by pressing
Win + Shift + R, or find it in your Start menu. - In the Snipping Tool window, click the video camera icon (next to the camera icon at the top) to switch to video recording mode.
- Click New, then click and drag to select the area of your screen you want to record. You can capture a portion of the screen or go full-screen.
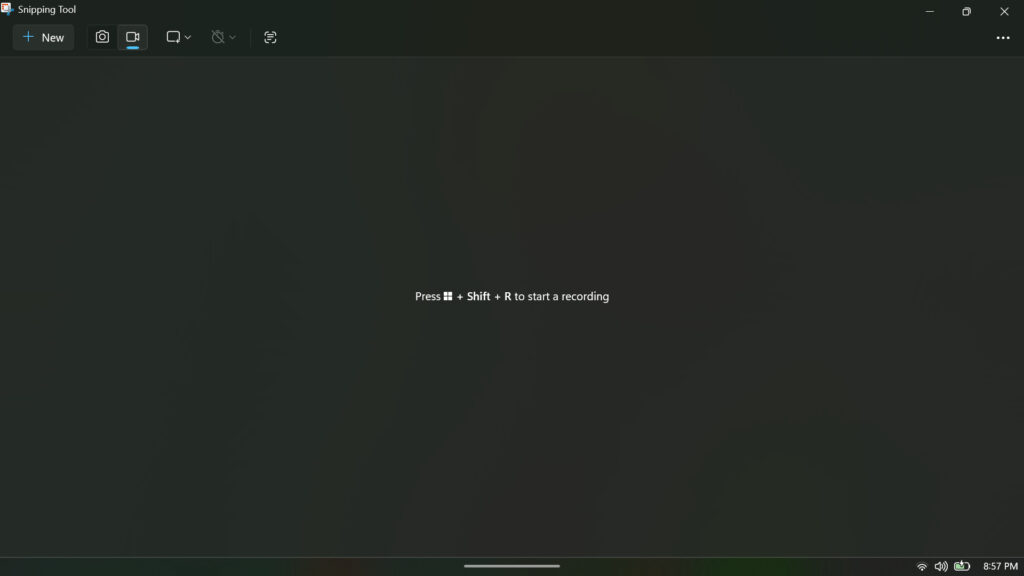
- When you’re happy with your selection, click Start to begin the countdown and start recording.
- A small toolbar will appear at the top of your screen with options to pause or stop the recording.
- Once you stop, the Snipping Tool will open a preview of your recording. Click Save (or
Ctrl + S) to save it as an MP4 file.
Why Snipping Tool Is Great for Screen Recording:
- This method is great for recording a specific area of your screen without capturing everything, which is ideal for focused tutorials or documenting a workflow.
- Unlike the Game Bar, the Snipping Tool can record the desktop and File Explorer.
Related: Windows 11 New Start Menu: What’s Changed and How to Enable It
Method 3: Best Third-Party Screen Recorders for Windows 11
The built-in options are great for quick recordings, but if you need more control, such as custom resolutions, multiple audio sources, live streaming, or built-in video editing, you’d need to look into a third-party tool.
1. OBS Studio (Free)
OBS, short for Open Broadcaster Software, has earned its reputation as the go-to free tool for screen recording and streaming. It’s widely used by streamers and creators who want more control than the typical built-in recorder offers. With OBS, you can capture several sources at once, your screen, webcam, microphone, even multiple scenes, and fine-tune details like resolution, frame rate, and bitrate to suit your setup.
It also lets you stream directly to platforms like Twitch and YouTube without paying for the privilege or dealing with watermarks. The interface can feel a little intimidating at first, especially if you’re coming from simpler tools, but OBS includes a setup wizard that helps you get the basics dialed in without too much guesswork.
2. Camtasia (Paid)
Camtasia from TechSmith has long been a familiar name among tutorial creators and corporate training teams. What keeps it relevant is the way it combines a high-quality screen recorder with a full-featured video editor in a single workspace. Instead of juggling multiple tools, you can record your screen, sync a webcam feed for a human touch, and perform detailed post-production such as trimming, adding annotations, and applying cursor effects, all in one place.
The platform has evolved with modern AI capabilities, now allowing you to “edit video by editing text” through its integration with Camtasia Audiate and automatically clean up background noise. It also simplifies complex layouts with “Camtasia Rev,” which offers instant styles for picture-in-picture presentations. When you’re ready to share, you can export locally in formats like MP4 or GIF, or upload directly to platforms like YouTube and Vimeo.
While Camtasia is now a paid product primarily offered through annual subscription plans, a free trial is available to let users explore all features, though exported videos will include a watermark.
3. Loom (Free & Paid)
Loom takes a different route from the ones we’ve just listed, and even from most screen recording tools, by focusing on “video messaging” rather than file production. It’s built for speed and effortless sharing, with minimal post-production. You simply press record to capture your screen, with the option to include your face in a signature bubble. The moment you stop, Loom instantly generates a shareable cloud link.
Because the video uploads while you record, there is no need to wait for files to save or process. You just copy the link and send it off. The video opens in a browser-based player where viewers can leave time-stamped comments or emoji reactions. While Loom does offer basic trimming and “filler word” removal, its strength is its immediacy. The free tier is generous but does limit video length and total storage.
Tips to Record Better Screen Videos on Windows 11
Getting the recording started is the easy part. Here are a few things to keep in mind to make sure your recordings come out clean and usable:
- Check your audio settings before you start: Decide whether you want to record your microphone (your voice), system audio (sounds from your computer), or both. Most tools let you toggle these independently, but get in the habit of checking before you hit record, not after.
- Close apps you don’t need: Screen recording is resource-intensive, especially at high resolutions. Closing unused browser tabs, background apps, and notifications will improve performance and keep your recording smooth.
- Set your screen resolution intentionally: If the recording is for others to watch, 1080p (1920×1080) is the standard sweet spot. It is high enough to be sharp, small enough to be manageable. Going higher (like 4K) creates large files and may strain your system.
- Do a short test recording first. Before committing to a 30-minute walkthrough, do a 10-second test and play it back. Check that the right audio is coming through and that the correct portion of your screen is being captured.
- Keep your desktop tidy. Viewers will see everything on your screen. Before recording, close any sensitive documents, clear your desktop, and disable notifications so nothing embarrassing pops up mid-recording.
Related: 10 Windows Accessibility Features Everyone Can Benefit From
Conclusion
So which method should you use? If you’ve never recorded your screen on Windows 11 before, start with either the Xbox Game Bar or the Snipping Tool. Both are already sitting on your computer, waiting in the background. There’s no setup to fuss with, no downloads to chase down, and they handle most everyday recording needs without any issue.
At some point, though, you might feel the edges. Maybe you want tighter control over audio, a cleaner editing workflow, or better ways to share what you’ve recorded. That’s usually the moment when it makes sense to step up to any of the third-party tools we listed and see what the wider ecosystem has to offer.
Until then, keep it simple.
The Xbox Game Bar cannot record the Windows desktop or File Explorer. It only works inside app windows. If you need to record the desktop, use the Snipping Tool or a third-party tool like OBS.
It depends on your settings. The Xbox Game Bar and Snipping Tool both support audio, but you may need to enable your microphone or system audio manually before starting. Always do a quick test recording to confirm your audio is coming through correctly.
Xbox Game Bar saves recordings automatically to Videos > Captures. The Snipping Tool will prompt you to choose a save location. Third-party tools like OBS let you set a custom folder in their settings.
The built-in tools don’t impose a strict time limit, but long recordings will produce large files and may strain your system. Loom’s free tier limits recording length, so check their current plan details if that’s a concern.
It can, especially on older or lower-end machines. To minimize impact, close unused apps, lower your recording resolution if needed, and make sure your storage drive has enough free space before you start.
Yes. The Snipping Tool lets you drag to select any region of your screen. OBS also supports window-specific capture, so you can isolate a single app without recording everything else.
Don’t miss these related reads: