
Your iPhone gets stuck on the Apple logo, or a failed update leaves it frozen halfway through restarting, and the old fix usually meant one thing: find a computer, open Finder or the Apple Devices app, connect a cable, and hope the phone responds.
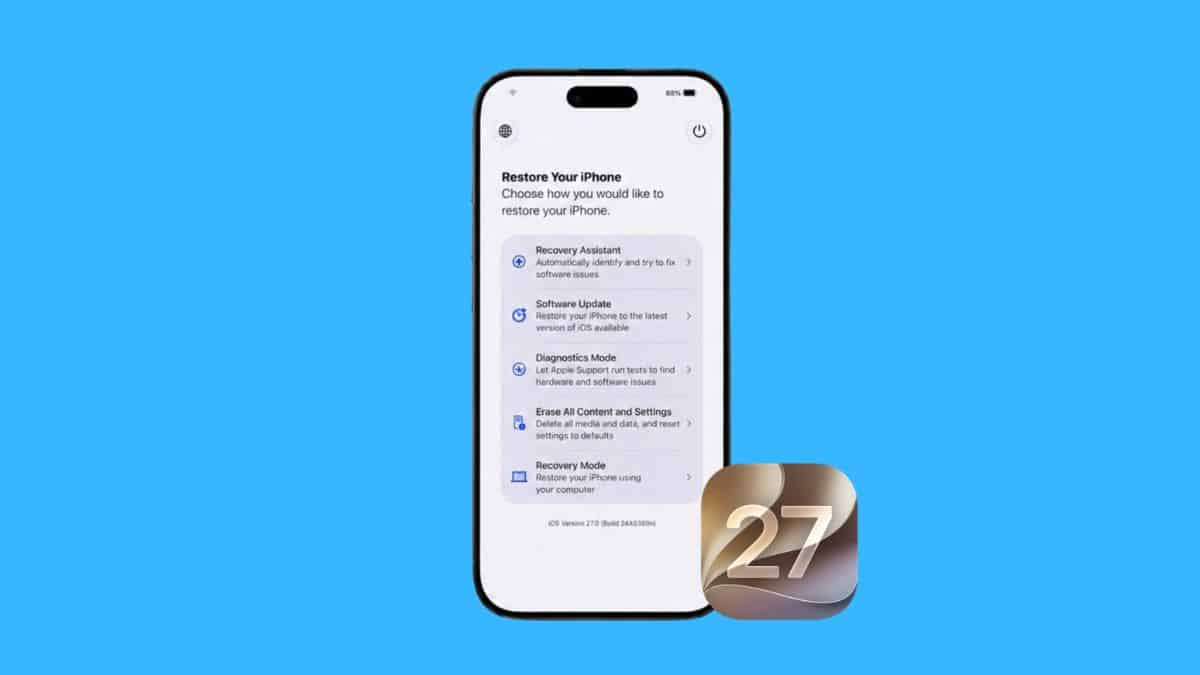
iOS 27 changes that. Apple introduced a new on-device recovery environment with iOS 27 and iPadOS 27, giving users a much more complete set of repair tools directly on the affected device. Instead of immediately reaching for a Mac or PC, you can now troubleshoot startup problems, reinstall software, run diagnostics, erase the device, or fall back to traditional computer-based recovery from one dedicated screen.
It’s one of the more practical, least flashy changes in iOS 27. It isn’t the kind of feature that gets a big keynote demo, but it quietly removes one of the most annoying parts of troubleshooting an iPhone: needing another computer just to repair the one already in your hand.
Here’s what the iOS 27 Recovery Screen actually is, how to enter it manually, what each option does, and what you should know before relying on it.
What Is the Recovery Screen in iOS 27?
Think of the new Recovery Screen as Apple finally giving the iPhone something much closer to the self-contained recovery environment Mac users have had for years. Instead of booting directly into the normal iOS interface, your iPhone can now start in a separate, lightweight recovery environment that sits outside the main operating system. From there, you can troubleshoot software issues, reinstall iOS, run diagnostics, erase the device, or switch to traditional Recovery Mode without first needing to boot normally.
Before iOS 27, iPhone recovery was far less straightforward. If an iPhone failed to start correctly, it could sometimes launch Recovery Assistant automatically, or it could simply sit on the Apple logo until you connected it to a Mac or PC and manually entered recovery mode. That usually meant looking up a specific button sequence that most people only ever need when something has already gone wrong.
iOS 27 brings those recovery paths together into a proper menu you can navigate directly on the device. The interface also gives you useful information such as the battery percentage and can reconnect to known Wi-Fi networks, so you’re not staring at a blank or frozen screen wondering whether the phone is even charging or still alive.
It’s a much more understandable recovery experience than what iPhone users had before.
How to Enter the iOS 27 Recovery Screen Manually
You don’t need to wait for your iPhone to break before opening the Recovery Screen.
Apple has built a manual entry path into iOS 27, so you can see the recovery environment yourself or use it when the device is still responsive enough to shut down normally.
Here’s how:
- Turn off your iPhone completely.
- Wait around 30 seconds.
- Press and hold the Side button.
- Keep holding even after the Apple logo appears.
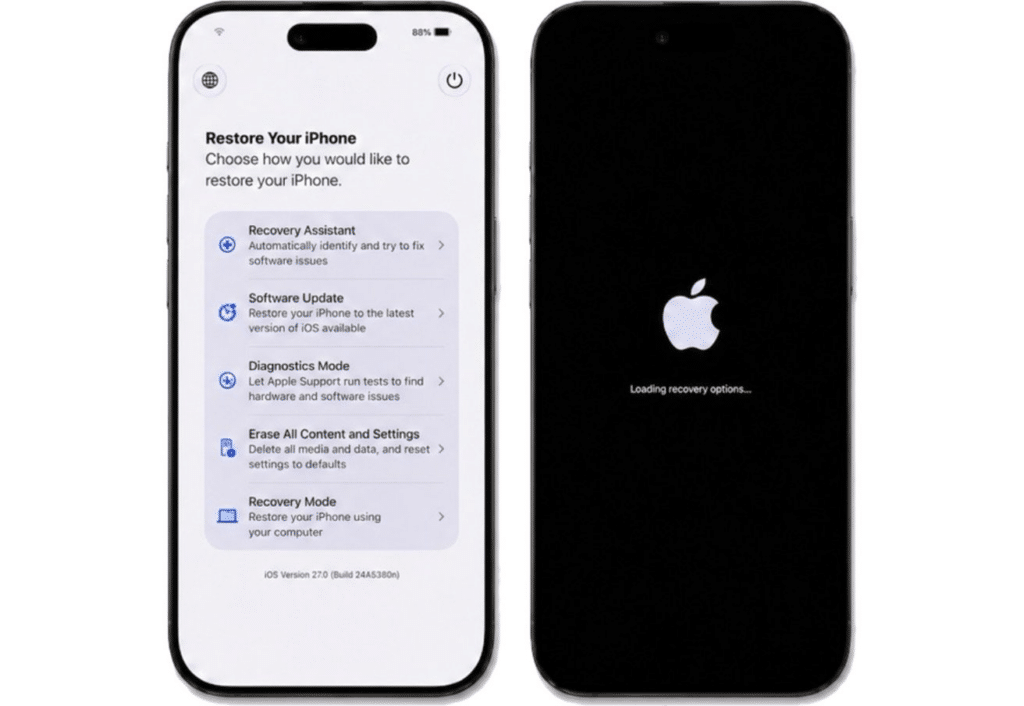
- Continue holding until you see Loading recovery options…
- Release the Side button once the recovery environment begins loading.
On an iPad, use the Top button instead.
The timing is the one part people are most likely to get wrong the first time.
If you release the Side button as soon as the Apple logo appears, the iPhone simply starts normally. You need to keep holding beyond the logo until the recovery message appears.
Once you get the timing right, the process is considerably easier to remember than the traditional recovery-mode button combinations most people have to search for every time something goes wrong.
What Can You Do From the iOS 27 Recovery Screen?
Once you’re inside, the recovery environment gives you several different repair paths.
The main options include:
- Recovery Assistant
- Software Update
- Diagnostics Mode
- Erase All Content and Settings
- Recovery Mode
- Nearby Device Recovery on supported hardware
They’re roughly ordered from less destructive troubleshooting options to more serious recovery methods.
That matters because you shouldn’t jump straight to erasing the device just because the first attempt doesn’t work.
Here’s what each option actually does.
1. Recovery Assistant: Try This First
Recovery Assistant is the most obvious place to start if your iPhone suddenly refuses to boot properly or keeps crashing during startup. It scans the device for known software problems and attempts to repair them without immediately wiping your data.
That’s the important part. If the issue is caused by corrupted system files, an incomplete software update, or another recoverable startup problem, Recovery Assistant is designed to try fixing that before you move on to more destructive options.
Apple has already used Recovery Assistant in earlier versions of iOS when certain devices encountered startup failures, but iOS 27 makes it part of a broader, manually accessible recovery interface rather than something you only encounter automatically.
If your iPhone suddenly gets stuck at the Apple logo with no obvious explanation, this is the option I’d try first.
2. Software Update: Reinstall iOS Without Erasing Everything
If the problem started immediately after an iOS update, Software Update is probably the next option worth trying.
This lets the recovery environment reinstall or update the system software without immediately performing a factory reset. That’s particularly useful for boot loops caused by a failed or incomplete update.
Previously, you’d usually connect the iPhone to a Mac or PC, put it into Recovery Mode, and choose Update through Finder or the Apple Devices app. iOS 27 moves that first attempt onto the iPhone itself.
If the reinstall succeeds, you can potentially get the phone booting again without wiping your apps, photos, messages, and other locally stored data. It’s still smart to have a recent backup, though. Recovery tools can reduce the risk of data loss, but they don’t eliminate it.
3. Diagnostics Mode: Check Whether the Problem Is Hardware
Diagnostics Mode serves a different purpose. Instead of trying to repair the phone immediately, it helps determine whether you’re dealing with a software issue or something more serious on the hardware side.
That’s useful because reinstalling iOS over and over isn’t going to fix a failing battery, damaged display, charging issue, or internal component failure.
If Recovery Assistant and Software Update aren’t solving the problem, Diagnostics can help narrow down what you’re actually dealing with before you take more drastic steps.
Think of it as a troubleshooting tool rather than a magic repair button. If it points toward hardware, that’s when Apple Support or a repair appointment starts making more sense than another software reinstall.
4. Erase All Content and Settings: The Full Reset Option
This is the one option you shouldn’t tap casually. Erase All Content and Settings performs a full factory reset directly from the recovery environment.
That means removing the data stored on the iPhone and returning it to a clean setup state. The convenience here is that you no longer need Finder, iTunes, or the Apple Devices app just to erase a device that won’t boot normally.
But convenience doesn’t make it less destructive. If your iPhone contains photos, messages, documents, or anything else that hasn’t been backed up, don’t jump to this option simply because Recovery Assistant didn’t fix things immediately.
I’d work through the safer choices first: Recovery Assistant, then Software Update, then traditional Recovery Mode if necessary.
Only move to a full erase once you’ve accepted that the locally stored data may be lost and you’ve exhausted the less destructive repair options.
5. Recovery Mode: The Traditional Computer Method Is Still There
Apple hasn’t removed the old Recovery Mode. Instead, iOS 27 puts it inside the new recovery environment as a fallback.
Selecting Recovery Mode takes you back to the familiar computer-assisted process. From there, you can connect the iPhone to Finder on a Mac or the Apple Devices app on Windows and continue with the traditional recovery workflow.
This matters because the new on-device tools won’t fix every possible failure. If the phone can’t download software correctly, networking isn’t working, Recovery Assistant fails, or the system installation is too badly damaged, a Mac or PC can still be necessary.
So the Recovery Screen doesn’t completely eliminate computers from iPhone troubleshooting. What it changes is when you need one. Before iOS 27, plugging into another computer was often one of the first steps. Now it can be one of the last.
6. Nearby Device Recovery: Fix an iPhone Without a Computer
Nearby Device Recovery is one of the more interesting options, particularly if your iPhone breaks while you’re away from home. On supported hardware, another unlocked iPhone or iPad can help the affected device get online and continue the recovery process.
The working Apple device effectively helps the phone in recovery reach the internet and complete the required software download without needing a Mac or PC.
That can be genuinely useful if you’re traveling and your iPhone gets stuck during an update. Instead of finding a laptop, you may be able to borrow another iPhone or iPad long enough to complete the recovery. It’s not available on every iPhone, though, which brings us to the biggest limitation.
Which iPhones Support Nearby Device Recovery?
Nearby Device Recovery has stricter hardware requirements than the main Recovery Screen itself.
Supported devices include newer iPhones such as:
- iPhone 15 Pro models
- iPhone 16 lineup
- iPhone 16e
- iPhone 17 lineup
- iPhone Air
Some newer iPads are supported as well.
That means an older device can still run iOS 27 and access the main recovery environment while not showing the Nearby Device Recovery option.
If you’re using an iPhone 11, iPhone 12, or iPhone 13, for example, don’t assume every recovery option you’ve seen in screenshots will appear on your device. The main menu can still be useful without Nearby Device Recovery, but you’ll have fewer ways to recover without a computer.
Recovery Over Wi-Fi Has an Important Limitation
The new recovery tools still need an internet connection when they have to download software.
And not every Wi-Fi network works. Recovery over Wi-Fi can run into problems on networks using 802.1X authentication, which is common in schools, universities, corporate offices, and other managed environments.
Captive Wi-Fi networks can also create problems if they require a browser-based login page before granting internet access. That means an iPhone that fails while you’re at work, on campus, in a hotel, or on certain public networks may not be able to complete the recovery process using that connection.
A normal home Wi-Fi network is the safer option. And if the recovery environment can’t reach Apple’s servers at all, that’s another situation where traditional computer-based Recovery Mode remains useful.
Recovery Screen vs. Recovery Assistant: What’s the Difference?
These two terms are easy to mix up, but they’re not the same thing.
Recovery Assistant is one repair tool.
The Recovery Screen is the larger recovery environment that contains Recovery Assistant along with Software Update, Diagnostics, Erase All Content and Settings, Recovery Mode, and other available options.
That’s the easiest way to think about it:
Recovery Screen = the menu.
Recovery Assistant = one tool inside that menu.
Recovery Assistant itself existed before iOS 27 in a more limited form and could appear automatically when an iPhone encountered certain startup problems.
What iOS 27 changes is the broader recovery experience. Instead of waiting for iOS to decide that something has gone wrong, you can deliberately boot into a dedicated repair environment and choose the recovery path yourself.
Can You Exit the Recovery Screen Without Changing Anything?
Yes. Opening the iOS 27 Recovery Screen doesn’t automatically repair, update, or erase anything.
If you entered it just to see what it looks like, or you decide you don’t want to proceed with a recovery option, you can simply restart the iPhone.
Use the on-screen power controls or choose the appropriate restart option to boot back into iOS normally. Simply entering the recovery environment doesn’t delete your data. That actually makes it worth opening once while your phone is working properly.
The worst time to learn where every recovery option lives is when your iPhone has already stopped booting.
Does the iOS 27 Recovery Screen Replace a Mac or PC?
For some problems, yes. For all problems, no.
Recovery Assistant, Software Update, Diagnostics, and Nearby Device Recovery can all reduce how often you need to connect the iPhone to another computer.
That’s a big improvement. But traditional Recovery Mode remains part of the menu for a reason.
If the phone can’t get online, the update fails, the software installation is badly damaged, or the on-device recovery environment simply doesn’t solve the issue, Finder or the Apple Devices app can still be necessary.
So I wouldn’t describe iOS 27 as completely removing the computer requirement. It’s more accurate to say it changes the order of troubleshooting.
Before: Problem → computer → recovery tools.
Now: Problem → on-device recovery → computer only if needed.
That difference is much more useful in practice than it sounds on paper.
Does the iOS 27 Recovery Screen Actually Work?
This is where I’d keep expectations realistic while iOS 27 is still in beta. The recovery environment is designed specifically to help when normal startup fails, but beta software is still beta software.
Early testing has shown some inconsistency in how certain recovery options behave across different devices and builds. Recovery Assistant may successfully repair one issue, return no known problems on another, or behave differently depending on the state of the installation.
Software Update can also run into problems during prerelease builds that may not exist once Apple ships the stable version. None of that is especially surprising for a recovery system still being tested across beta releases.
But it does mean I wouldn’t treat the iOS 27 Recovery Screen as a guaranteed safety net yet. If you’re running the beta on a device containing important photos, messages, work files, or anything else you can’t replace, keep a current backup.
And don’t assume Recovery Assistant will always solve a problem without affecting data. Recovery tools are useful. Backups are still better.
Who Will Actually Benefit From the iOS 27 Recovery Screen?
If your iPhone has never frozen on the Apple logo or failed during an update, this feature may sound like a solution to a problem you’ve never had.
Fair enough. Most people won’t open the Recovery Screen regularly, and plenty of users may go years without ever needing it. But that’s also why it’s valuable. Recovery tools are invisible until the moment you desperately need them.
If you’ve ever dealt with a failed iOS update late at night with no laptop nearby, or you manage an iPhone for a parent or child who wouldn’t know what DFU mode means, the new Recovery Screen fixes exactly that moment of panic.
It also makes troubleshooting easier to explain. Instead of walking someone through a sequence of Volume Up, Volume Down, and Side button presses over the phone, you can tell them to boot into the recovery menu and choose the appropriate option.
That sounds small until you’re the person trying to explain Recovery Mode to someone who can’t get past the Apple logo.
If you want to see everything else Apple has changed this cycle, our full iOS 27 public beta guide covers the bigger additions. And if you’re checking whether your current iPhone can install the update at all, see our complete list of iOS 27 compatible devices.
Final Thoughts
The iOS 27 Recovery Screen isn’t the feature Apple is going to use to sell an iPhone, and it probably won’t be the reason anyone installs the update on day one.
Its value only becomes obvious after something goes wrong. Instead of immediately needing another computer because the computer in your hand refuses to boot, you now get a proper on-device recovery environment with Recovery Assistant, Software Update, Diagnostics, full erase controls, and traditional Recovery Mode all in one place.
Supported devices also get Nearby Device Recovery, giving you another route when a Mac or PC isn’t available. It doesn’t eliminate the need for backups, and it doesn’t completely eliminate the need for a computer either. Hardware limits, Wi-Fi restrictions, and failed recovery attempts still mean Finder or the Apple Devices app can remain part of the process.
What iOS 27 does is move that computer further down the troubleshooting list. That’s not flashy.
But the next time an iPhone gets stuck halfway through an update, it could be the difference between fixing it from the couch and spending the next hour searching for a cable and another computer.
Don’t miss these related reads: