Learning how to create and delete stickers on iPhone starts with a moment most people have had: your dog does something absurd, you snap a photo on instinct, and five minutes later you want to slap that exact moment onto a text message instead of digging through the App Store for a sticker pack that almost fits. That is the gap Apple closed with custom stickers, and once you know where the controls live, making one takes seconds.
Apple built custom stickers into iOS 17, letting you lift the subject from a photo and turn it into a sticker you can use in Messages, Notes, Mail, and other supported apps. The feature has held up well since, with Apple continuing to improve the syncing behind it. This is not a flashy headline feature. It is the kind of thing you use without thinking about it, until a sticker refuses to sync or your sticker drawer turns into digital clutter you cannot find your way through.
Here’s how to create stickers on your iPhone, turn Live Photos into animated stickers, add effects, delete stickers you no longer want, and understand what actually happens when you hit Delete.
What You Need to Create Stickers on iPhone
Before getting started, there are a few requirements worth knowing:
- iOS version: You need iOS 17 or later. Regular photo stickers don’t require Apple Intelligence or a specific newer iPhone chip.
- Source photo: You can use a regular photo or Live Photo from the Photos app. Images with a clearly defined person, pet, or object generally produce cleaner cutouts.
- Supported apps: Your stickers can be used in Messages, Notes, Mail, FaceTime, and other apps that support Apple’s system sticker picker.
- iCloud syncing: Stickers can sync across compatible Apple devices signed in to the same Apple Account when the relevant iCloud settings are enabled.
The cleaner the separation between your subject and the background, the better the resulting sticker usually looks. Busy backgrounds, motion blur, and partially hidden subjects can produce rougher edges.
How to Create a Sticker From a Photo on iPhone
Turning an existing photo into a sticker only takes a few taps:
- Open the Photos app on your iPhone.
- Find a photo containing the person, pet, or object you want to use.
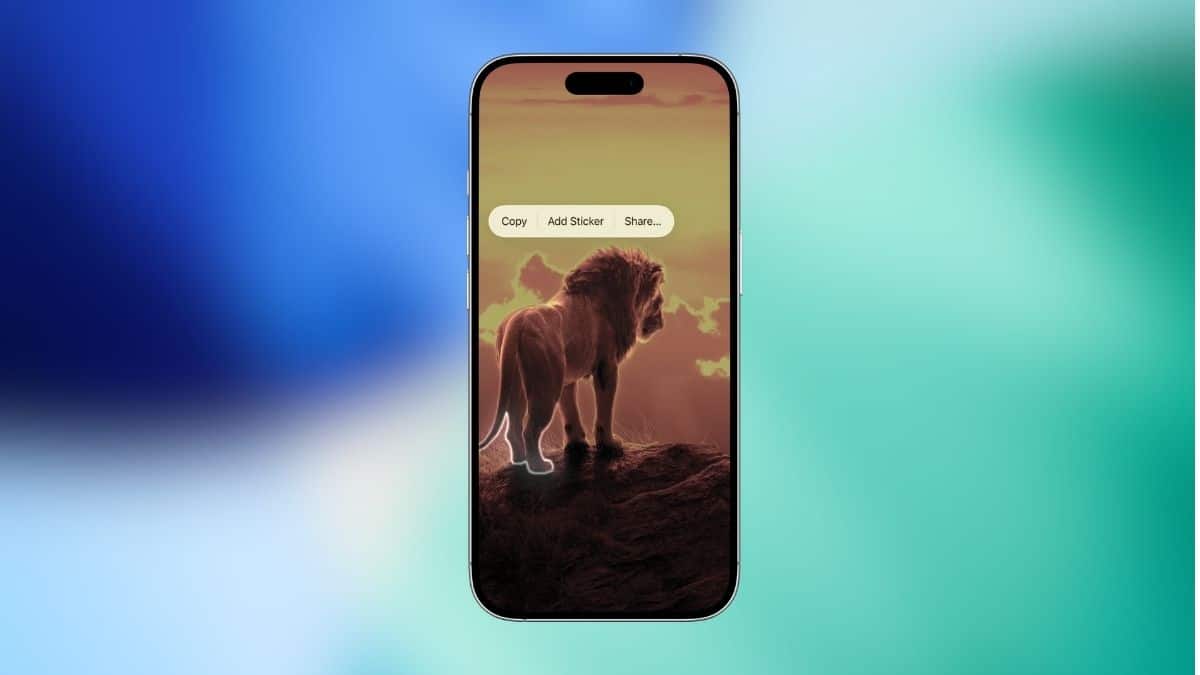
- Press and hold the subject until you see it separate from the background with a slight outline or glow.
- Tap Add Sticker in the menu that appears.
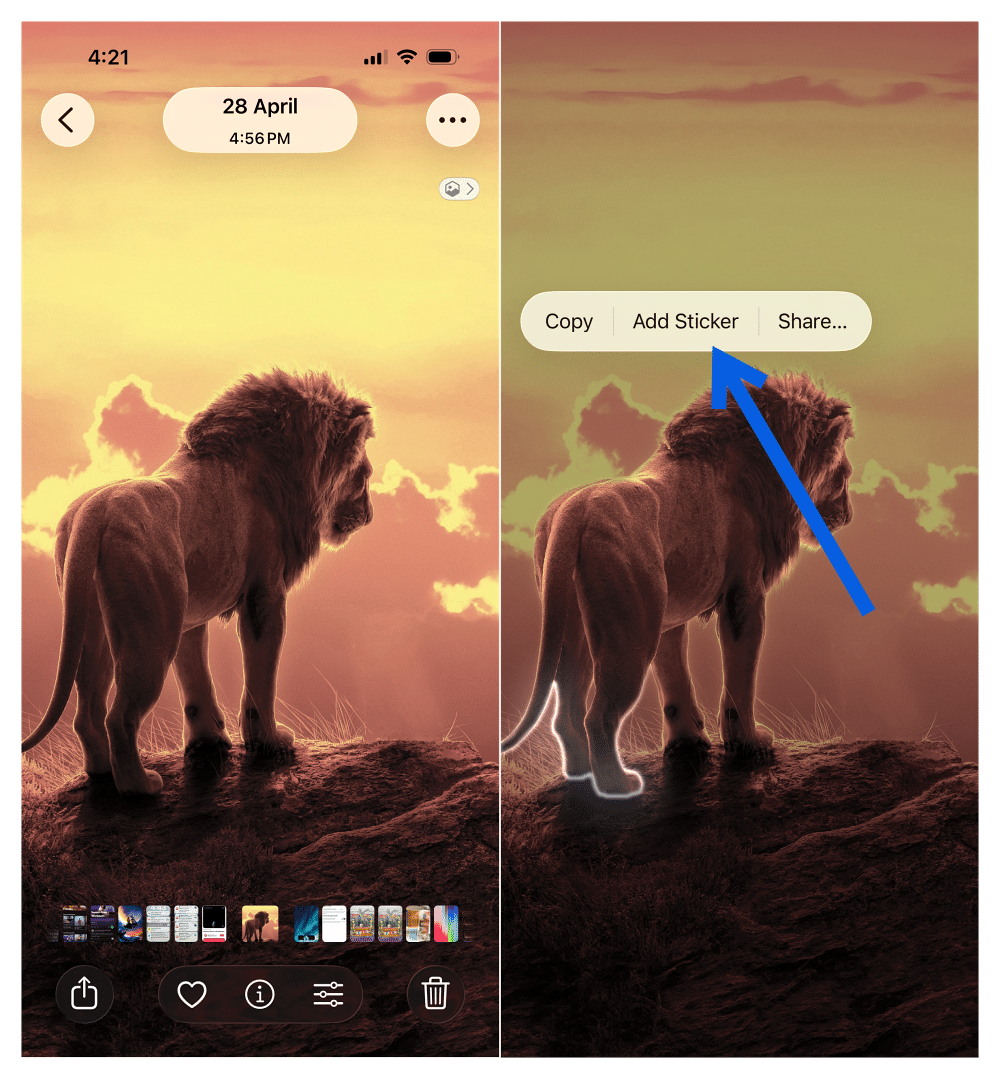
That’s it.
Your new sticker is automatically added to your sticker collection and becomes available through the sticker drawer and supported keyboard interfaces. There’s no need to manually crop the image or remove its background with a third-party app.
How to Turn a Live Photo Into an Animated Sticker
Live Photos can make the feature considerably more fun because iOS can preserve the movement instead of turning everything into a static cutout.
Open a Live Photo in the Photos app, press and hold the subject, and select Add Sticker. If the photo is suitable, iOS creates a Live Sticker that preserves motion from the original Live Photo.
The result could be your dog wagging its tail, someone laughing, or another short moment playing as an animated sticker inside a conversation.
If you would rather have a still sticker, you can disable the Live effect and use a static version instead.
Not every Live Photo produces a perfect result. Heavy motion blur, rapid camera movement, or a subject moving partially outside the frame can make the animated cutout look rough around the edges. If that happens, using a still version usually looks better.
How to Add Effects to iPhone Stickers
Once you’ve created a sticker, you can give it a different look without having to recreate it.
- Open Messages and enter a conversation.
- Open your Stickers collection.
- Press and hold the sticker you want to customize.
- Tap Add Effect.
- Choose Outline, Comic, Puffy, or Shiny.
- Tap outside the sticker or select Done when you’re finished.
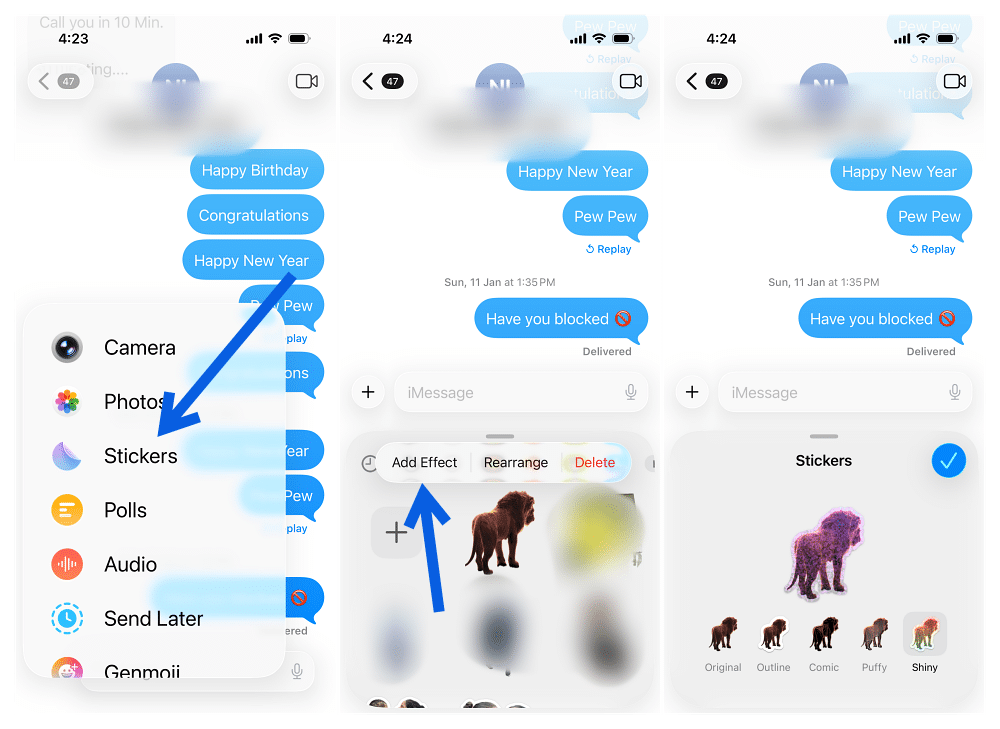
Each effect changes the presentation rather than the original photo.
Outline adds a border around the subject, helping it stand out against different backgrounds. Comic gives the image a more illustrated appearance. Puffy creates a raised, dimensional effect, while Shiny gives the sticker a reflective look.
You can change the effect later without recreating the sticker from the original photo.
How to Create a Sticker Directly in Messages
You don’t always need to open Photos first. If you’re already texting someone and suddenly decide a photo would make the perfect reaction sticker, you can create it from inside Messages.
- Open a conversation in Messages.
- Tap the + button beside the text field.
- Tap Stickers.
- Tap the + button in the sticker interface.
- Choose the photo you want to use.
- Select the detected subject and add it to your sticker collection.
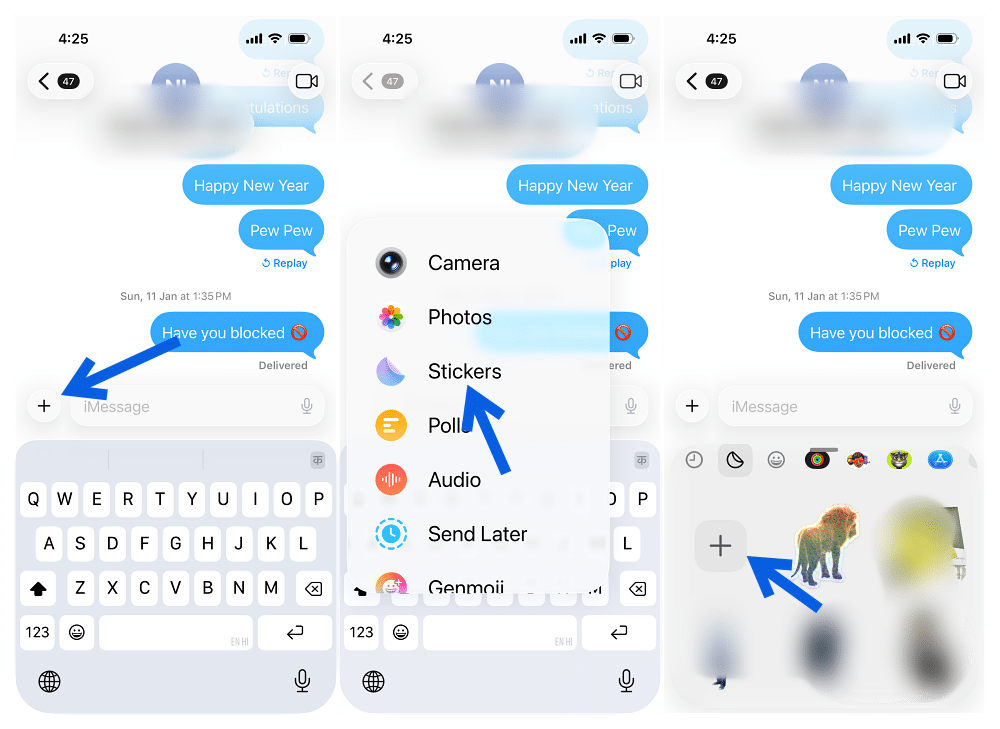
The end result is the same as creating one through Photos, but this route is faster when you’re already in the middle of a conversation.
How to Delete a Sticker on iPhone
Custom sticker libraries can fill up surprisingly quickly. Fortunately, removing one is just as straightforward as creating it.
- Open Messages and access your Stickers collection. You can also access stickers through supported keyboard interfaces.
- Press and hold the sticker you want to remove.
- Tap Delete.
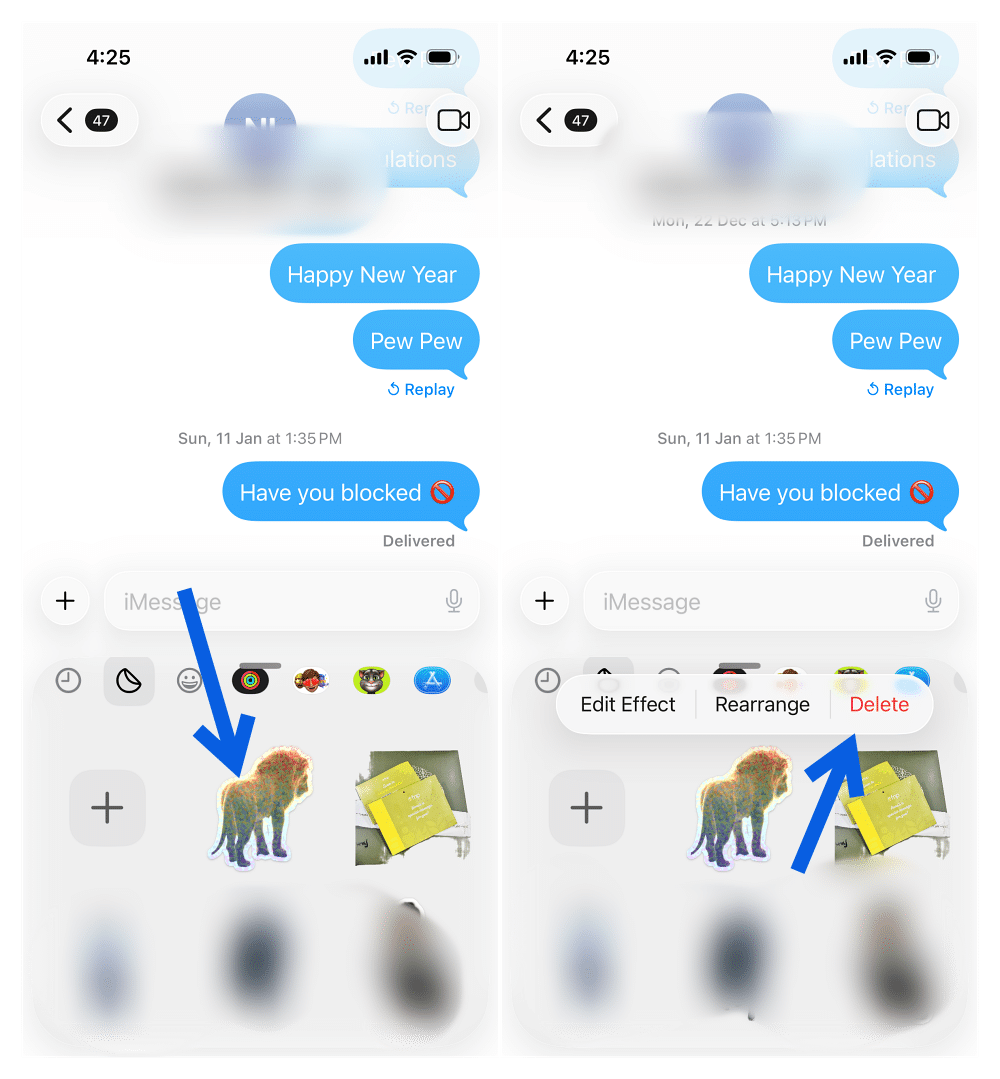
The sticker is removed from your collection.
Be careful when tapping Delete because you may not always get an additional confirmation or convenient undo option. If you think you might want the sticker later, keep the original photo so you can recreate it.
How to Delete Multiple Stickers on iPhone
Deleting stickers individually gets tedious if you’ve accumulated dozens of them. For a larger cleanup, use the rearrangement interface.
- Open your sticker collection.
- Press and hold one of your custom stickers.
- Tap Rearrange.
- Your stickers enter an editing mode similar to rearranging apps on the Home Screen.
- Tap the removal control on each sticker you want to delete.
- Tap Done or exit editing mode when you’re finished.
This is much faster when you’re cleaning out a large collection rather than removing one unwanted sticker.
What Happens When You Delete an iPhone Sticker?
Deleting a sticker removes it from your sticker collection rather than deleting the original photo it came from. Your original image remains safely inside Photos, so if you change your mind later, you can return to the photo and create the sticker again.
Stickers can also sync across your Apple devices through iCloud. That means deleting a synced sticker on your iPhone may also remove it from your sticker collection on other compatible devices using the same Apple Account.
Sync hasn’t always been flawless. Earlier iOS versions had reports of stickers failing to appear correctly across devices or becoming corrupted after syncing. Apple addressed sticker-related syncing issues in iOS 26.6, so updating your devices is worth trying before manually recreating stickers that appear to be missing.
iPhone Stickers vs. Genmoji: What’s the Difference?
It’s easy to confuse custom stickers with Genmoji because both can appear alongside emoji and stickers, but they’re fundamentally different features.
The stickers covered in this guide start with a real photo. Your iPhone identifies a subject in an existing image, separates it from the background, and turns that cutout into a reusable sticker.
Genmoji works differently. Instead of requiring an existing photo, it uses Apple Intelligence to generate an image based on your description.
If you want a sticker of your actual cat sitting on the couch, use the photo sticker feature. If you want to create something that doesn’t exist in your photo library, such as a custom emoji-style image based on a description, that’s where Genmoji comes in.
Another important difference is compatibility. Regular custom photo stickers have been available since iOS 17 and don’t require Apple Intelligence. Genmoji requires a compatible Apple Intelligence device and supported software.
How to Manage Third-Party Sticker Packs
Not everything inside the sticker interface was created from your photos. Messages has supported downloadable sticker packs for years, and third-party apps can still add their own stickers. These can appear alongside your personal stickers, emoji, and other visual elements, which is one reason the sticker drawer can start feeling cluttered.
Third-party sticker packs are managed differently from the photo stickers you create yourself. Depending on your current iOS version and the app involved, you may need to manage the associated Messages app or remove the app that supplied the sticker pack.
If you’re having trouble figuring out what a particular button inside Messages does, our iMessage icons and symbols guide explains the common icons you’ll encounter.
Why Can’t I Create a Sticker From a Photo?
If pressing and holding a subject doesn’t give you the Add Sticker option, start with the photo itself. iOS needs to clearly identify a subject before it can separate it from the background. Try another photo where the person, pet, or object is sharper and more clearly separated from its surroundings.
Also make sure your iPhone is running iOS 17 or later. If the feature previously worked but your stickers are suddenly missing or aren’t syncing properly, updating iOS and checking your iCloud settings are good first troubleshooting steps.
For Live Stickers specifically, try using a different Live Photo if the animation looks broken or the subject isn’t being isolated correctly.
Final Thoughts
Creating a sticker on iPhone is remarkably simple once you know it’s hiding behind a press-and-hold gesture. Find a photo, lift the subject, tap Add Sticker, and it’s ready to use. Live Photos can become animated stickers, while effects such as Outline, Comic, Puffy, and Shiny let you personalize them further.
Deleting them is just as easy. Press and hold an unwanted sticker and select Delete, or use Rearrange when you need to clean up several at once. Just remember that sticker changes can sync across your Apple devices, while deleting a sticker doesn’t delete the original photo you used to create it.
If you’re also customizing how your conversations look, our guide to changing the Messages background on iPhone and iPad is a natural next step once you’ve sorted out your sticker collection.