There’s something different about old photographs. Not just visually, but emotionally. A slightly faded smile, a crease running through someone’s face, or colors that have slowly disappeared over time, these aren’t just imperfections, they’re pieces of memory wearing out.
I’ve tried traditional restoration tools before. Some worked, most didn’t. Either they overprocessed the image or required too much manual effort to get anything usable. But recently, I started testing Google Gemini for photo restoration, and the results were surprisingly consistent.
Not perfect every time, but good enough to bring photos back to life in a way that actually feels natural.
If you’re trying to restore old photos without diving into Photoshop or expensive services, this is one of the simplest and most effective approaches right now. Here’s exactly how it works, along with prompts that gave me the best results.
Why Google Gemini Actually Works for Photo Restoration
Google Gemini isn’t just enhancing images blindly. It analyzes what’s missing and rebuilds details based on context.
When I tested it across different types of photos, faded portraits, torn prints, and even low-quality scans, one thing stood out. The results improved significantly when the prompt was clear and specific.
Unlike basic “auto-enhance” tools, Gemini responds to instructions. You can tell it what to fix, what to preserve, and what the final image should feel like.
That level of control is what makes the difference.
How to Restore Old Photos Using Google Gemini AI
Once you understand the workflow, the process is straightforward and repeatable.
Step 1: Upload the original image
Open Gemini and upload your photo. If you’re working with a physical print, scan it at a higher resolution (600 DPI or above). This alone improves output quality more than any prompt tweak.
Step 2: Write a clear restoration prompt
Avoid vague instructions. Instead of saying “fix this image,” describe the actual damage.
Mention things like:
- cracks or folds
- fading or yellowing
- blur or loss of detail
Also define the final look. Whether you want it natural, colorized, or just sharper.
Step 3: Generate and refine
Run the prompt and review the result. In most cases, the first output is good but not final.
I usually refine it once or twice by adjusting the prompt slightly. That’s where the real improvement happens.
What Actually Improved My Results (Real Observations)
After testing multiple photos, a few patterns became obvious:
- Specific prompts outperform generic ones: The more precise the instruction, the better the output.
- Faces need protection: If you don’t explicitly mention preserving facial features, Gemini may over-smooth or alter expressions.
- Colorization works best in moderation: Asking for “natural colors” instead of “vibrant colors” avoids unrealistic tones.
- Severely damaged photos work better in stages: First restore structure, then refine color and detail.
This isn’t a one-click magic tool. But when used properly, it gets very close.
If you’re experimenting with different styles beyond restoration, these viral Google Gemini AI photo editing prompts are also worth trying for creative edits and transformations.
5 Google Gemini AI Prompts That Actually Work
These are the prompts that consistently gave me usable, realistic results.
1. Faded Family Portrait

Best for: Soft faces, low contrast, aging prints
Restore this old portrait by removing cracks, stains, and faded areas. Enhance facial clarity while preserving natural skin texture and original expression. Improve contrast and sharpness without over-processing. The final result should look realistic and true to the original photo.2. Blurry 1990s Photo
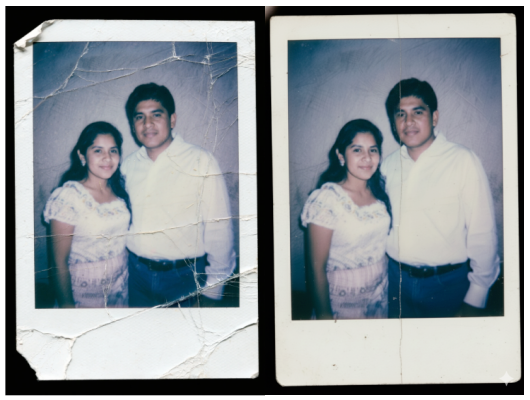
Best for: Fold lines, blur, damaged edges
Fix this old photo by removing fold marks, cracks, and edge damage. Restore sharpness and clarity across the image while maintaining natural colors. Rebuild missing details without making the image look artificial or over-smoothed.3. Yellowed Black-and-White Image
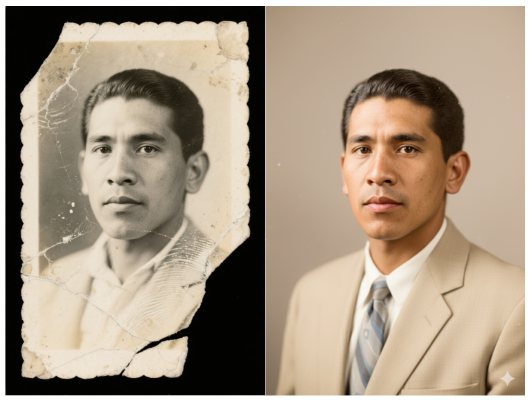
Best for: Classic portraits with stains
Clean and restore this black-and-white photo by removing stains, cracks, and discoloration. Improve contrast and tonal balance while keeping the original monochrome look intact. The result should feel authentic and not digitally altered.4. Group Photo with Damage
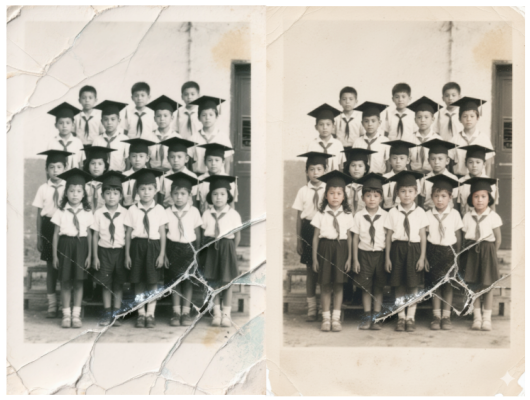
Best for: Multiple faces, heavy wear
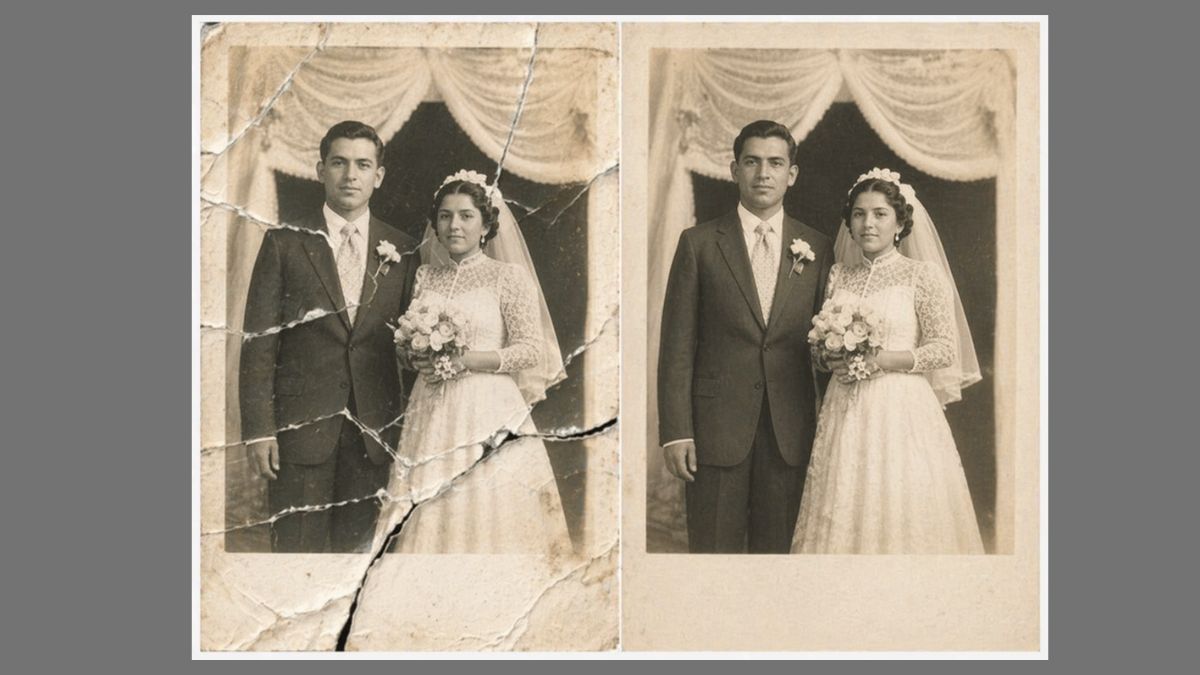
Restore this group photo by repairing cracks, folds, and surface damage. Enhance clarity for each face individually while maintaining natural proportions and expressions. Improve overall sharpness and balance without distorting any subject.5. Old Wedding Photo
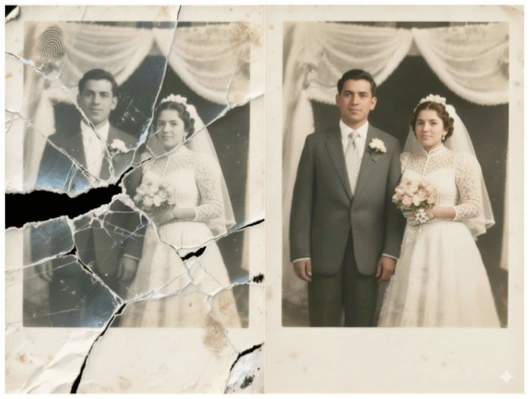
Best for: Emotional, high-value memories
Restore and gently colorize this wedding photo by removing damage, stains, and texture issues. Enhance clarity and detail while keeping colors realistic and subtle. Preserve facial features and expressions accurately.Writing Better Prompts (This Is What Makes the Difference)
This is where most people get average results.
If you want better outputs, focus on three things:
- Be specific about damage: Say exactly what’s wrong instead of using generic terms.
- Define the final look: Use phrases like “natural,” “realistic,” or “true to original.”
- Protect important details: Especially faces. Always mention preserving expressions and structure.
And if you’re looking to go beyond restoration and create stylized or personality-based edits, these viral Gemini AI prompts for boys can help you explore more creative outputs.
Final Thoughts
I didn’t expect much when I first tested Gemini for photo restoration. But after trying it across different scenarios, it became clear this isn’t just another basic enhancement tool.
It sits somewhere between automation and control.
You’re not manually editing every detail, but you’re also not leaving everything to chance. That balance is what makes it useful.
If you’ve been holding onto old photos that feel beyond saving, this is easily one of the fastest ways to bring them back without turning it into a full editing project.
And once you get the prompts right, the process becomes surprisingly reliable.
Yes, but results depend on image quality. Extremely damaged photos may require multiple passes or minor manual fixes.
No. That’s the advantage here. If you can describe what’s wrong with the image, you can restore it.
Check out more Gemini posts: