If you’ve opened Windows Security recently and noticed a warning icon next to Device security, you’re not imagining things. Since April 2026, Microsoft has been quietly alerting Windows 11 users about an issue most people have never had to think about: the certificates that power Secure Boot are beginning to expire.
Two of those certificates have already reached their expiration dates. The Microsoft Corporation KEK CA 2011 and Microsoft UEFI CA 2011 certificates expired on June 24 and June 27, 2026, while a third certificate—Windows Production PCA 2011—is scheduled to expire on October 19, 2026.
Most Windows 11 PCs updated themselves automatically in the background. Many others didn’t, which explains why “how to turn on Secure Boot” has suddenly become a common search instead of a niche BIOS question.
Here’s what’s happening, how to check whether your PC is affected, and how to enable Secure Boot properly, whether you’re using a Dell, HP, Lenovo, Asus, Acer, or a custom-built desktop.
What Is Secure Boot in Windows 11, and Why Does It Matter?
Secure Boot is a security feature built directly into your PC’s UEFI firmware. Before Windows even starts loading, Secure Boot checks every piece of software involved in the startup process and allows only components signed with trusted digital certificates to run.
That simple verification step blocks bootkits, firmware-level malware, and other threats that attempt to compromise your computer before Windows—or even your antivirus software—has a chance to start.
This is exactly why Microsoft made Secure Boot a requirement for Windows 11-certified PCs. Traditional antivirus software can only protect Windows after it loads. Secure Boot protects the system before Windows ever reaches the desktop.
Why Secure Boot Is Suddenly Important in 2026
The recent certificate expirations haven’t disabled Secure Boot or stopped Windows from booting.
Instead, they affect your PC’s ability to receive future boot-level security updates.
Microsoft periodically updates Secure Boot certificates whenever researchers discover new vulnerabilities in the boot process. If your PC is still using expired certificates, Windows can continue running normally, but it may no longer receive those future protections automatically.
Nothing appears broken today, which is exactly why many users overlook the warning. The real concern is that your PC gradually loses an important layer of security over time without any obvious symptoms.
PC manufacturers have handled the transition differently.
- Dell now ships both the older 2011 certificates and the newer 2023 certificates on supported devices, maintaining dual-certificate support throughout each product’s service lifecycle.
- HP requires BIOS updates on many commercial systems, with rollout schedules varying by model and release year.
- Asus and Acer have largely distributed certificate updates through Windows Update, although Asus also provides manual PowerShell instructions for systems that continue displaying Secure Boot warnings.
If your PC is more than a few years old, it’s worth checking your manufacturer’s support page rather than assuming Windows Update has already taken care of everything.
How to Check Your Secure Boot Status in Windows 11
Before changing anything in the BIOS or UEFI, confirm your current Secure Boot status. Windows includes two simple ways to do this.
Method 1: Check Through Windows Security
- Open Windows Security.
- Select Device security.
- Look under Core isolation and Secure Boot.
Here’s what each status typically means:
- Green checkmark: Secure Boot is enabled and up to date.
- Yellow warning: An update is pending, which is often resolved by installing the latest Windows and firmware updates.
- Red warning: Windows couldn’t complete the Secure Boot certificate update automatically, and your PC may require a manual update from the manufacturer.
Method 2: Check Using System Information
For a more technical confirmation:
- Press Windows + R.
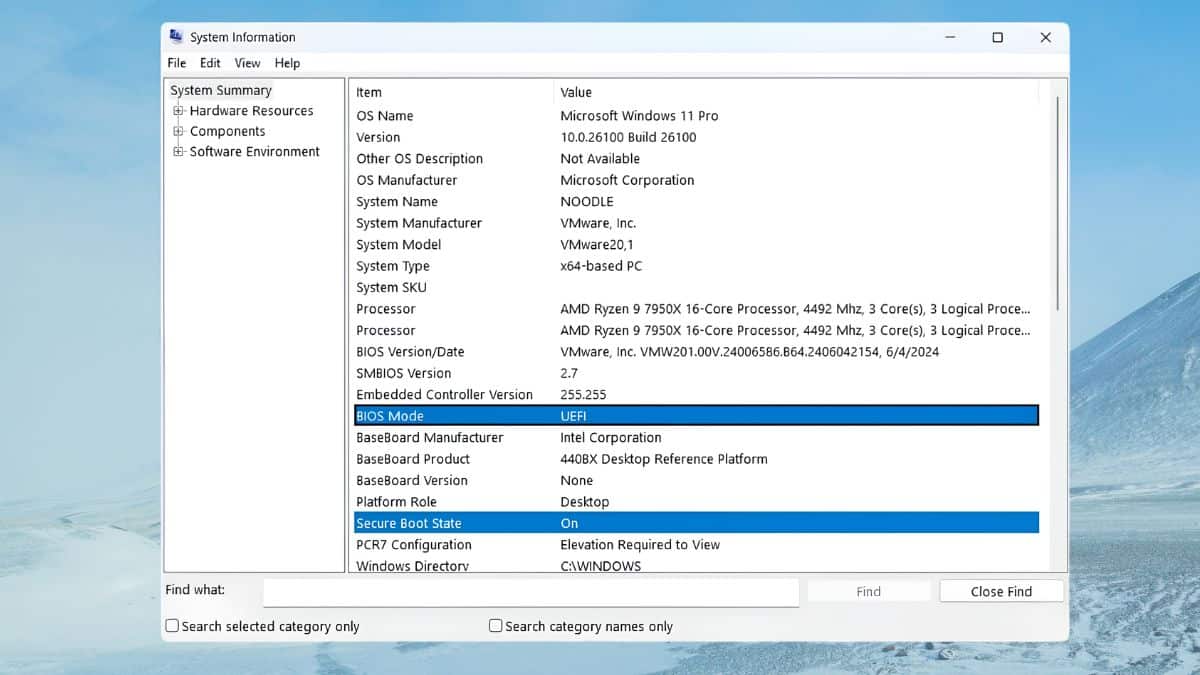
- Type msinfo32 and press Enter.
- In System Information, locate Secure Boot State.
You’ll usually see one of three values:
- On: Secure Boot is enabled.
- Off: Secure Boot is supported but currently disabled.
- Unsupported: Your PC is likely running in Legacy BIOS (CSM) mode instead of UEFI, or the hardware doesn’t support Secure Boot.
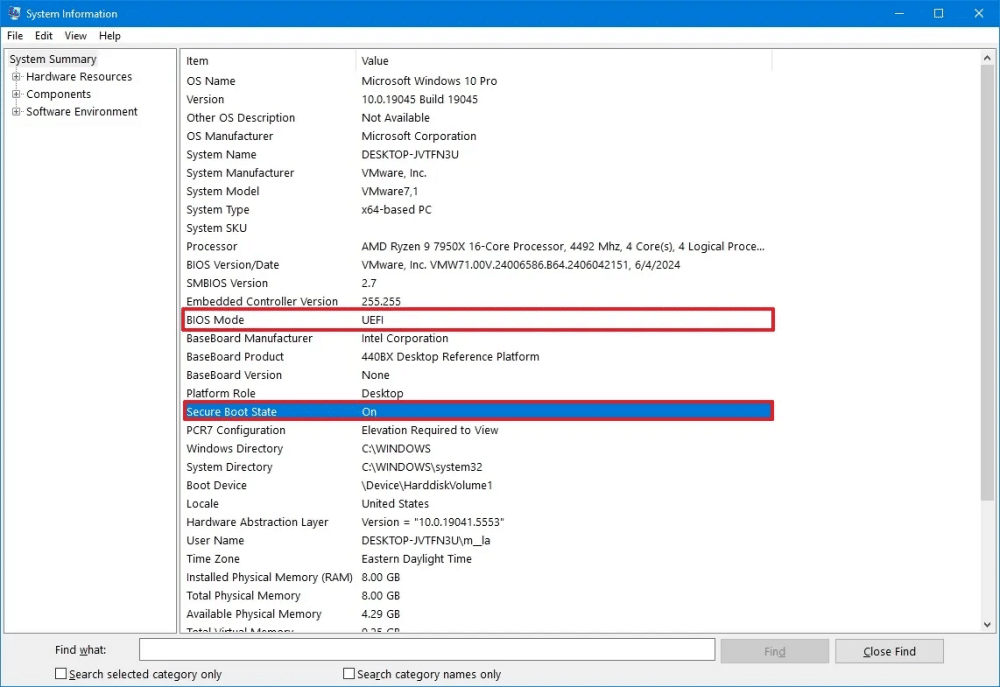
If you see Unsupported, don’t head straight into the BIOS looking for the Secure Boot toggle. In most cases, you’ll first need to switch from Legacy BIOS to UEFI, which is a separate process.
How to Enable Secure Boot in Windows 11
The first steps are identical across almost every Windows 11 laptop and desktop because they simply take you into the UEFI firmware settings.
- Open Settings.
- Go to System → Recovery.
- Under Advanced startup, click Restart now.
- After your PC restarts, select Troubleshoot → Advanced options → UEFI Firmware Settings.
- Click Restart.
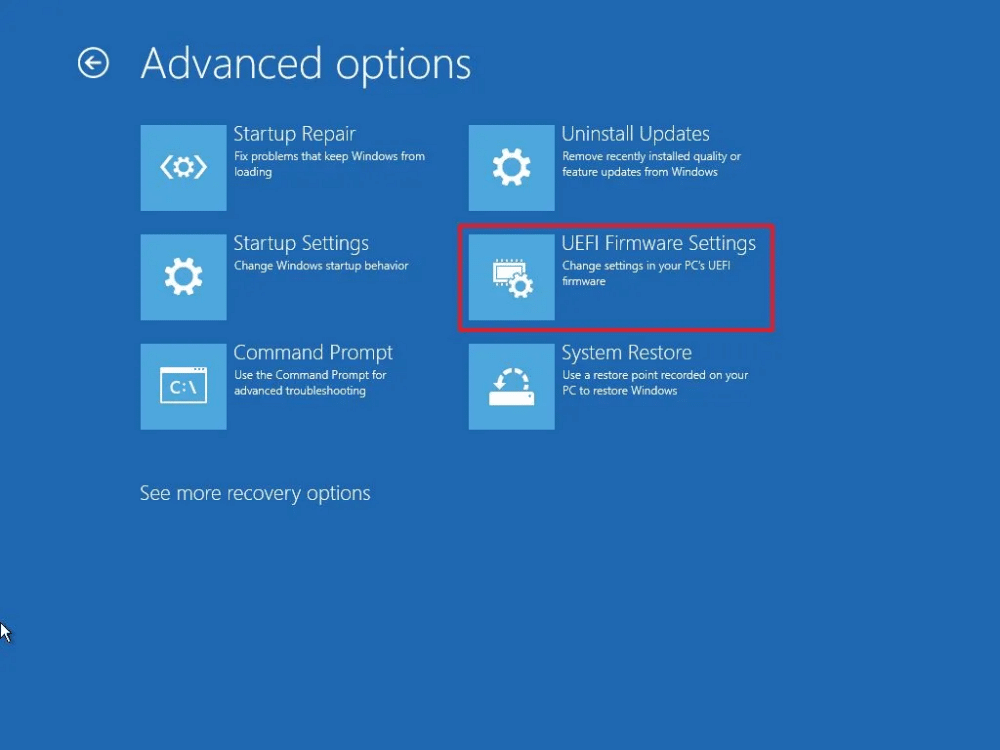
Your computer will reboot directly into the BIOS/UEFI setup screen.
From here, the exact location of the Secure Boot setting depends on your laptop or motherboard manufacturer. That’s also where many people get stuck, since every BIOS uses slightly different menu names.
Enable Secure Boot on Dell, HP, Lenovo, Asus, and Gigabyte PCs
Once you’re inside the BIOS or UEFI settings, follow the steps for your PC or motherboard manufacturer.
Dell
- Restart your PC and press F2 repeatedly during startup to enter the BIOS.
- Open the Secure Boot section.
- Set Secure Boot to Enabled.
- Select Apply, then choose Save and Exit.
HP
- Restart your computer and press F10 repeatedly during startup.
- Navigate to System Configuration → Security → Secure Boot Configuration.
- Enable Secure Boot.
- If Legacy Support is still enabled, disable it.
- Save your changes and restart the PC.
Lenovo
- Restart your PC and press F1 or F2, depending on your model.
- Open the Security tab.
- Locate Secure Boot.
- Change the setting to Enabled.
- Save your changes before exiting the BIOS.
Asus
- Hold F2 while turning on your PC.
- Once inside the BIOS, press F7 to enter Advanced Mode.
- Go to Security → Secure Boot.
- Set Secure Boot Control to Enabled.
- Press F10 to save the changes and restart.
Gigabyte Motherboards
- Restart your PC and press the Delete key during startup.
- Open the Boot tab.
- Enable Secure Boot.
- If the option is grayed out, enable Windows 8/10/11 Features first.
- Save the changes and restart your PC.
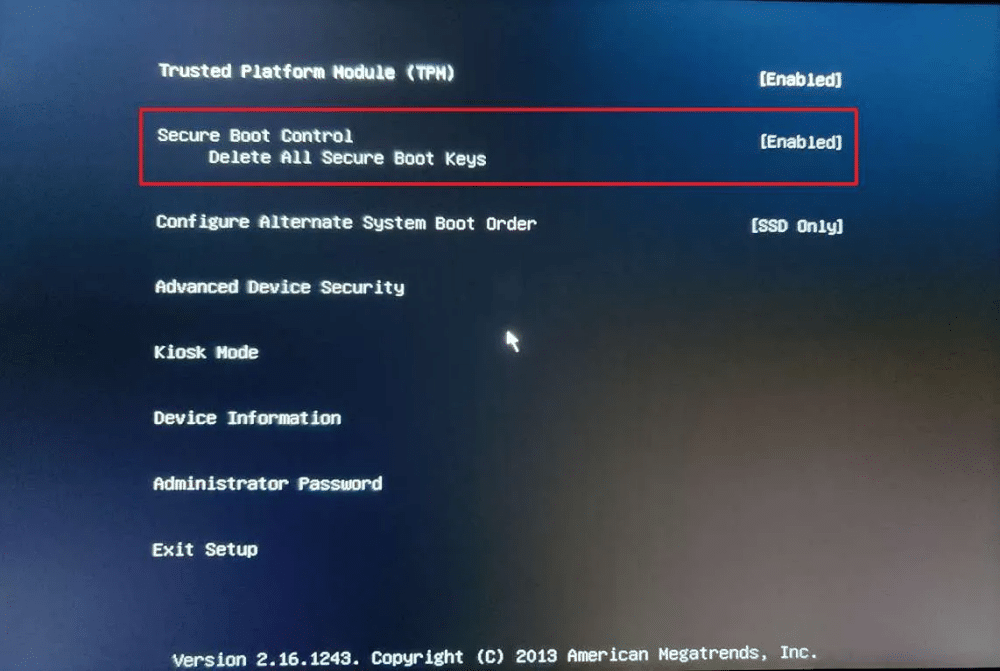
After Windows loads again, open System Information (msinfo32) one more time and confirm that Secure Boot State now reads On.
Secure Boot Won’t Turn On? Here’s How to Fix It
If Secure Boot refuses to enable, the problem usually isn’t the Secure Boot setting itself.
1. Your PC Is Using Legacy BIOS (CSM) Instead of UEFI
This is by far the most common reason.
Secure Boot only works when Windows is installed in UEFI mode. If your computer is still using Legacy BIOS (CSM), the Secure Boot option may be disabled or unavailable.
Before changing anything:
- Check whether your BIOS lists Boot Mode or Boot List as Legacy.
- Back up your important files.
- Understand that switching an existing Windows installation from Legacy BIOS to UEFI incorrectly can leave Windows unable to boot.
If your PC is still running in Legacy mode, converting it to UEFI is a much larger task than simply enabling a BIOS setting.
2. Your Hardware Doesn’t Support Secure Boot
Some older computers simply don’t support Secure Boot.
If System Information continues showing Secure Boot State: Unsupported even after confirming your system is using UEFI, your motherboard likely predates Secure Boot support.
Similarly, Windows 11 also requires TPM 2.0. Older systems missing both TPM 2.0 and Secure Boot generally can’t meet Windows 11’s security requirements through BIOS settings alone.
3. Install BIOS and Windows Updates
If Secure Boot was working previously but you’re now seeing certificate warnings, the simplest solution may be installing every available update.
Make sure you:
- Install all pending Windows Updates.
- Update your motherboard or laptop BIOS if your manufacturer has released a newer version.
- Check your manufacturer’s support page for Secure Boot certificate updates if Windows hasn’t installed them automatically.
For many users, these updates resolve the warning without requiring any manual BIOS changes.
Final Thoughts
Secure Boot has always been an important part of Windows 11’s security, but Microsoft’s 2026 certificate refresh has brought it into the spotlight for millions of users.
The good news is that enabling Secure Boot usually takes only a few minutes once you know where to find the setting in your BIOS or UEFI firmware. Before making any changes, check your current Secure Boot status in Windows Security or System Information so you know whether your PC actually needs attention.
If Secure Boot won’t enable, don’t immediately assume something is broken. In most cases, the underlying issue is either Legacy BIOS mode, an outdated BIOS, or older hardware that doesn’t support the feature.
Once you’ve confirmed that Secure Boot is enabled and your system is fully updated, your PC will continue receiving Microsoft’s latest boot-level security protections, helping safeguard one of the most critical parts of the Windows startup process.
If you’ve recently set up a new Windows 11 PC, it’s also worth reviewing the rest of your post-install checklist. Our guide to everything you should do after installing Windows 11 covers the updates, privacy settings, backup options, and other tweaks that help you get the most out of a fresh installation.