Every search you make, every YouTube video you watch, every place you navigate to on Google Maps, Google keeps track of it all.
While this can make life easier with quick suggestions and personalized results, it also means that a lot of personal information about you is being stored. In an age where fake images, AI misuse, and privacy breaches are everywhere, knowing how to take control of your Google activity history is essential.
Table of Contents
- What Deleting Google Activity Does (and Doesn’t Do)
- How to Delete All Google Activity on Android, iPhone and iPad
- How to Delete All Google Activity on Desktop
- How to Delete Specific Product Histories
- How to Completely Disable Activity Tracking on Google
- How to Use Auto-Delete for Google Activity
- Final Thoughts
TL;DR: To delete everything quickly, go to myactivity.google.com → Delete → All time → Confirm. Then turn off tracking or set an auto-delete rule to stop future data from piling up.
What Deleting Google Activity Does (and Doesn’t Do)
When you clear your Google activity, you’re removing the records of your searches, YouTube history, Maps routes, Assistant queries, and other actions saved under your account. This keeps others who have access to your account from snooping, and it also limits how much Google uses that data to personalize ads, recommendations, and results, or you can fine-tune personalization by adding preferred sources in Google Search.
Thankfully, Google gives you good control over how this data is handled. You can:
- Delete everything at once
- Remove only specific items
- Select a custom date range
- Clear history from a single service (like YouTube or Gemini) while keeping the rest
It’s important to remember that this only covers past activity. For future data, you can either disable activity tracking completely or set auto-delete rules (3, 18, or 36 months). This way, Google clears your activity automatically without you doing it manually every time.
Still, deleting activity doesn’t mean erasing your entire Google account.
- Files in Drive, emails in Gmail, photos in Google Photos, and public posts like YouTube comments stay untouched.
- Google may keep some information for business or legal compliance.
- Your internet service provider (ISP) and certain websites can still see what you access.
- Some faint traces may remain in backups or logs for a limited time.
In short, deleting Google activity is like cleaning up your visible browsing trail. Most of your footprints are gone, but some faint imprints can still exist in the background.
How to Delete All Google Activity on Android, iPhone and iPad
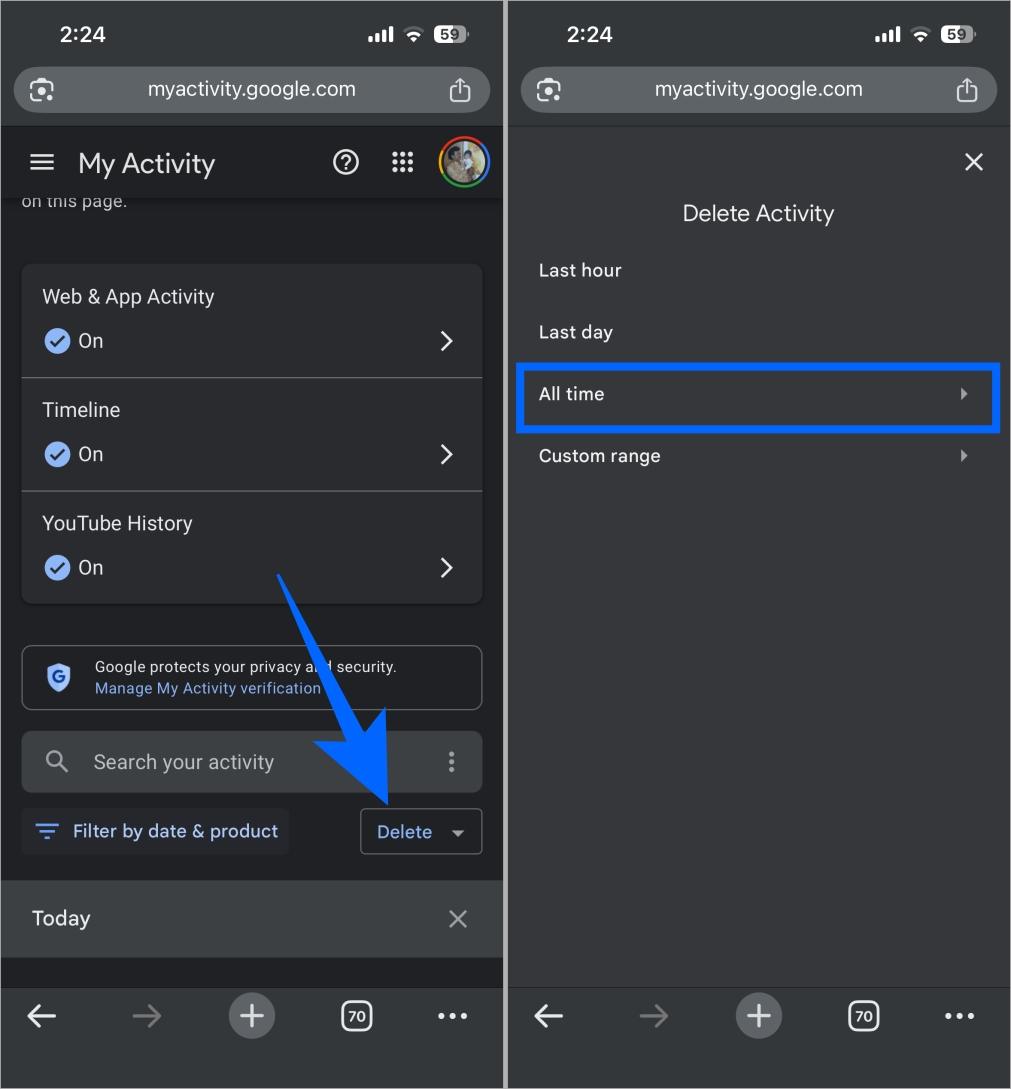
The process of deleting all the Google activity data is the same on Android, iPhone, and iPad. Here’s how.
- Open Google Activity page.
- Tap Delete above your activity.
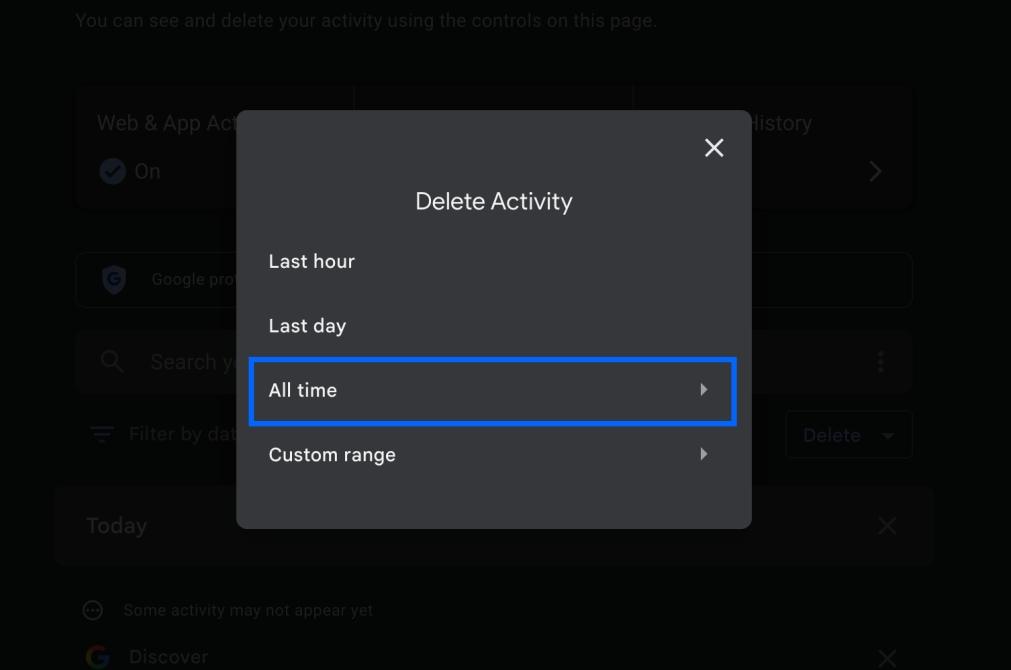
- Choose All time.

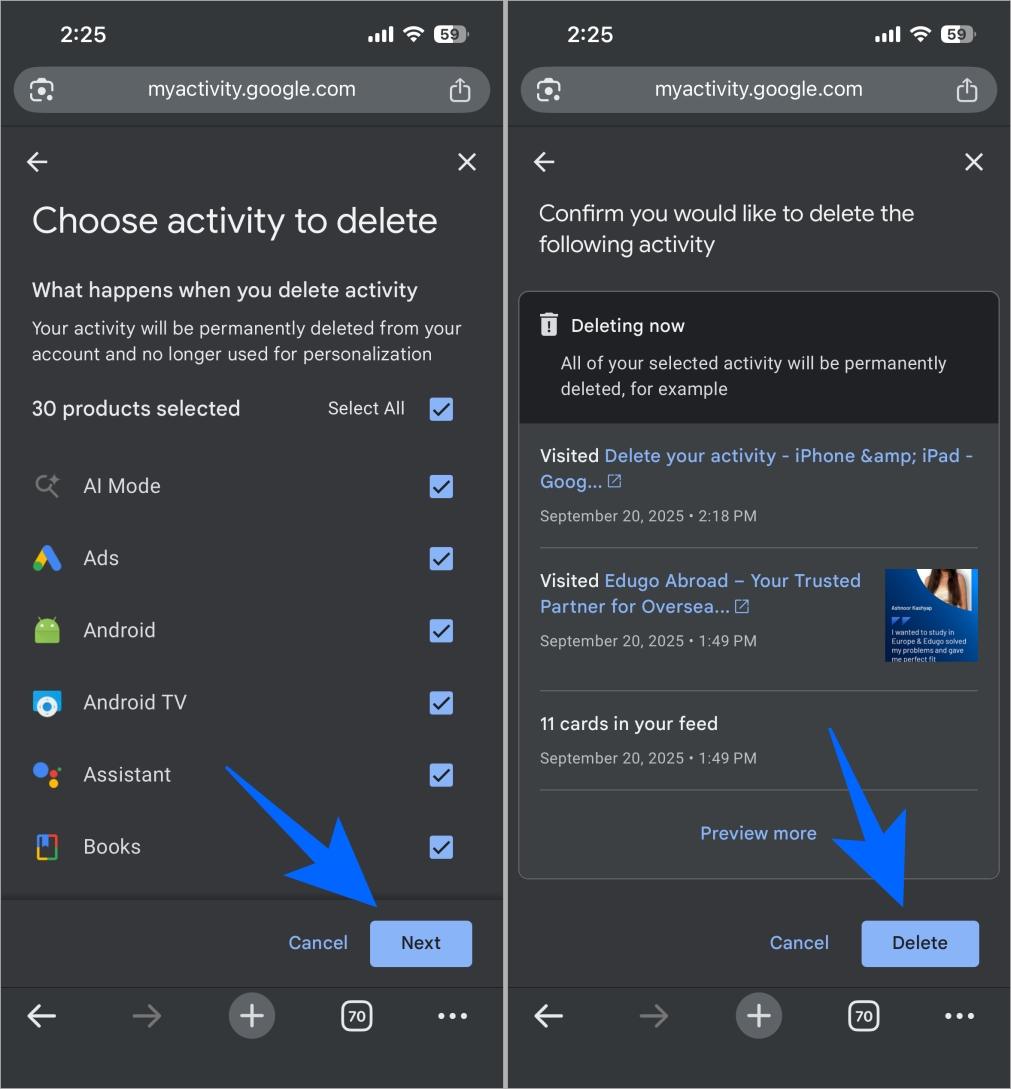
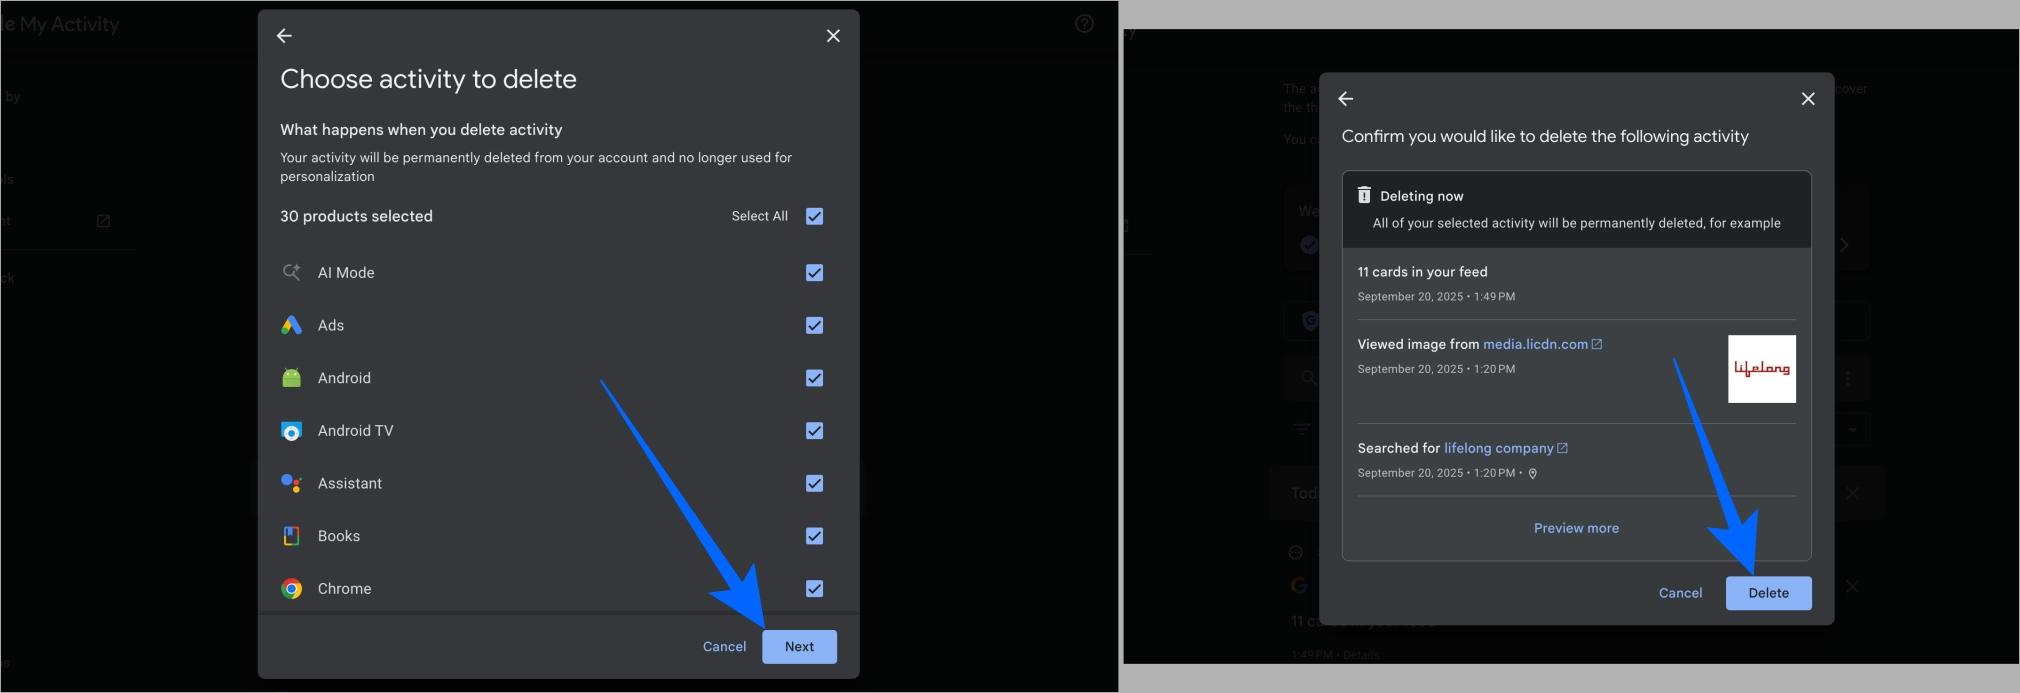
- Tap Next → Delete to confirm.

Once done, all your previous history will be cleared from your account. Instead of choosing All time, you can also pick a specific date range if you only want to remove certain periods. Remember, this only deletes what has already been stored. Google will still collect future data unless you disable activity tracking or set up auto-delete, which we cover later.
How to Delete All Google Activity on Desktop
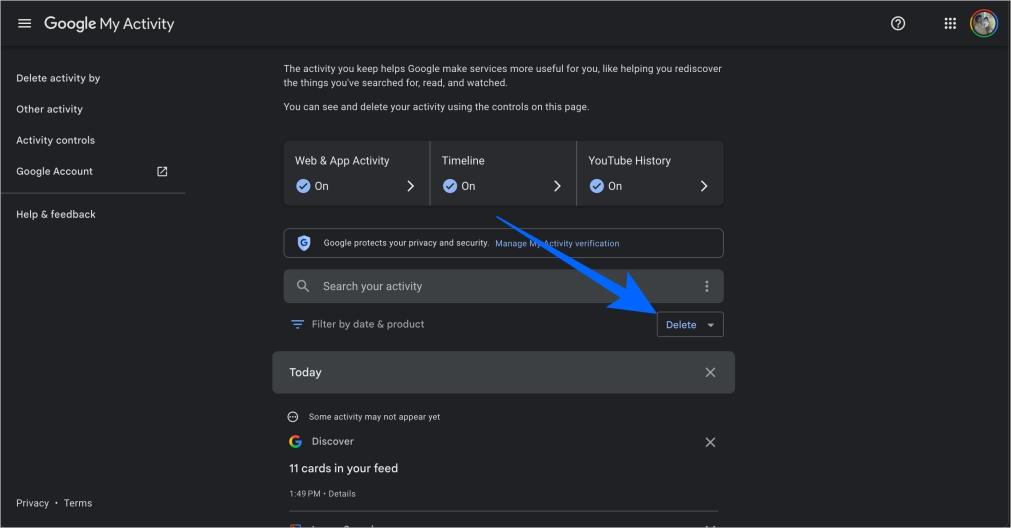
On a computer:
- Go to Google Activity page.
- Click Delete above your activity.

- Select All time.

- Confirm by clicking Next → Delete.

This will erase everything saved in your history so far. If you don’t want to wipe it all, you can pick specific days or months using the custom range option instead of choosing All time. But there are two important things to keep in mind. First, some services like Gemini, Chrome, and Google Maps keep their own activity records. You’ll need to delete those separately. Second, this only clears your past data. To prevent Google from saving new activity going forward, you’ll need to either disable activity tracking or set up auto-delete, which we’ll cover below.
How to Delete Specific Product Histories
Sometimes clearing everything at once isn’t enough. Different Google services like YouTube, Maps, Chrome, or Gemini keep their own history, and you might want to manage them separately.
YouTube History
Your YouTube history keeps track of every video you watch and search for. While it helps with recommendations and remembering where you left off, it also reveals your interests, habits, and even personal moods. If misused, this data could expose more than you’d like.
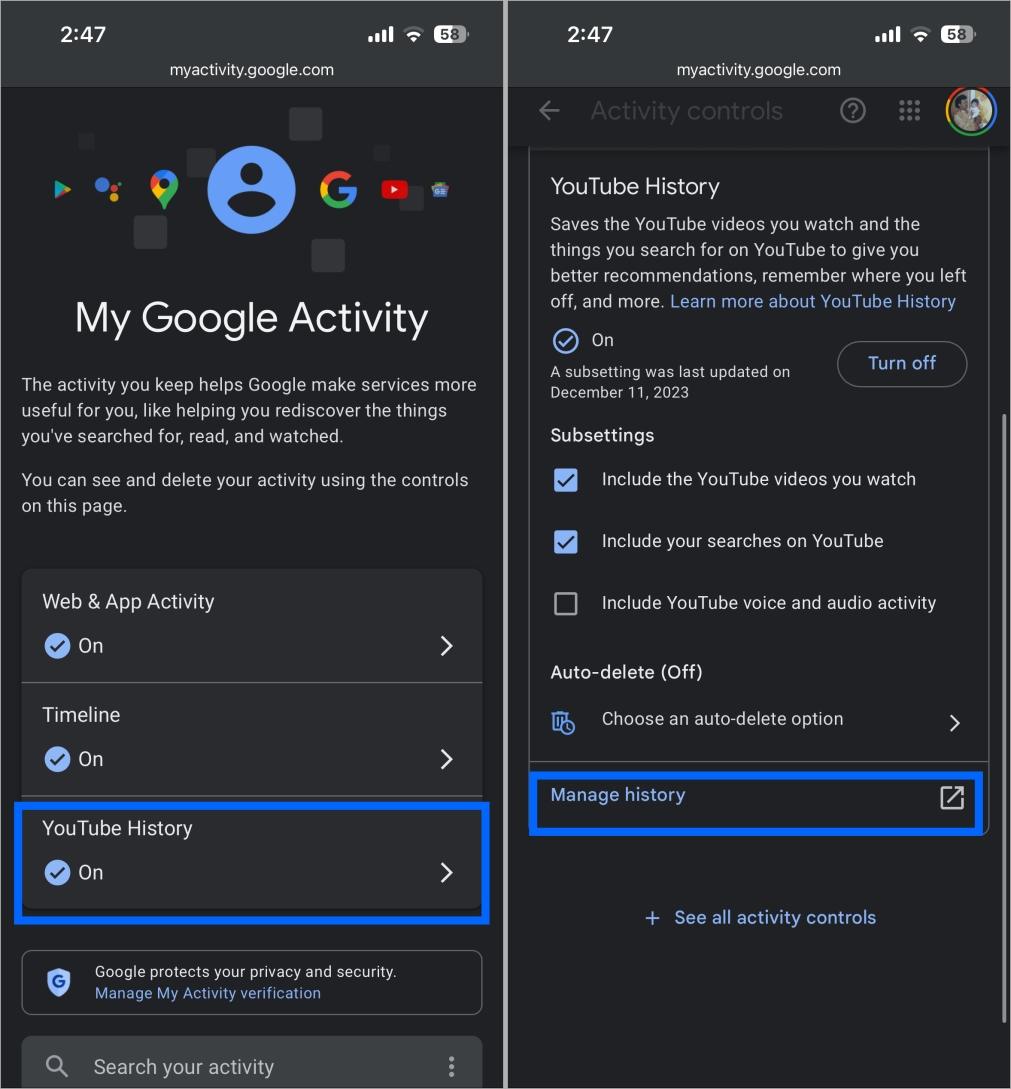
- Open Google Activity page.
- Click on YouTube History and then Manage History.

- Here you can view all your YouTube activity.
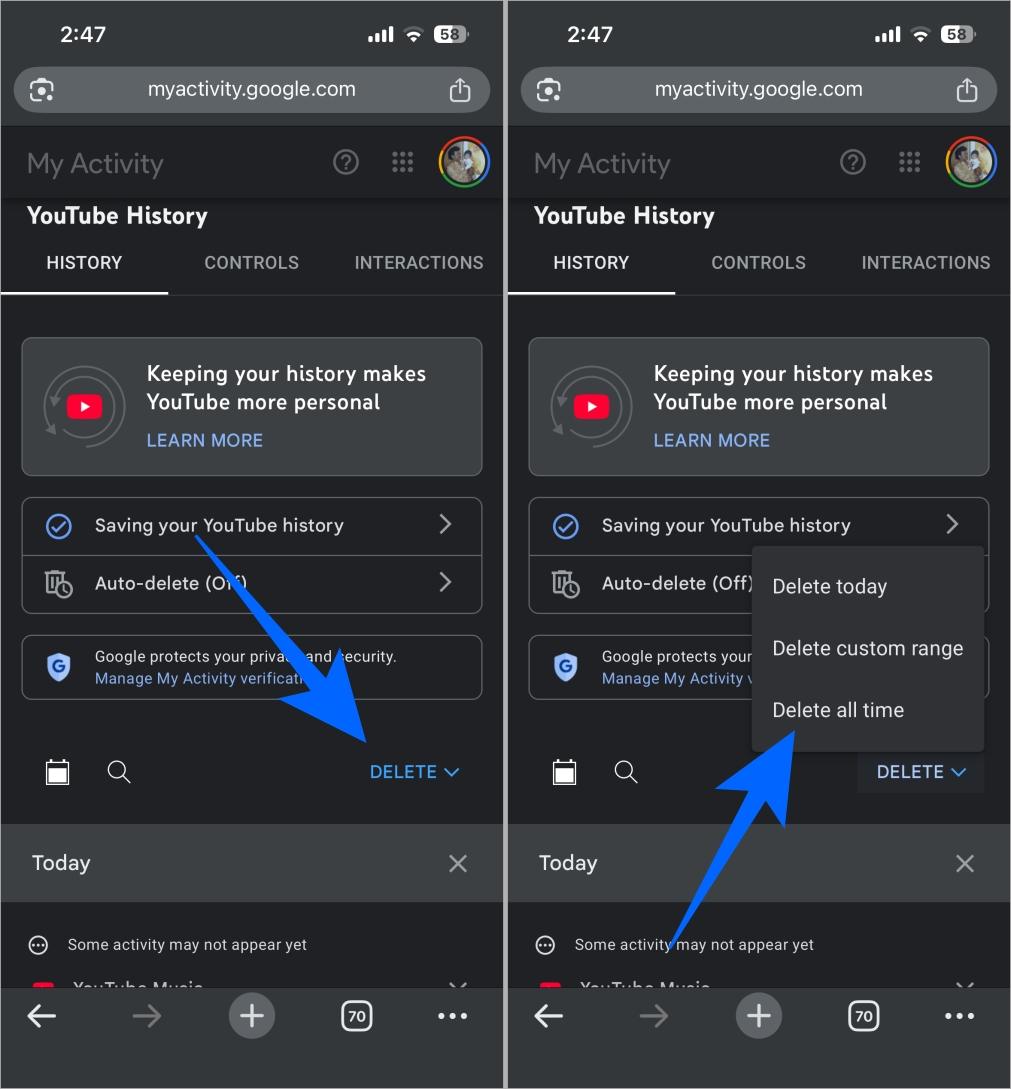
- Select Delete and then Delete all time
- In the pop-up, click on the Delete to confirm.

Related: How to Clear YouTube Search History on Any Device
Chrome History
Chrome saves a record of every site you visit, every search, and sometimes even forms you fill out. This makes browsing easier, but it can reveal sensitive details if someone gains access to it.
- Open Chrome on your device (computer, Android, iPhone, or iPad).
- Tap or click the More (three dots) menu at the top right.
- Select Delete browsing data.
- Select how much history to delete (for example, the last 15 minutes, the last 24 hours, etc.). To delete everything, choose All time.
- Check the boxes for the data you want Chrome to delete, including browsing history, cookies, cached files, and more.
- Deselect anything you don’t want to remove.
- Confirm by tapping or clicking Delete data (or Confirm, then Delete Browsing Data on iPhone/iPad).

To delete just one or a couple of websites you visited, open the three-dot menu → History → select the site(s) → delete.
Google Maps Timeline
Maps Timeline stores every place you’ve been, using GPS and location services. While useful for tracking trips or commutes, it can become risky if location patterns fall into the wrong hands.
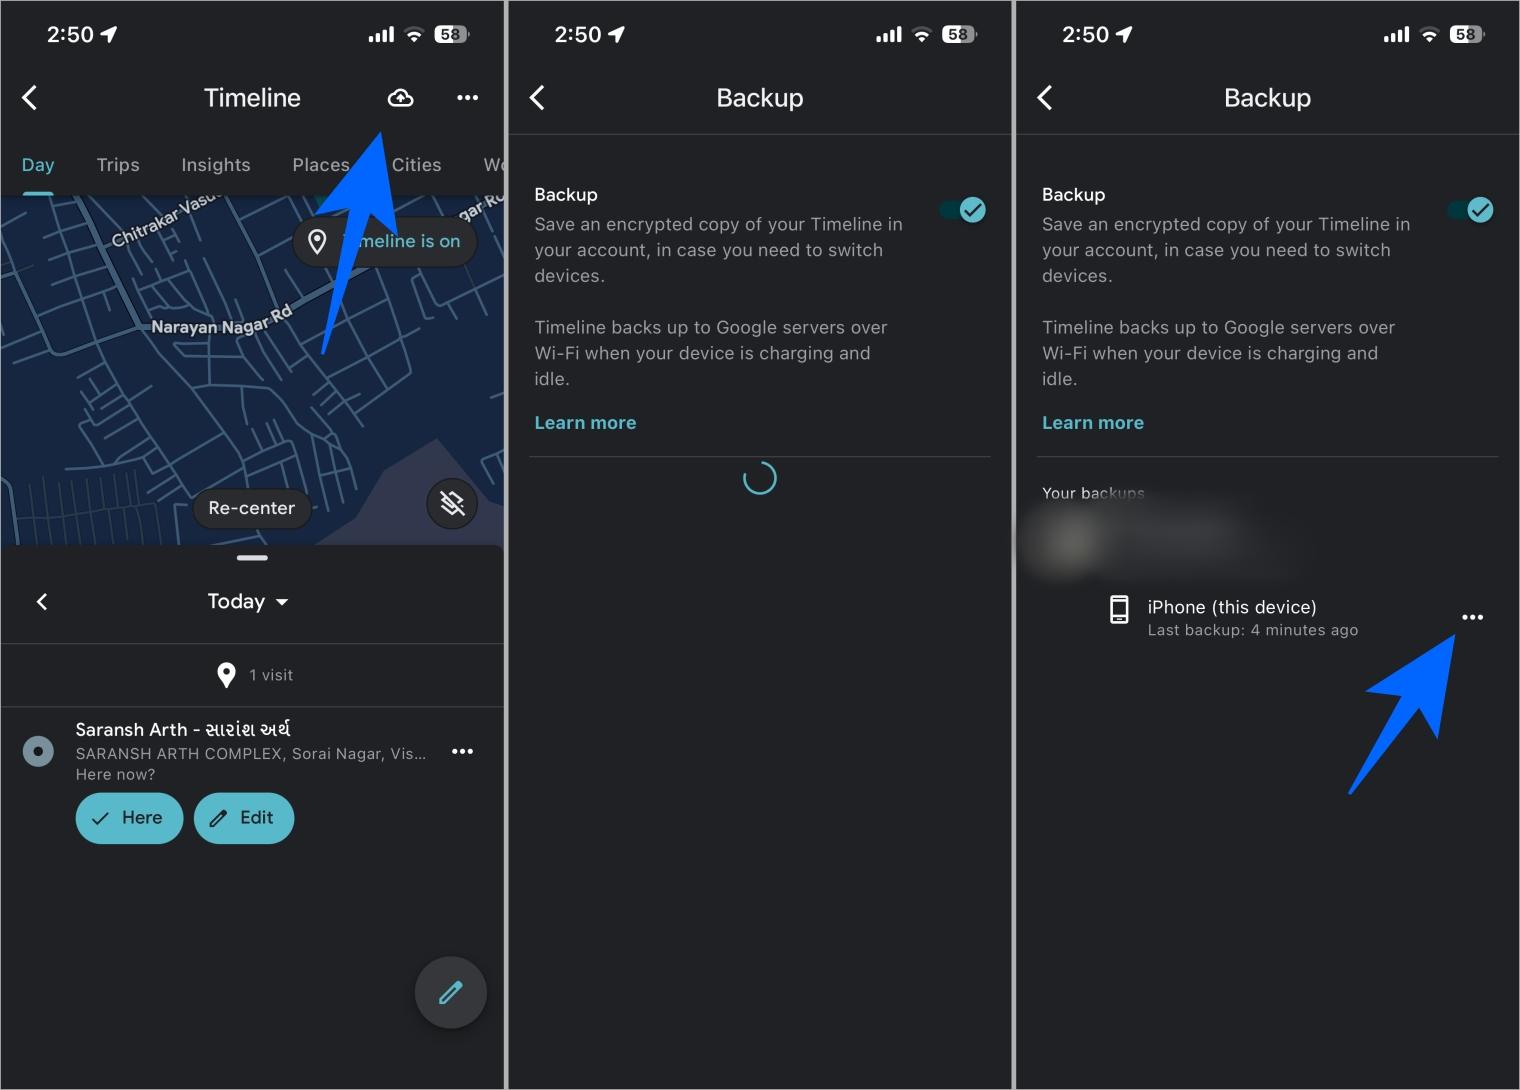
- On your Android phone, iPhone, or iPad, open the Google Maps app.
- Tap your profile picture or initial and select Your timeline.
- At the top right, tap Backup.
- In the Your backups section, choose the device you want to manage.
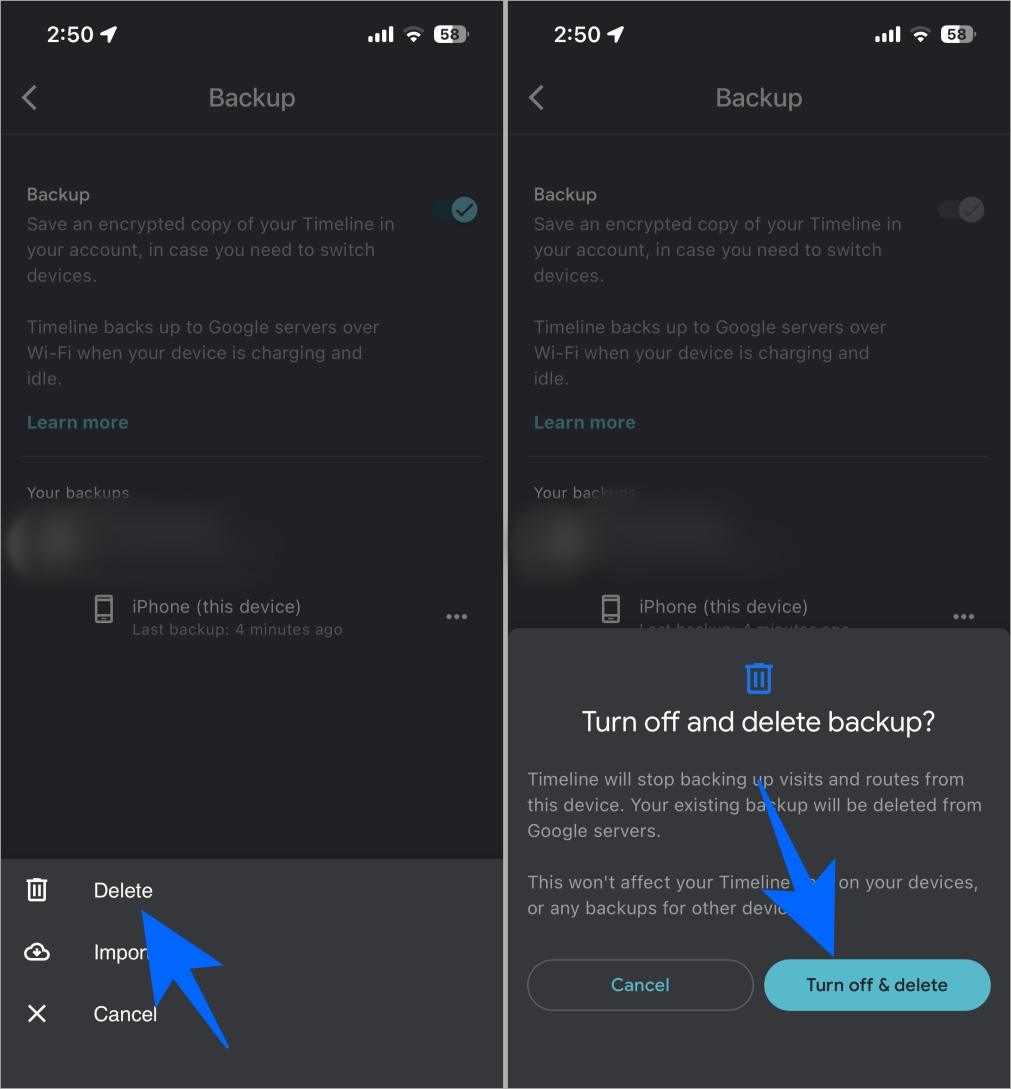
- Tap More (three dots).

- Tap Delete → Select Turn off & delete to confirm.

Google Play Search History
Google Play saves everything you search for in the app store. This may not seem critical, but it can show your app interests or reveal apps you’d prefer to keep private.
- Open the Google Play Store app on your Android device.
- At the top right, tap your profile icon.
- Go to Settings → General → Account and device preferences.
- Scroll down and tap Clear device search history.
Gemini History
Gemini, Google’s AI assistant, logs your chats and interactions. These entries help improve answers, but they also contain personal context you may not want stored.
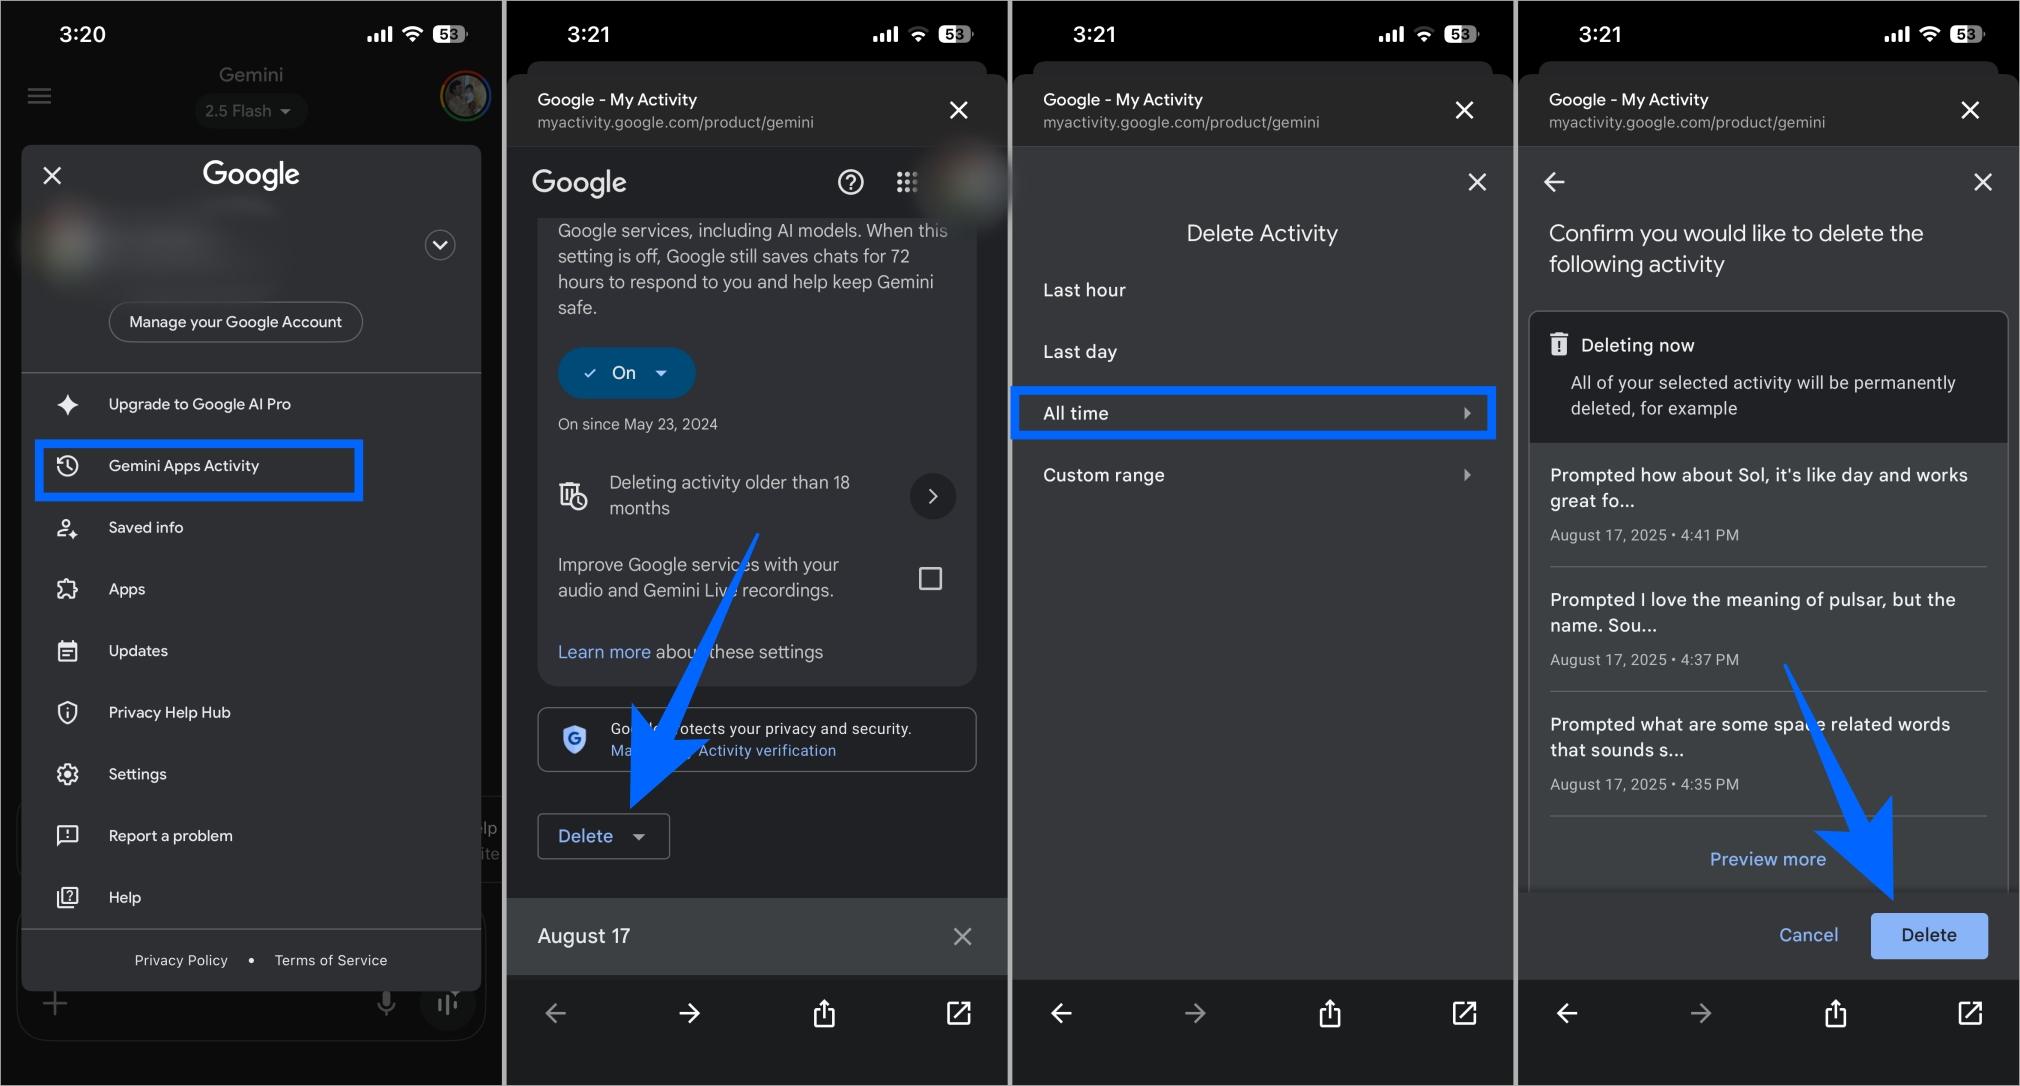
- Open the Gemini app on Android or iPhone, or go to gemini.google.com on your computer.
- Sign in with your Google Account if needed.
- Tap or click your profile picture or initial.
- Select Gemini Apps Activity (on computer: go to Settings & help → Activity).
- Choose Delete and then what you want to delete: All time, Last hour, Last day, Custom range, a specific day, or a specific activity item.
- Confirm by selecting Delete.

How to Completely Disable Activity Tracking on Google
If you don’t want Google to log your future activity at all, you can disable tracking directly in your account settings. This covers searches, YouTube, Maps, Gemini, and other services linked to your Google Account. Keep in mind that turning this off may limit personalization, like fewer tailored recommendations or ads.
- Go to Google Activity page.
- Choose the history type you want to disable (Web & App Activity, Location History, YouTube History, Gemini Activity).
- Tap or click Turn off.
- (Optional) Select Turn off and delete activity if you also want to remove past data tied to that service.
- Confirm your choice.

You can also find more activities here. Disable everything that you do not want Google to keep track of.
From now on, Google won’t record new activity for that service. You can repeat the process for each type of history you want disabled. If you change your mind later, you can re-enable tracking with the same steps.
How to Use Auto-Delete for Google Activity
Auto-delete is Google’s way of helping you manage history without constantly doing it yourself. Instead of clearing things manually, you can schedule deletion so old data disappears automatically. This is useful if you want to keep recent history for convenience but don’t want Google to keep a long-term record of everything.
- Go to Google Activity page.
- Choose the activity type (Search, YouTube, Location, Gemini, etc.).
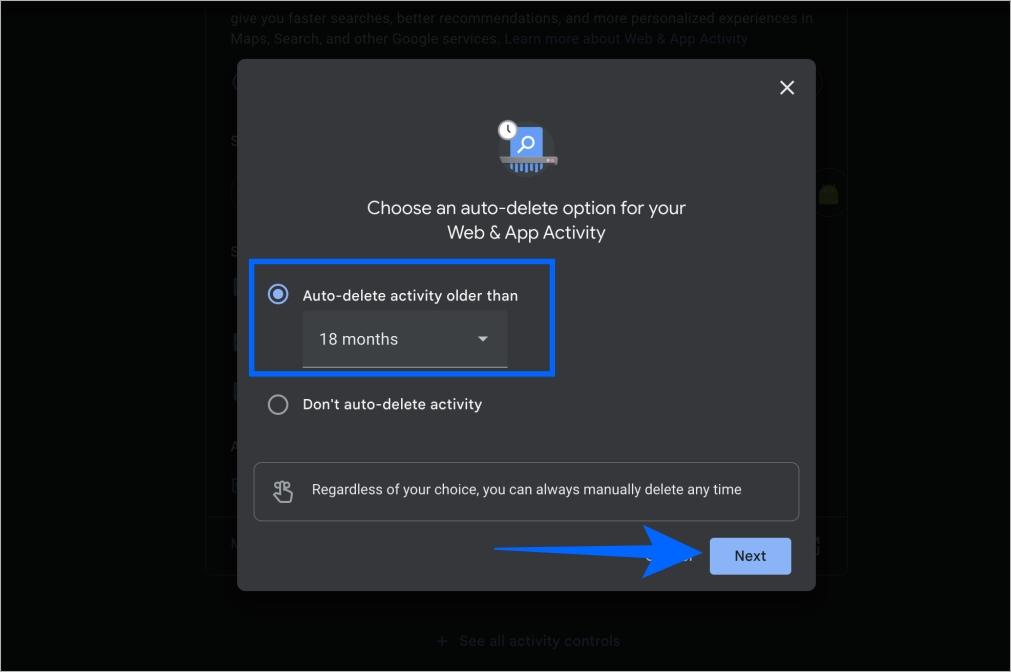
- Tap or click Auto-delete.
- Pick how long Google should keep your history: 3 months, 18 months, or 36 months.
- Confirm your choice.

Once set, Google will regularly remove older entries. For example, if you choose 3 months, everything older than that will be erased automatically. Some information, like IP-based location data, may still expire sooner (often after 30 days). This ensures your activity log stays short and manageable while giving you the privacy of not having years of data saved.
Final Thoughts
Your Google activity history is powerful, it helps personalize your digital life, but it can also expose more about you than you’d like. Deleting it puts you back in control. Whether you want a clean slate, hide something personal, or reduce Google’s hold on your data, these tools make it possible.
Pair it with habits like using Incognito mode, reviewing app permissions, or even adjusting what you see by choosing to turn off AI Overview in Google Search, or trying privacy-focused search engines like DuckDuckGo or Startpage for stronger protection.
FAQs
No. It only removes history. Your account stays active.
Mostly. Google removes data from your account and systems, though some info may be kept for legal or business needs.
If you’re signed in on multiple devices, synced activity may take time to update, or some activity outside ‘My Activity’ (like Maps Timeline) may need separate deletion.
No, ads don’t disappear. But they’ll be less personalized without your past activity.
No. Once deleted, you can’t restore it. That’s why it’s good to double-check before confirming.
You might also like:

